
Re-Waterproofing Your Tent for Camping Trips
Quick answer
- Inspect your tent for wear and tear.
- Clean your tent thoroughly.
- Choose the right re-waterproofing product.
- Apply the product evenly in a well-ventilated area.
- Allow ample drying time.
- Test for leaks before your next trip.
- Consider seam sealing too.
What to check first (do this before you drive out)
Before you even think about hitting the trail, give your tent a good once-over. This isn’t just about looking good; it’s about staying dry when the sky decides to open up.
- Land manager / legality: Who owns the dirt you’re pitching on? Is it National Forest, BLM land, a State Park, or private? Different agencies have different rules, especially regarding campfires and permits. Always check the official website for the specific area you plan to visit. Ignorance here can lead to fines or being asked to pack out.
- Access/road conditions: Is that dirt road leading to your sweet spot really passable for your rig? Some roads are fine for a Subaru, others demand 4WD and high clearance. A little rain can turn a smooth track into a mud pit real fast. Check recent trip reports or call the ranger station. Getting stuck miles from anywhere is a bad start to any trip.
- Fire restrictions + weather + wind: This is huge. Are campfires allowed? Are there burn bans in effect? Check the local fire danger level. Also, look at the forecast. High winds can make pitching a tent a wrestling match and heavy rain will test even the best waterproofing. Don’t be the person who sets up in a dry creek bed just before a flash flood.
- Water plan + waste plan (Leave No Trace): Where will you get your drinking water, and how will you treat it? Carry enough, or know your water sources and have your filter/purifier ready. And what about waste? Pack it in, pack it out. This includes food scraps, toilet paper, and everything else. Leave your campsite cleaner than you found it.
- Safety (wildlife, distance to help, comms): Know what critters share the landscape. Store food properly to avoid unwanted visitors. How far are you from a ranger station or town? Cell service is usually a joke in the backcountry. Let someone know your itinerary and when to expect you back.
Step-by-step (field workflow)
Alright, let’s get that tent back in fighting shape. This process is pretty straightforward, but doing it right makes all the difference.
1. Inspect for damage:
- What to do: Set up your tent in a clear, open space. Look for any rips, tears, holes, or worn spots in the fabric. Check zippers for smooth operation and any broken teeth.
- What “good” looks like: You can clearly see the fabric’s integrity, and all zippers function flawlessly.
- Common mistake: Skipping this step and discovering a hole only when it’s raining hard. Avoid it by being thorough.
2. Clean the tent:
- What to do: Gently brush off loose dirt and debris. Then, use a mild soap (like Nikwax Tent & Gear SolarWash or a similar biodegradable soap) and cool water. Scrub gently with a soft brush or sponge. Rinse thoroughly.
- What “good” looks like: The tent fabric is clean, free of dirt and grime, and smells fresh. No soap residue should be visible.
- Common mistake: Using harsh detergents or washing machines, which can strip away existing DWR (Durable Water Repellent) coatings and damage the fabric. Stick to gentle cleaning.
When cleaning your tent, consider using a mild, tent-specific cleaner like Nikwax Tent & Gear SolarWash to protect the fabric.

3. Dry completely:
- What to do: Hang the tent to air dry completely. Ensure it’s bone dry inside and out. This can take a day or two, depending on humidity.
- What “good” looks like: No damp spots anywhere. The fabric feels dry to the touch.
- Common mistake: Packing away a slightly damp tent. This is a recipe for mildew and can ruin your tent. Be patient.
4. Choose your re-waterproofing product:
- What to do: Select a spray-on or wash-in waterproofing treatment. Brands like Nikwax, Granger’s, or Scotchgard offer good options. Make sure it’s compatible with your tent’s fabric (nylon, polyester, etc.).
- What “good” looks like: You have a product specifically designed for tent fabrics.
- Common mistake: Using a generic waterproofing spray not meant for tents, which can damage the fabric or leave a sticky residue.
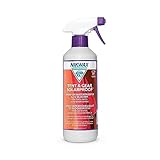
For effective re-waterproofing, choose a product specifically designed for tents, such as a high-quality tent waterproofing spray.
5. Prepare your workspace:
- What to do: Find a well-ventilated area, preferably outdoors or in a garage with open doors. Lay down a tarp or old sheets to protect the surface from the waterproofing treatment.
- What “good” looks like: A clean, protected area where you won’t get overspray on anything important.
- Common mistake: Applying the treatment indoors without ventilation, leading to fumes and potential mess.
6. Apply the waterproofing (spray-on):
- What to do: Hold the spray can about 6-8 inches away from the fabric. Apply in even, overlapping strokes. Work in sections, ensuring complete coverage without saturating the fabric.
- What “good” looks like: A uniform, thin layer of treatment across the entire tent fly and body.
- Common mistake: Spraying too close or too heavily, causing drips and uneven coverage.
When applying a spray-on treatment, ensure you use a dedicated tent waterproofing spray for even and effective coverage.
7. Apply the waterproofing (wash-in):
- What to do: Follow the product instructions precisely. This usually involves adding the treatment to your washing machine during the rinse cycle after cleaning.
- What “good” looks like: The treatment has been incorporated evenly into the fabric during the wash.
- Common mistake: Not following the specific machine settings or detergent compartment instructions, leading to poor application.
8. Allow to dry:
- What to do: Hang the tent up again and let it air dry completely. This is crucial for the treatment to bond with the fabric. Refer to the product’s instructions for drying times, which can range from 24-72 hours.
- What “good” looks like: The tent fabric feels dry and has a slightly different texture, indicating the treatment has set.
- Common mistake: Rushing the drying process and packing the tent before it’s fully cured.
9. Seal the seams (optional but recommended):
- What to do: Check your tent seams. If they look worn or you notice small leaks, apply a seam sealer specifically designed for tents. Apply a thin, even bead along the inside of the seams.
- What “good” looks like: The seams are well-sealed with no gaps.
- Common mistake: Skipping seam sealing, as seams are often the first place leaks start.
10. Test for leaks:
- What to do: Once dry and cured, set up your tent. Have someone spray it with a hose on a gentle setting (like a shower) for several minutes. Go inside and check for any drips or damp spots.
- What “good” looks like: Absolutely no water penetrates the fabric or seams.
- Common mistake: Not testing, and finding out your tent leaks when you’re miles from home in a downpour.
Common mistakes (and what happens if you ignore them)
| Mistake | What it causes | Fix |
|---|---|---|
| Skipping pre-trip inspection | Discovering rips/holes during bad weather, leading to a wet, miserable trip. | Always set up and inspect your tent before packing for a trip. |
| Using harsh detergents or washing machines | Strips factory DWR, damages fabric, reduces waterproofing effectiveness. | Use mild, tent-specific cleaners and hand-wash or use delicate cycles if absolutely necessary. |
| Not drying the tent completely | Mildew growth, fabric degradation, potential odors, and reduced lifespan. | Hang the tent until it’s completely dry, even if it takes an extra day. |
| Using the wrong waterproofing product | Fabric damage, sticky residue, reduced breathability, or ineffective treatment. | Research and use products specifically designed for your tent’s material (nylon, polyester). |
| Applying treatment unevenly | Inconsistent water repellency, leaving spots vulnerable to leaks. | Apply in thin, overlapping coats from the recommended distance. |
| Not allowing sufficient drying/curing time | Treatment doesn’t bond properly, washes off easily, or remains tacky. | Follow product instructions for drying and curing; be patient. |
| Forgetting to seal the seams | Seams are common failure points for waterproofing, leading to drips. | Inspect and re-seal seams annually or as needed with a dedicated seam sealer. |
| Not testing after re-waterproofing | Discovering leaks in the field when it’s too late to do anything about it. | Perform a water test with a hose after the tent is fully dry and cured. |
| Storing the tent damp or dirty | Accelerates fabric breakdown, encourages mildew, and attracts pests. | Always store your tent clean and completely dry in a cool, dry place. |
| Over-tightening guylines | Can stress seams and fabric, leading to premature wear and tear. | Tighten guylines just enough to secure the tent; avoid excessive tension. |
Decision rules (simple if/then)
- If your tent fabric beads water like a fresh wax job, then you probably don’t need to re-waterproof it yet because the existing DWR is still active.
- If water soaks into the fabric quickly instead of beading, then it’s time to re-waterproof because the DWR has worn out.
- If you see visible mold or mildew spots, then clean thoroughly with a specialized cleaner before attempting to re-waterproof.
- If you are using a wash-in treatment, then make sure your washing machine is clean and free of detergent residue because it can interfere with the treatment.
- If you are using a spray-on treatment, then apply it in thin, even coats because heavy application can lead to streaks and poor performance.
- If the weather forecast calls for heavy rain or high winds, then do your re-waterproofing well in advance of your trip because it needs time to cure properly.
- If your tent is old and the fabric feels brittle or is starting to delaminate, then it might be beyond repair, and it’s time to consider a new tent.
- If you notice small holes or worn spots, then consider patching them before applying the waterproofing treatment for a more robust repair.
- If you’re unsure about the type of fabric your tent is made from, then check the manufacturer’s tags or website for guidance on appropriate treatments.
- If you plan on camping in extreme conditions (heavy rain, prolonged exposure), then consider a higher-end, more durable waterproofing treatment.
- If you only use your tent a few times a year, then it might last several seasons without re-waterproofing, but always check its performance before each trip.
FAQ
How often should I re-waterproof my tent?
This depends on how often you use it and the conditions you camp in. A good rule of thumb is every 1-2 years, or when you notice water no longer beads on the fabric.
Can I use a regular waterproofing spray on my tent?
Not always. Many general waterproofing sprays can damage tent fabrics or leave a sticky residue that attracts dirt. Always use a product specifically designed for camping gear.
What’s the difference between a spray-on and a wash-in treatment?
Spray-on treatments are applied directly to the fabric and are good for touch-ups or when you can’t use a washing machine. Wash-in treatments are added to a washing machine and offer more uniform coverage for the entire tent.
Will re-waterproofing make my tent completely waterproof again?
It will restore and enhance its water repellency, making it highly water-resistant. However, the tent’s seams and design also play a role in its overall waterproofness.
How do I know if my tent needs re-waterproofing?
The easiest test is the “beading test.” If water beads up and rolls off the fabric, the DWR is still good. If water soaks in, it’s time for treatment.
What if my tent has a rip? Should I seal it before waterproofing?
Yes, absolutely. Patch any rips or tears with a dedicated tent repair kit before applying any waterproofing treatment. This ensures a solid base for the waterproofing.
Can I re-waterproof the inner tent too?
Generally, you only need to re-waterproof the rainfly and the floor of the tent. The inner tent is usually made of mesh for breathability and doesn’t require waterproofing.
How long does re-waterproofing last?
The lifespan of the treatment varies, but you can expect it to last for several washes or a season or two of regular use. Proper care and maintenance will extend its effectiveness.
What this page does NOT cover (and where to go next)
- Specific product reviews and comparisons. (Look for gear review sites.)
- Advanced tent repair techniques for major damage. (Consult specialized repair services.)
- Choosing the right tent for your needs. (Research tent types and features.)
- Detailed instructions for specific tent brands or models. (Refer to your tent’s manual.)
- Campground etiquette and booking. (Check park websites and reservation platforms.)

Camping Bob has spent over 20 years camping across the US — from BLM dispersed sites in the Southwest to KOA campgrounds in the Pacific Northwest. He writes practical, no-nonsense guides to help fellow campers get outdoors with confidence.