
Waterproofing Your Tent for Camping
Quick answer
- Check your tent’s seams and fabric for wear.
- Clean your tent thoroughly before treating.
- Use a tent-specific waterproofing spray or treatment.
- Apply evenly in a well-ventilated area.
- Reapply annually or after heavy use.
- Test for leaks by spraying with a hose.
What to check first (do this before you drive out)
Before you even think about packing, give your tent a once-over. This isn’t just about making it look good; it’s about ensuring you stay dry when the weather turns.
- Land manager / legality: Know who manages the land you’re camping on. Is it National Forest, BLM, State Park, or private? Each has its own rules about campfires, waste disposal, and sometimes even tent treatments. A quick check of the agency’s website is usually all it takes.
- Access/road conditions: This is crucial. Is the road to your campsite a smooth paved path, or is it a rutted, rocky mess? Know your vehicle’s capabilities. A Subaru Outback might handle a forest service road fine, but a low-slung sedan will get chewed up. Check recent conditions if possible, especially after rain or snow.
- Fire restrictions + weather + wind: This is non-negotiable. Fire restrictions are serious business. Check the official alerts for the area. Likewise, know the forecast. A little rain is one thing; a thunderstorm with high winds is another. Wind can make pitching your tent a nightmare and dramatically increase the chill factor.
- Water plan + waste plan (Leave No Trace): Where will you get your water? Are there reliable sources, or do you need to pack it all in? And what about waste? Pack it in, pack it out. This is the golden rule of camping. Know how you’ll handle trash and human waste to leave your spot better than you found it.
- Safety (wildlife, distance to help, comms): Be aware of local wildlife. Know what to do if you encounter bears, snakes, or other critters. How far are you from the nearest ranger station or town? Do you have cell service? A satellite messenger is a good idea for remote trips.
Step-by-step (field workflow)
Getting your tent ready for the elements is a process. It’s not complicated, but it needs attention to detail.
1. Inspect the tent:
- What to do: Lay your tent out flat, ideally on a clean surface. Look for rips, tears, worn spots, and loose threads. Check the zippers and seams.
- What “good” looks like: A clean, intact tent with no obvious damage. Seams are tight and the fabric is supple, not brittle.
- Common mistake: Rushing this step and missing a small hole that could become a big problem. Always take your time.
2. Clean the tent:
- What to do: Use a mild soap (like Nikwax Tent Wash or similar) and a soft brush or sponge. Gently scrub the fabric. Rinse thoroughly.
- What “good” looks like: A clean tent free of dirt, grime, and old residue. This ensures the waterproofing treatment adheres properly.
- Common mistake: Using harsh detergents or abrasive cleaners. This can strip away existing DWR (Durable Water Repellent) coatings and damage the fabric.
3. Dry the tent completely:
- What to do: Hang the tent to air dry. Make sure it’s bone dry before proceeding.
- What “good” looks like: No damp spots or moisture anywhere. Even a little dampness can ruin the treatment.
- Common mistake: Storing a damp tent. This leads to mildew and rot, which is way worse than a leaky seam.
4. Choose your waterproofing product:
- What to do: Select a product specifically designed for tents and outdoor gear. Sprays are common, but some are wash-in treatments.
- What “good” looks like: A product that matches your tent’s fabric type (nylon, polyester) and is known for its effectiveness.
- Common mistake: Using a generic waterproofing spray not meant for tents. It might damage the fabric or not be durable enough.
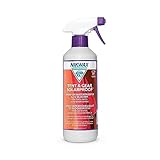
When choosing your waterproofing product, consider a reliable tent waterproofing spray like this one to ensure your tent is ready for any weather.
5. Find a suitable application area:
- What to do: Set up your tent in a well-ventilated area, preferably outdoors. Avoid direct sunlight during application, as it can speed up drying too much.
- What “good” looks like: An open, breezy space where you can easily access all parts of the tent without obstruction.
- Common mistake: Applying indoors in a confined space. Fumes can be strong, and you won’t get good ventilation.
6. Apply the waterproofing treatment:
- What to do: Follow the product instructions precisely. For sprays, hold the can the recommended distance away and apply in even, overlapping strokes.
- What “good” looks like: A consistent, thin layer of treatment covering all fabric surfaces, including seams.
- Common mistake: Applying too thick or in blotchy patches. This leads to uneven protection and potential stiffness.
7. Treat the seams:
- What to do: Pay special attention to seams. Many waterproofing products come with a seam sealer, or you can use a dedicated seam-sealing product.
- What “good” looks like: A continuous, thin bead of sealant along all interior and exterior seams.
- Common mistake: Forgetting about seams. They are the most common entry point for water.
Don’t forget to treat the seams! A dedicated seam sealer for tents, such as this one, is crucial for preventing leaks in these vulnerable areas.

8. Allow to dry and cure:
- What to do: Let the tent air dry completely, following the product’s curing time. This can take 24-72 hours.
- What “good” looks like: A fully dry tent that no longer feels tacky or smells strongly of the treatment.
- Common mistake: Packing up or using the tent before it’s fully cured. This can compromise the treatment and leave residue on your gear.
9. Test for leaks:
- What to do: Once cured, set up the tent and spray it down with a hose on a gentle setting. Go inside and look for any drips or wet spots.
- What “good” looks like: Absolutely no water coming through. The fabric should bead up and roll off.
- Common mistake: Skipping this crucial test. You don’t want to find out your tent leaks when you’re miles from anywhere in a downpour.
Common mistakes (and what happens if you ignore them)
| Mistake | What it causes | Fix |
|---|---|---|
| Not cleaning the tent first | Poor adhesion of waterproofing treatment | Clean thoroughly with a specialized tent cleaner before applying. |
| Using harsh detergents | Damage to fabric and existing DWR coatings | Use only mild, gear-specific cleaners. |
| Applying treatment in direct sun | Uneven drying, potential damage to treatment | Apply in shade or indoors with good ventilation. |
| Applying too thick or unevenly | Stiffness, potential for leaks, wasted product | Apply thin, even coats. Follow product instructions for application distance and technique. |
| Forgetting to treat seams | Water seeping through the most vulnerable areas | Use a dedicated seam sealer or the product’s seam treatment option. |
| Using the tent before it’s fully cured | Treatment wears off quickly, potential residue transfer | Allow the full curing time recommended by the product manufacturer. |
| Not testing for leaks after treatment | Finding out your tent leaks during a rainstorm | Set up and hose down the tent after curing to check for any breaches. |
| Storing a damp tent | Mildew, rot, permanent damage, foul odor | Always ensure your tent is completely dry before storing it. |
| Using the wrong waterproofing product | Fabric damage, ineffective water repellency | Use products specifically designed for your tent’s material (nylon, polyester, canvas). |
| Ignoring manufacturer instructions | Ineffective treatment, potential product damage | Read and follow all instructions on the waterproofing product and your tent’s care tag. |
Decision rules (simple if/then)
- If your tent is old and has seen a lot of trips, then treat it proactively because its original waterproofing is likely degraded.
- If you’re going on a multi-day trip in an area known for rain, then waterproofing your tent is a high priority because staying dry is key to comfort and safety.
- If you notice water beading poorly on your tent fabric, then it’s time to reapply waterproofing because the DWR is no longer effective.
- If you’ve just purchased a new tent, then inspect it for factory defects but generally hold off on immediate waterproofing unless you know it’s a known issue with that model.
- If you’re camping in a desert environment, then waterproofing is less critical for rain but still important for dew and dust resistance.
- If you use a tent footprint or ground tarp, then make sure it’s slightly smaller than your tent floor to prevent water from channeling underneath.
- If you’re treating a canvas tent, then use products specifically designed for canvas, as they differ from synthetic fabric treatments.
- If you find a small tear during inspection, then patch it before waterproofing because the patch needs to be sealed too.
- If you’re unsure about a product, then test it on a small, inconspicuous area first because you don’t want to ruin the whole tent.
- If you plan to use a tent stove, then ensure your tent is made of fire-resistant material and follow all safety guidelines; waterproofing is secondary to fire safety.
- If you’re camping in extreme cold, then ensure your tent is properly ventilated to prevent condensation buildup, which can freeze and create ice inside.
FAQ
How often should I waterproof my tent?
Reapply waterproofing treatment annually, or after about 30-5 nights of heavy use, or whenever you notice water isn’t beading up on the fabric.
To keep your tent in top condition, reapply a quality tent waterproofing spray annually or after significant use to maintain its protective barrier.
Can I use Scotchgard on my tent?
While some people do, it’s generally not recommended. Products specifically designed for outdoor gear are formulated to work with tent fabrics and coatings without causing damage.
What’s the difference between waterproofing and water-repellent?
Water-repellent (DWR – Durable Water Repellent) is a finish that makes water bead up and roll off. Waterproofing refers to materials that physically block water from passing through, like a coated fabric or a seam tape.
Do I need to waterproof the rainfly and the tent floor?
Yes, absolutely. The rainfly is your primary barrier against rain, and the tent floor needs to withstand ground moisture and any puddles.
How long does tent waterproofing last?
It varies based on the product, the fabric, and how much you use your tent. Expect it to last anywhere from a few months to a year or more of regular use.
Can I use a bathtub-style tent floor to avoid waterproofing?
A bathtub floor helps keep water out, but it’s not a substitute for a waterproof tent body and rainfly, especially in heavy rain or if the ground becomes saturated.
What if my tent has a mesh inner?
You don’t need to waterproof the mesh sections. Focus on the fabric parts of the tent body and the rainfly.
Is it okay to use a tent sealant on old, leaky seams?
Yes, seam sealers are designed for this. Clean the seam thoroughly first, then apply the sealer according to the product’s instructions.
What this page does NOT cover (and where to go next)
- Specific campsite reservations and booking procedures. (Check park or forest service websites.)
- Detailed gear repair techniques beyond basic waterproofing. (Look for guides on patching and seam ripping.)
- Advanced backcountry navigation and survival skills. (Consider taking a wilderness skills course.)
- Recommendations for specific tent models or brands. (Read reviews and compare specs.)
- Regulations regarding campfires, bear canisters, or dispersed camping permits. (Consult the relevant land management agency’s rules.)

Camping Bob has spent over 20 years camping across the US — from BLM dispersed sites in the Southwest to KOA campgrounds in the Pacific Northwest. He writes practical, no-nonsense guides to help fellow campers get outdoors with confidence.