How To Properly Clean Your Hydration Bladder Tube
Quick answer
- Rinse the tube immediately after each use with clean water.
- Use a dedicated cleaning brush for thorough scrubbing.
- A mild soap and water solution can be used for deeper cleaning.
- Always air dry the tube completely before storing.
- Avoid harsh chemicals; they can degrade the material.
- Regular cleaning prevents mold and funky tastes.
What to check first (do this before you drive out)
Before you even think about hitting the trail, make sure your hydration system is ready. A clean bladder and tube are non-negotiable for enjoying your hike or ride.
- Land manager / legality: While not directly related to cleaning your gear, knowing who manages the land you’re on (USFS, BLM, NPS, state parks) is key for general camping etiquette. Always follow their rules.
- Access/road conditions: This applies more to getting to your campsite, but it’s a good reminder to check your vehicle and the roads. Don’t get stuck because you didn’t check if that dirt road is passable.
- Fire restrictions + weather + wind: Crucial for safety and preventing wildfires. Always check current fire bans and the weather forecast. High winds can make camp life miserable and dangerous.
- Water plan + waste plan (Leave No Trace): This is where your hydration bladder comes in. Plan how much water you’ll need. And remember, pack out everything you pack in, including any cleaning supplies or old water. Leave it better than you found it.
- Safety (wildlife, distance to help, comms): Make sure someone knows where you are and when you expect to be back. Cell service is often spotty out there. Having a plan for emergencies is smart.
Step-by-step (field workflow)
Cleaning your hydration bladder tube doesn’t have to be a chore. Here’s how to do it right, whether you’re at home or on a longer trip.
1. Empty the bladder completely.
- What to do: Pour out any remaining water. Get every last drop.
- What “good” looks like: The bladder should be totally empty.
- Common mistake: Leaving a little water in the bottom. This can lead to stale water and potential mold growth later. Make sure it’s bone dry.
2. Rinse the tube with clean water.
- What to do: Disconnect the tube from the bladder. Run clean, cool water through it. You can do this by holding one end under a faucet and letting it flow out the other.
- What “good” looks like: Water flows freely and comes out clear.
- Common mistake: Just swishing a little water around. You need a good flow to flush out any debris or residue.
3. Use a dedicated cleaning brush.
- What to do: Insert a long, flexible hydration bladder cleaning brush into the tube. Gently scrub back and forth.
- What “good” looks like: The brush moves smoothly and removes any visible gunk.
- Common mistake: Not using a brush at all, or using something too stiff that could damage the tube. A proper brush is designed for this.
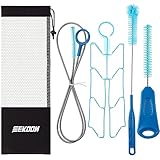
For the most effective clean, consider investing in a dedicated hydration bladder cleaning kit. These kits typically include brushes perfectly sized for your tube and bladder.
4. Prepare a mild cleaning solution (if needed).
- What to do: Mix a small amount of mild dish soap with warm water, or use a specialized hydration bladder cleaning tablet.
- What “good” looks like: A lightly sudsy or clear solution. Avoid strong detergents.
- Common mistake: Using bleach or very hot water. These can degrade the plastic and leave a strong chemical taste.
5. Flush the cleaning solution through the tube.
- What to do: Put the cleaning solution into the bladder or directly into the tube (if you can seal one end). Then, suck or push the solution through the tube.
- What “good” looks like: The solution passes through, coating the inside of the tube.
- Common mistake: Not ensuring the solution contacts the entire inner surface. You might need to work it through a couple of times.
6. Rinse thoroughly with clean water.
- What to do: This is critical. Run a lot of clean water through the tube to remove all traces of soap or cleaning solution.
- What “good” looks like: Absolutely no soap residue or scent remains.
- Common mistake: Inadequate rinsing. You don’t want your water tasting like lemon dish soap.
7. Dry the tube completely.
- What to do: Hang the tube so both ends are pointing downwards. Allow air to circulate through it. You can also gently pull a clean, dry cloth through it with a string, but air drying is best.
- What “good” looks like: No moisture visible inside. The tube feels dry to the touch.
- Common mistake: Storing the tube while it’s still damp. This is the fastest way to grow mold and mildew.
8. Store properly.
- What to do: Once completely dry, reattach the tube to the bladder (if detached) or store it separately. Keep it in a cool, dry place.
- What “good” looks like: The gear is ready for its next adventure, clean and odor-free.
- Common mistake: Stuffing it into a damp backpack or leaving it in direct sunlight. This can damage the materials and promote bacterial growth.
Common mistakes (and what happens if you ignore them)
| Mistake | What it causes | Fix |
|---|---|---|
| Not rinsing immediately after use | Stagnant water breeds bacteria and mold. | Always give your tube a quick rinse with clean water right after your hike or ride. |
| Using hot water or harsh chemicals | Degrades the bladder and tube material, leaves chemical taste. | Stick to cool/lukewarm water and mild soap or specialized cleaning tablets. |
| Forgetting to dry it completely | Mold and mildew growth, unpleasant odors, potential health issues. | Air dry thoroughly. Hang it up, or use a gentle drying method. Never store it damp. |
| Not using a cleaning brush | Buildup of biofilm (slimy stuff) that’s hard to remove later. | Invest in a good hydration bladder cleaning brush set. They’re designed for the job. |
| Storing with the cap on tight (damp) | Traps moisture, creating a perfect environment for mold. | Store with the bladder and tube unsealed or slightly open to allow air circulation. |
| Drinking directly from a dirty tube | Ingesting bacteria and mold, leading to stomach upset or illness. | Clean your gear regularly. If it smells or looks suspect, clean it thoroughly before use. |
| Not cleaning the bladder itself | The tube is only part of the system; the bladder needs cleaning too. | Follow manufacturer instructions for cleaning the bladder itself. Many can be turned inside out. |
| Using abrasive scrubbers | Scratches the inside of the tube, creating more places for gunk to hide. | Use soft brushes specifically designed for hydration systems. |
| Relying solely on taste/smell | Some mold and bacteria are odorless and tasteless until they’re well-established. | Don’t wait for a bad smell. Regular, proactive cleaning is the best defense. |
| Not checking manufacturer guidelines | Different materials might have slightly different care needs. | Always refer to the specific cleaning instructions provided by your hydration system’s manufacturer. |
To avoid biofilm buildup, a common mistake is not using a cleaning brush. A good hydration bladder cleaning kit will include the necessary brushes to keep your tube spotless.
Decision rules (simple if/then)
- If you just finished a long, sweaty hike, then rinse your hydration tube immediately because it prevents bacteria from setting up shop.
- If you notice a funky smell, then it’s time for a deep clean with a brush and mild soap because that smell is usually mold or mildew.
- If you’re going on a multi-day trip, then pack a small cleaning brush and some biodegradable soap because you’ll want to keep things fresh on the go.
- If you used a sports drink or electrolyte mix, then rinse extra thoroughly because sugary residues are a magnet for bacteria.
- If you can’t get a smell out after cleaning, then consider replacing the tube because sometimes the biofilm can be too stubborn to remove.
- If you store your gear in a damp garage, then make sure the bladder and tube are bone dry and slightly open because trapped moisture will cause problems.
- If your bladder and tube are old, then inspect them for cracks or wear before cleaning because damaged gear might need replacing anyway.
- If you’re unsure about a cleaning product, then always test it on a small, inconspicuous area first because you don’t want to ruin your gear.
- If you’re using a tablet cleaner, then follow the package directions precisely because they are formulated for specific cleaning actions.
- If you feel a slimy residue inside the tube, then you definitely need to scrub with a brush because that’s biofilm.
- If you’re cleaning in the backcountry, then use water wisely and pack out all cleaning supplies because Leave No Trace is key.
FAQ
How often should I clean my hydration bladder tube?
It’s best to rinse it after every use and give it a thorough scrub with a brush at least once a week, or more if you use it frequently or for drinks other than water.
Can I use regular dish soap?
Yes, a small amount of mild dish soap mixed with water is generally fine for a deep clean, but make sure you rinse it out completely. Avoid harsh detergents.
What’s the best way to dry the tube?
Hang it up so air can flow through it. Gravity helps water drain out, and air circulation does the rest. Don’t just leave it coiled up.
How do I get rid of a moldy smell?
A good scrubbing with a dedicated brush and a mild soap solution is usually the first step. For stubborn smells, a specialized cleaning tablet or a diluted vinegar solution might help, followed by thorough rinsing and drying.
Can I put my hydration bladder tube in the dishwasher?
Some manufacturers say yes, but it’s often not recommended. The high heat and harsh detergents can degrade the material over time and may not clean the inside of the tube effectively. Always check your product’s manual.
What happens if I don’t clean my tube?
You risk growing mold and bacteria, which can make your water taste bad and potentially make you sick. It can also clog the bite valve.
Should I clean the bladder and the tube separately?
Yes, absolutely. While they are connected, they often require slightly different cleaning approaches, especially for the bladder itself, which might need to be turned inside out.
Is it okay to leave water in the bladder overnight?
No, it’s not ideal. Even clean water can start to develop a stale taste and can encourage bacterial growth if left sitting for extended periods. Empty and rinse.
What this page does NOT cover (and where to go next)
- Detailed cleaning instructions for specific bladder brands (check manufacturer websites).
- Troubleshooting complex issues like a clogged bite valve (often requires disassembly).
- Choosing the right hydration pack for your outdoor activities.
- Advanced water purification methods for backcountry use.
- The best hiking trails for testing out your freshly cleaned gear.
Camping Bob has spent over 20 years camping across the US — from BLM dispersed sites in the Southwest to KOA campgrounds in the Pacific Northwest. He writes practical, no-nonsense guides to help fellow campers get outdoors with confidence.