How to Set Up a Tarp Shelter: Configurations, Knots & Tips
The fastest way to a solid tarp shelter is a good ridgeline. If you get that line straight, high enough, and properly tensioned, everything else—the fly, the stakes, the side panels—falls into place. Start by picking a spot where wind and rain won’t work against you, then run a single ridgeline between two trees (or poles) at shoulder height. That one line is the backbone of nearly every tarp setup.

The Foundation: Ridgeline First, Everything Else Second
Most beginners spend too much time fussing with stakes and corners before the ridgeline is set. The ridgeline determines the shelter’s pitch, its ability to shed water, and its resistance to wind. Get it wrong and no amount of stake tension will save you.
Pick the Right Spot
Before tying anything, run through these five site checks. Each is a simple pass/fail.
- Drainage: Is the ground slightly sloped? Water should run away from your sleeping area, not pool under it.
- Wind direction: Face the open end of the shelter away from the prevailing wind. If you’re not sure, toss a handful of dirt and watch which way it drifts.
- Tree spacing: Can your ridgeline span the gap at shoulder height without sagging? Ideal distance is 8–12 feet for a standard 10×10 tarp.
- Clear overhead: No dead branches, widowmakers, or low-hanging limbs above your pitch.
- Soft ground for stakes: If you can push a stake in by hand with minimal effort, you’re good. Rocky or hard-packed soil needs different stakes (or a rock to hammer with).
Stop threshold: If you fail two or more of these checks, or if you can’t find two solid anchor points within 15 feet of each other, stop and move to a different campsite. Pitching on poor terrain invites gear failure and unsafe sleep conditions.
The Ridgeline Knot That Adjusts Later
You want a knot that lets you tighten or loosen the line without retying. A taut‑line hitch works for most synthetic cord, but for the ridgeline itself the fastest option is a Prusik loop on the tarp’s center seam. Tie a short loop of accessory cord (6–8 inches) around the ridgeline, then clip the tarp grommet into the Prusik. This lets you slide the tarp along the ridgeline for perfect centering before tensioning the ends.
Counter-intuitive tip: Don’t crank the ridgeline drum-tight. A slight dip (2–3 inches of sag over 10 feet) actually helps the tarp shed wind gusts by flexing instead of fighting. Overtightening creates sail loads that can pull stakes or tear grommets.
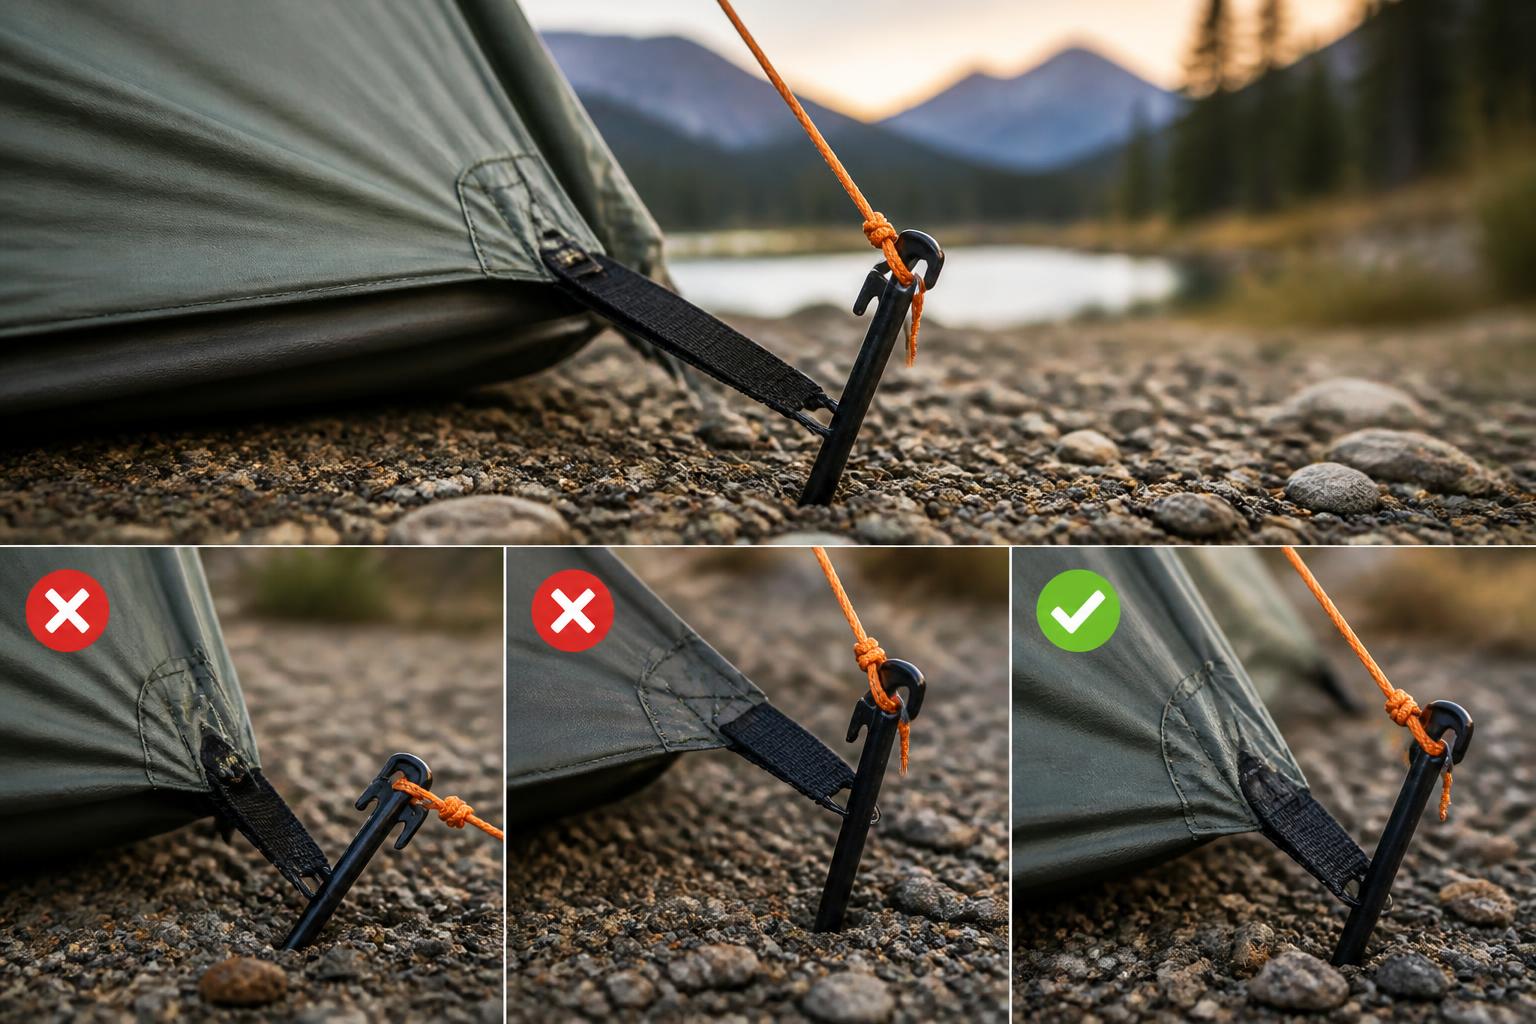
Staking the Panel Corners
Once the ridgeline is set and the tarp is centered, stake the four corners (or six, if you’re using a larger tarp with mid-panel tie-outs). Drive each stake at a 45‑degree angle away from the tarp, not straight down. The stake line should pull the panel taut but leave enough play that the fabric doesn’t hum in the wind.

Verification step after staking: Push on the center of each panel. The fabric should depress 1–2 inches and spring back. If it feels drum-tight or flaps loosely, adjust the stake angle or move the stake farther out. A properly tensioned panel sheds rain without straining grommets.
Three Common Configurations (and When to Use Each)
Not every trip calls for the same shape. Here’s a quick comparison of the three most reliable setups.
| Configuration | Wind Protection | Rain Coverage | Setup Speed | Best For |
|---|---|---|---|---|
| A‑Frame (symmetrical) | Good on both sides | Full coverage | Fast | All‑round, mild weather |
| Lean‑to | Excellent on one side | Good, but open back | Medium | Strong wind from one direction |
| Flying Diamond | Fair on all sides | Partial (great for sleeping area) | Fast | Ultralight / smallest footprint |
A‑Frame
Pull the two longer sides of the tarp down to the ground at a roughly 45° angle. This creates a tent‑like tunnel. It’s the most forgiving shape for rain because water runs off both sides. Best for solo camping where you need floor space and headroom.
Lean‑to
Anchor the ridgeline close to the ground on the windward side and prop the opposite side up with trekking poles or a stick. You get a low, wind‑shedding wall on one side and an open face for cooking or gear storage. Use this when you know the wind will hammer from a single direction for the whole night.
Flying Diamond
Turn the tarp so one corner becomes the high point (pole or tree) and the opposite corner is staked low. The other two corners are staked out to the sides. This creates a small, aerodynamic shelter that packs small and pitches fast. Ideal for a quick overnight with minimal gear.
The Knots You Actually Need
You can get away with three knots. Everything else is optional.
- Taut‑line hitch: For all adjustable guy lines. Tie it on each stake line so you can fine‑tune tension without retying.
- Prusik loop: For attaching the tarp to the ridgeline. It grips the cord when pulled and slides when slack. Use 3 mm cord in a 5‑inch loop.
- Sheet bend: For joining two lengths of cord when your ridgeline is too short or you need an extension. Simple, strong, unties easily.
Example: If your ridgeline cord is only 15 feet but the tree gap is 20 feet, a sheet bend lets you join two 15‑foot cords with no bulk. Tie it, then use a taut‑line hitch on the far end for tension.
Practice these knots at home until you can tie them in the dark. On a windy night, muscle memory matters more than speed.
Common Failure Modes and How to Avoid Them
Even experienced hikers make these mistakes. Watch for them during setup.
- Overtightening the panel stakes. A drum‑tight panel creates a sail. When the wind hits, it strains the grommets and can flip the tarp. Leave a finger‑width of flex along each edge.
- Wrong ridgeline angle. The ridgeline should be level, not tilted. If one end is much higher than the other, water runs off the high side and pools on the low side inside the shelter. Use a stick or trekking pole to raise the low end.
- Poor stake choice for the soil. In loose sand or snow, standard aluminum stakes pull out in a gust. Carry 6‑inch plastic or aluminum snow stakes for soft ground. On hard-packed trails, nail‑style stakes with a notch hold better.
- Guy lines too short. If your main stake lines are less than 4 feet, you can’t move the stakes far enough out to achieve the correct angle. Pack 6–8 foot lines for each tie‑out point.
Realistic failure scenario: You set up an A‑frame on a slight slope with the ridgeline a few inches off-level. During a night of steady rain, water collects on the low panel, forms a puddle, and eventually seeps through the fabric. Symptom: a bulging panel and dripping inside. Cause: an unlevel ridgeline that didn’t allow water to shed. Safer next move: Before dark, get inside the shelter and shine a headlamp upward. Any dimples in the fabric are potential pooling points. Adjust the ridgeline height until the fabric is smooth across both sides.
Quick Success Check
After you’ve staked everything, run through this operator flow before you crawl in.
- Ridgeline check: Push up on the center of the tarp. You should feel springy resistance without the tarp sagging more than 2–3 inches.
- Guy line tension: Walk around the shelter and lightly twang each line. They should sound similar—no line should be near breaking tension.
- Water test: Splash a handful of water on the highest point of the tarp. It should run off cleanly toward the edges and be gone within 5 seconds. Any pooling means you need to adjust the ridgeline angle or stake placement.
- Wind stability: Gently push each side of the tarp. The stakes should hold firm. If a stake moves, re‑drive it at a steeper angle.
- Headroom check: Sit inside your sleeping position. You should have at least 6 inches of air gap between your face and the tarp. Lower the ridgeline slightly if not.
Stop/escalate threshold: If after two attempts any of these checks still fails—especially #3 (water pooling) or #4 (stakes pulling out)—do not sleep under the tarp. Move to a different spot or switch to a fully enclosed tent. A tarp that can’t shed water or hold ground in a breeze is a safety risk.
FAQ
Should I pitch the tarp high or low?
High (above head height) gives more airflow and room to move, but catches wind and rain splash from the sides. Low (below shoulder height) protects better from wind and rain but feels cramped. For stormy nights, go low. For mild weather, go high.
What’s the best knot for tying the ridgeline to a tree?
A taut‑line hitch or a trucker’s hitch. Both allow adjustment without slack. For quick tie‑off, a two‑half‑hitch works, but you lose the ability to tighten later.
Can I use trekking poles instead of trees?
Yes. A pair of trekking poles with a line between them replaces a tree ridgeline. Use the Prusik method to attach the tarp to the line, then stake out the corners as usual. Make sure the poles are planted firmly and angled slightly outward for stability.
Camping Bob has spent over 20 years camping across the US — from BLM dispersed sites in the Southwest to KOA campgrounds in the Pacific Northwest. He writes practical, no-nonsense guides to help fellow campers get outdoors with confidence.