
How to Tie a Ridgeline for Your Tarp: Knots and Techniques
The fastest way to get a tarp overhead is to run a continuous ridgeline between two trees and drape the tarp over it. Use a trucker’s hitch when you need heavy tension for storm-proofing or when your tarp is heavy, or a taut-line hitch if you want to adjust sag without retying. For most casual camping setups with a lightweight tarp under 15 feet of span, a continuous ridgeline with a taut-line hitch at one end gives you the best balance of speed and control.

What You’ll Need Before You Start
Gather your gear before you head to the trees:
- Tarp – any rectangular or square tarp with grommets or reinforced loops. Heavy polyethylene models like PROTARP Extreme Heavy Duty 22 Mil Tarp Cover (14–22 mil) need a different knot than lightweight silnylon tarps. The Amazon Basics Waterproof Multipurpose Camping Tarp (about 9.5 x 11.3 feet) is a midweight option that works well with either knot, depending on conditions. For extra-large setups, the Sunvigor Tarp Waterproof 10x20Ft (14 mil) benefits from a trucker’s hitch due to its size and weight.
- Cordage – 20–30 feet of 3mm or 4mm accessory cord, paracord, or dyneema line. Avoid stretchy rope; polyester or dyneema hold tension far better than nylon.
- Two trees or posts – spaced about 10–15 feet apart for a standard tarp.
- Optional – two small carabiners or tree-huggers to avoid damaging bark and give you a cleaner attachment point.

Decision criterion: The weight of your tarp material and the distance between anchors changes which knot you should use. A light silnylon tarp (10×10, under 2 lbs) can be tensioned with a simple taut-line hitch. A heavy polyethylene tarp (14–22 mil, 5+ lbs) needs a trucker’s hitch to maintain tension without slipping. If your span exceeds 14 feet, use the trucker’s hitch regardless of tarp weight — longer spans create more sag that a taut-line hitch can’t overcome. If you are unsure, test the ridgeline with the taut-line hitch first; if it slips more than 3 inches under hand pressure within 5 minutes, switch to the trucker’s hitch.
Continuous vs. Split Ridgeline: Which Setup Fits Your Site?
Continuous ridgeline – one long line runs from tree to tree, and the tarp rests on top of it. Tie one end to the first tree, pass the line through the tarp’s center grommets or loops, and tension the other end. This keeps the tarp centered and lets you slide it left or right easily without retying. It is the better choice when your anchor points are roughly parallel and you want to adjust coverage after setup.
Split ridgeline – two shorter lines, each tied from one corner of the tarp to a separate tree. Faster to rig initially because you skip the center threading step, but harder to center the tarp and less adjustable after it is up. If one tree is much thicker than the other or the two trees are not parallel, a split ridgeline lets you work around odd anchor geometry more easily.
For general camping, the continuous method is more forgiving and gives you better control over sag. Use a split ridgeline only when you are setting up between irregularly spaced anchors (e.g., a tree and a post, or two trees at very different heights) where a single line would run badly off-center.
How to Tie a Continuous Ridgeline (Ordered Steps)
Follow these steps in sequence. Each step includes a checkpoint to catch problems early.
Step 1: Tie a fixed loop on the first tree. Use a bowline (strong, non-jamming) or a clove hitch (quick on and off). Leave about 6 inches of tail and secure it with a half hitch. If you use a bowline, make sure the loop passes around the tree, not just through the bark — wrap the line at least once to avoid slipping.
Checkpoint after step 1: Pull the tail firmly. The knot should not slide or rotate around the tree. If it does, add an extra wrap before the knot, or switch to a clove hitch with a backup half hitch.
Step 2: Run the line through the tarp’s grommets. Starting from the fixed tree, pass the line under the tarp’s center ridge points (usually the grommet at each short end) so the tarp sits on top of the ridgeline. If your tarp has a center loop, thread through that as well. Keep the line running above the tarp fabric, not below it, so the tarp drapes evenly on both sides.
Checkpoint after step 2: Walk to the free end of the tarp. Check that the ridgeline passes through every center grommet and that the tarp is roughly centered between the two trees. If the tarp is more than 2 feet off-center, re-thread before moving on.
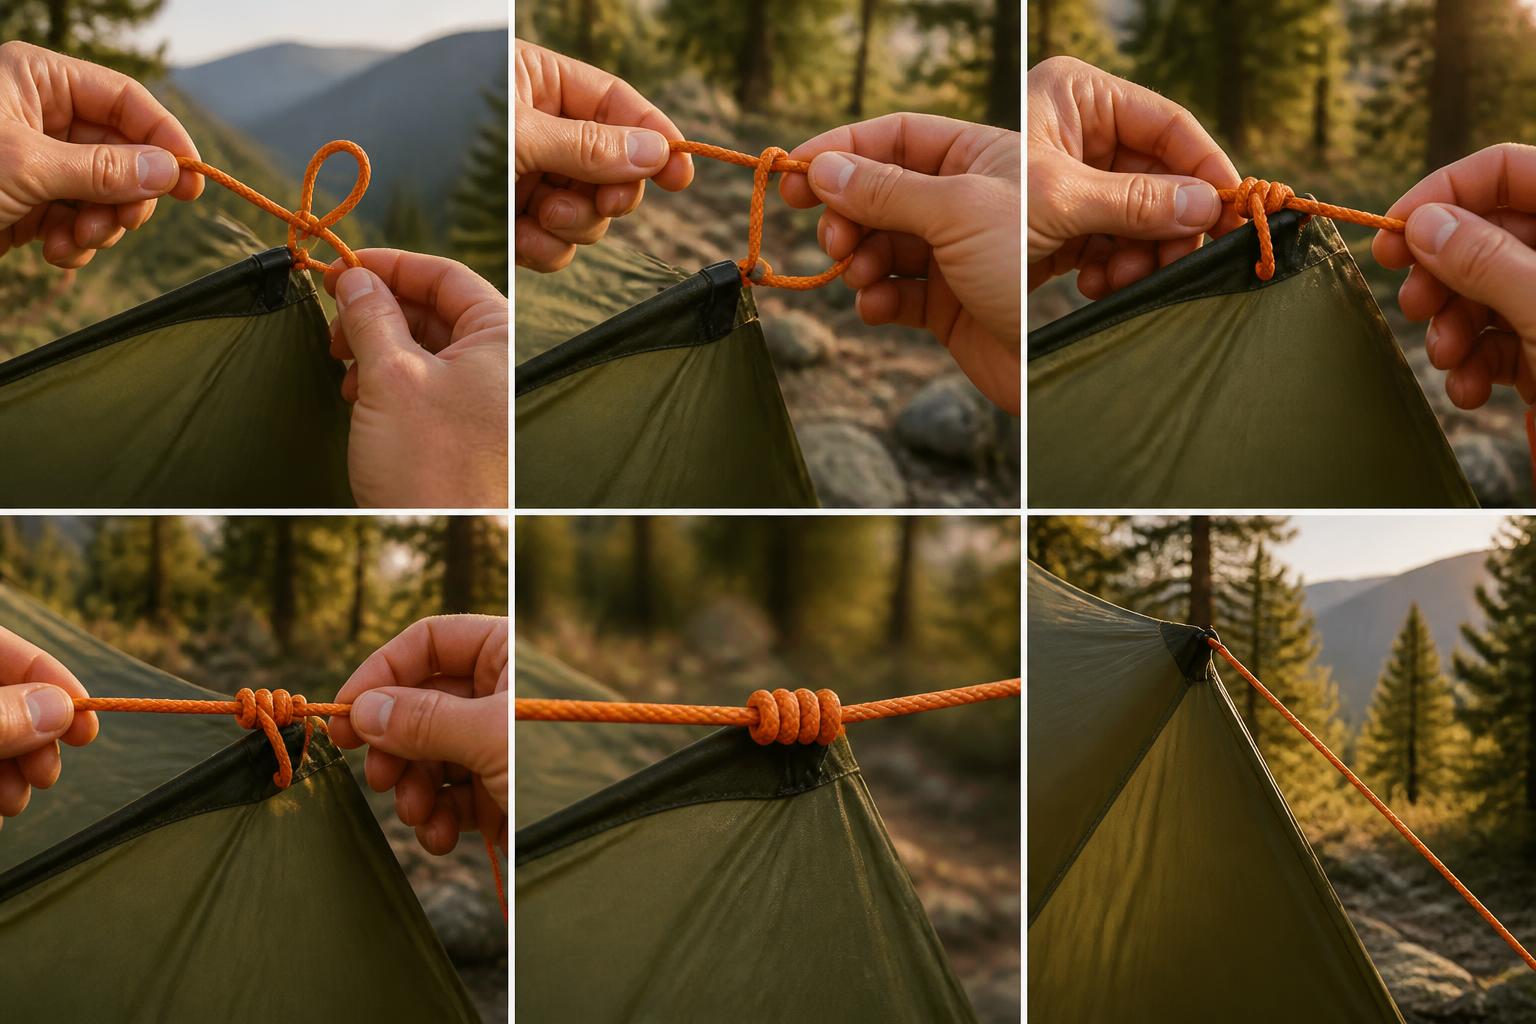
Step 3: Attach to the second tree with a tensioning knot. Pass the line around the second tree, then tie a trucker’s hitch or taut-line hitch.
– Trucker’s hitch: Creates a mechanical advantage — best for heavy tarps, windy conditions, and spans over 14 feet.
– Taut-line hitch: Slides to adjust tension — good for quick tweaks on lighter tarps under 15 feet.
Step 4: Adjust tension. Pull the working end until the ridgeline is tight enough that the tarp does not sag more than 2–3 inches when you push up from underneath. Tie off the tail with two half hitches. Do not overtighten to the point where the grommets deform or the tarp fabric wrinkles — you want a flat ridge, not a drumhead.
Early checkpoint after step 4: Before you stake down the tarp corners, double-check that the ridgeline is straight and the tarp is centered over your intended area. If the line dips more than 6 inches in the middle, loosen the knot, take up more slack, and re-tension. If the dip persists after a second attempt, your span may be too long for the cordage you are using — reduce the distance between anchors or switch to a trucker’s hitch for better mechanical advantage.
Likely causes of persistent sag:
– Cordage is too stretchy (nylon paracord stretches more than polyester or dyneema) — switch to low-stretch line.
– Span is too long for the cord thickness — use 4mm line for spans over 15 feet.
– The knot is slipping because the tail is too short — always leave at least 6 inches of tail after the final half hitch.
Success check: Push up on the tarp from underneath at the center of the ridgeline. The line should deflect no more than 2–3 inches under firm hand pressure. If it deflects more, re-tension. If it still deflects after re-tensioning, shorten your span or upgrade your cordage.
Choosing the Right Knot for Your Setup
| Condition | Recommended Knot | Why |
|---|---|---|
| Light tarp (under 2 lbs), span under 14 ft, calm weather | Taut-line hitch | Quick to adjust, easy to retie |
| Heavy tarp (14–22 mil, 5+ lbs), any span | Trucker’s hitch | Mechanical advantage holds heavy fabric taut |
| Span over 14 ft, any tarp weight | Trucker’s hitch | Longer spans need more tension than a taut-line can maintain |
| Windy conditions or storm camping | Trucker’s hitch with a backup half hitch | Extra security against gusts |
| Quick lunch stop, minimal setup | Taut-line hitch or even a simple clove hitch on both ends | Fast to tie and untie |
If you plan to leave the tarp up overnight or in changing weather, default to the trucker’s hitch. The taut-line hitch is fine for daytime use when you can monitor and adjust.
Quick Setup Check (Fit-for-Use Checklist)
Use these five checks before you stake the tarp corners or call the setup done:
- Ridgeline straightness – The line between trees should be a straight horizontal line, not a U-shape. Pass: less than 3 inches of dip at center. Fail: dip exceeds 6 inches.
- Tarp centering – The tarp should be roughly centered between the two trees, with both ends of the tarp at similar distances from each tree. Pass: within 1 foot of center. Fail: more than 2 feet off-center.
- Tension under hand pressure – Push up at the center of the ridgeline. Pass: deflection under 3 inches. Fail: deflection over 5 inches.
- Knot security – Each knot should have at least 6 inches of tail and two half hitches if used. Pass: no slip when pulled firmly. Fail: knot slides or tail is under 4 inches.
- Grommet condition – No grommet should be pulled out of shape or tearing. Pass: grommet is round and fabric around it is flat. Fail: grommet is oval or fabric is puckered.
If all five checks pass, you are ready to stake the corners. If any check fails, fix that issue before moving on.
FAQ
How long should my ridgeline be?
A 25–30 foot line works for most setups with two trees 10–15 feet apart. The extra length gives you room to tie knots and wrap around trunks.
Can I use paracord for a ridgeline?
Yes, but only if it is the low-stretch type (e.g., 550 paracord made from polyester). Standard nylon paracord stretches significantly when wet and will let your tarp sag overnight.
What if I only have one tree?
Use a trekking pole or a sturdy branch as the second anchor. Rig the ridgeline from the tree to the pole, then stake the pole into the ground with a guy line.
How tight should the ridgeline be?
Tight enough that the tarp does not sag more than 2–3 inches when you push up from underneath, but not so tight that the grommets deform. The tarp should sit flat, not drum-tight.
What knot is best for tying the ridgeline to the tree initially?
A bowline if you want a non-jamming loop that is easy to untie later, or a clove hitch if you want something quick that holds well on vertical trunks. Both work fine for a fixed end.
Do I need tree straps or can I tie directly to the trunk?
Tying directly to the trunk works, but tree straps with a ring or carabiner protect the bark and make it faster to adjust the ridgeline. If you tie directly, use a wide flat wrap to minimize damage.
Why does my ridgeline keep slipping?
Most likely causes: the knot is tied incorrectly (check for a slipped hitch), the cordage is too slick (dyneema needs special knots like the prusik), or the tail is too short (needs at least 6 inches). Tighten the knot, add a backup half hitch, or switch to a trucker’s hitch for more grip.
If you have completed these steps and checks, your ridgeline is ready to support the tarp through the night. Stake the corners at the height you need, and adjust the tension on individual guy lines as weather conditions change.

Camping Bob has spent over 20 years camping across the US — from BLM dispersed sites in the Southwest to KOA campgrounds in the Pacific Northwest. He writes practical, no-nonsense guides to help fellow campers get outdoors with confidence.