Keeping Your Hydration Pack Clean: Camelbak Care Guide
Quick answer
- Clean your hydration reservoir and hose after every use.
- Use warm water and mild soap, or a specialized cleaning kit.
- Rinse thoroughly to remove all soap residue.
- Dry completely before storing to prevent mold and mildew.
- Inspect for wear and tear regularly.
- Replace parts like the bite valve if they show signs of damage.
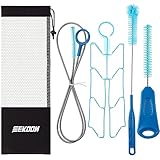
For a thorough clean, consider a dedicated hydration bladder cleaning kit. These kits often include brushes for hard-to-reach areas and specialized cleaning tablets.
What to check first (do this before you drive out)
Before you even think about hitting the trail with your hydration pack, a quick check ensures it’s ready for action and won’t leave you with a funky taste or worse.
- Land manager / legality: While this is mostly about your pack, remember where you’re going. Know who manages the land – is it US Forest Service, BLM, a National Park, or state land? This impacts rules about fires, camping, and what you can bring. It’s about being a good guest in the wild.
- Access/road conditions: This is crucial for getting to your trailhead. Is the road paved, gravel, or a rough track? Do you need 4WD or high clearance? Don’t get stuck before you even start hiking. A quick check on local conditions or recent trip reports can save you a headache.
- Fire restrictions + weather + wind: Always check current fire restrictions. A campfire ban means no campfires, period. Also, check the weather forecast and wind. A sudden storm can ruin a trip, and strong winds can make hiking miserable or even dangerous.
- Water plan + waste plan (Leave No Trace): How much water do you really need for your trip? Factor in the heat, exertion, and availability of water sources. If you plan to filter or treat water, make sure your system is working. And always, always pack out everything you pack in, including all trash and food scraps. Leave it better than you found it.
- Safety (wildlife, distance to help, comms): Be aware of the local wildlife. Know what to do if you encounter bears, snakes, or other critters. Understand how far you are from the nearest ranger station or town. And check your cell service – or lack thereof. Carry a satellite messenger or let someone know your itinerary if you’ll be out of touch.
Step-by-step (field workflow)
Keeping your hydration reservoir clean is straightforward. It’s about consistency.
1. Empty the reservoir: After your hike, dump any leftover water.
- Good looks like: A completely empty bladder with no sloshing.
- Common mistake: Leaving water in for days. This is how funk starts. Just dump it.
2. Rinse with warm water: Fill the reservoir with warm tap water and swish it around.
- Good looks like: Water visibly clearing any sediment or residue.
- Common mistake: Using cold water. Warm water helps loosen gunk.
3. Add mild soap (optional but recommended): A tiny drop of mild dish soap or a specialized reservoir cleaner works.
- Good looks like: A few gentle suds, not a washing machine explosion.
- Common mistake: Using too much soap. You’ll be rinsing forever.
While mild dish soap works, a specialized reservoir cleaner from a hydration bladder cleaning kit can be more effective at tackling stubborn residues and odors.
4. Swish and scrub: Agitate the soapy water inside the reservoir. Use a reservoir brush if you have one, especially for stubborn spots.
- Good looks like: The brush getting into corners and loosening anything stuck.
- Common mistake: Not using a brush. It’s hard to get the bottom and corners clean without one.
5. Empty the soapy water: Dump it all out.
- Good looks like: No more suds.
- Common mistake: Leaving soap residue behind. This is the worst.
6. Rinse thoroughly: Fill and empty the reservoir with clean water multiple times until absolutely no soap smell or taste remains.
- Good looks like: Crystal clear water with zero suds or soapy scent. This is key.
- Common mistake: Not rinsing enough. You’ll regret that soapy water on your next hike.
7. Clean the hose and bite valve: Run warm water through the hose. If you have a cleaning brush, use it. For the bite valve, gently scrub it with a small brush or cloth.
- Good looks like: Water flows freely, and the valve looks clean.
- Common mistake: Forgetting the hose and valve. They get just as gnarly as the reservoir.
8. Dry completely: This is the most important step for long-term storage. Hang the reservoir upside down. Use a reservoir hanger or a clothes hanger to keep it open. Let the hose hang separately.
- Good looks like: The inside feels totally dry, no damp spots. It might take a day or two.
- Common mistake: Storing it wet. Hello, mold.
9. Store properly: Once dry, store the reservoir loosely rolled or in a cool, dry place.
- Good looks like: A clean, dry reservoir ready for its next adventure.
- Common mistake: Cramming it into a packed bag wet.
Common mistakes (and what happens if you ignore them)
| Mistake | What it causes | Fix |
|---|---|---|
| Not rinsing thoroughly | Lingering soap taste, potential stomach upset | Rinse multiple times until no soap smell or taste remains. |
| Storing the reservoir wet | Mold and mildew growth, bad smell/taste | Dry completely before storing; use a hanger to keep it open. |
| Using harsh chemicals or bleach | Reservoir material damage, unsafe for drinking water | Stick to mild dish soap or specialized reservoir cleaners. |
| Forgetting to clean the hose and bite valve | Mold, bacteria buildup, unpleasant taste | Clean hose and valve with warm water and a small brush after each use. |
| Not using a reservoir brush | Difficulty removing residue, especially at the bottom | Invest in a reservoir cleaning brush kit. |
| Leaving old drinks (sports drinks, etc.) | Sticky residue, difficult to clean, attracts mold | Always empty and rinse after using anything other than water. |
| Skipping cleaning after every use | Gradual buildup of funk, harder to clean later | Make it a habit: clean and dry after every hike. |
| Not inspecting for wear and tear | Leaks, potential failure on the trail | Check for cracks, tears, or worn seals regularly. |
| Overfilling the reservoir | Stress on seams, potential leaks | Fill to the recommended capacity, don’t force it. |
To avoid the common mistake of not using a reservoir brush, invest in a hydration bladder cleaning kit which typically includes all the necessary tools for a comprehensive clean.
Decision rules (simple if/then)
- If you used anything other than plain water in your reservoir, then rinse it immediately because sports drinks and electrolytes leave sticky residue that’s a breeding ground for funk.
- If you see any black spots or fuzzy growth inside your reservoir, then it’s time for a deep clean with a specialized cleaner or a soak in a diluted vinegar solution, because that’s mold and you don’t want to drink that.
- If the bite valve feels stiff or is leaking, then replace it because a faulty bite valve can lead to water loss and frustration on the trail.
- If you’re storing your pack for more than a month, then make sure it’s bone dry and consider storing it with the bladder partially open or with a reservoir hanger, because even a hint of moisture can lead to mold over time.
- If you notice a persistent plastic taste, then try cleaning it with a baking soda paste or a specialized cleaner, because sometimes the material can absorb odors or tastes.
- If you’re going on a multi-day trip, then pack a small bottle of mild dish soap and a reservoir brush, because regular cleaning on the go is better than a deep clean later.
- If your reservoir has a leak, then inspect the seams and the connection points first, because these are common failure areas.
- If you’re unsure about the cleaning product, then err on the side of caution and stick to warm water and mild soap, because you don’t want to damage the material or make it unsafe to drink from.
- If you’re packing out, then make sure your reservoir is empty and dry, because you don’t want to find a soggy mess when you unpack.
- If you’re using a reservoir from a brand other than Camelbak, then check their specific care instructions, because different materials might require slightly different handling.
FAQ
How often should I clean my hydration pack?
Clean it after every use, especially if you used anything other than plain water. A quick rinse and dry is best.
What’s the best way to dry my hydration reservoir?
Hang it upside down so air can circulate. Use a reservoir hanger or a sturdy clothes hanger to keep it open. Let the hose hang separately.
Can I use bleach to clean my hydration pack?
No, avoid bleach. It can damage the material and leave harmful residues. Stick to mild soap or specialized cleaners.
My hydration pack smells weird. What should I do?
This usually means mold or mildew. Try a deep clean with a reservoir cleaning brush and a mild soap solution, or a soak in diluted vinegar. Ensure it dries completely afterward.
If your hydration pack smells weird, a deep clean with a reservoir cleaning brush and specialized cleaner from a hydration bladder cleaning kit can often resolve the issue.
How do I clean the bite valve?
Gently scrub the bite valve with warm water and a small brush or cloth. Ensure no residue remains. You can often disassemble it for better cleaning.
What if my reservoir has a persistent bad taste?
Try a baking soda paste scrub or a specialized reservoir cleaning solution. Sometimes the material can absorb flavors. Thorough rinsing is crucial.
Should I clean the reservoir if I only used it for water?
Yes, it’s still a good idea. Even plain water can leave a slight residue or start to develop a smell if left stagnant. A quick rinse prevents this.
How do I prevent mold in my hydration pack?
The key is complete drying before storage. Never store it wet. Keeping it open and allowing air circulation helps immensely.
What this page does NOT cover (and where to go next)
- Detailed troubleshooting for specific reservoir leaks or valve issues (check manufacturer support).
- Advanced cleaning techniques for very stubborn stains or odors (look for specialized cleaning kits).
- Water purification methods for backcountry use (this is about cleaning your container, not treating water).
- Choosing the right hydration pack for your activity (consider pack size, capacity, and features).
- Repairing damaged reservoir material (sometimes replacement is the only option).
Camping Bob has spent over 20 years camping across the US — from BLM dispersed sites in the Southwest to KOA campgrounds in the Pacific Northwest. He writes practical, no-nonsense guides to help fellow campers get outdoors with confidence.