How to Use Bear Spray Correctly: Technique, Range and Practice
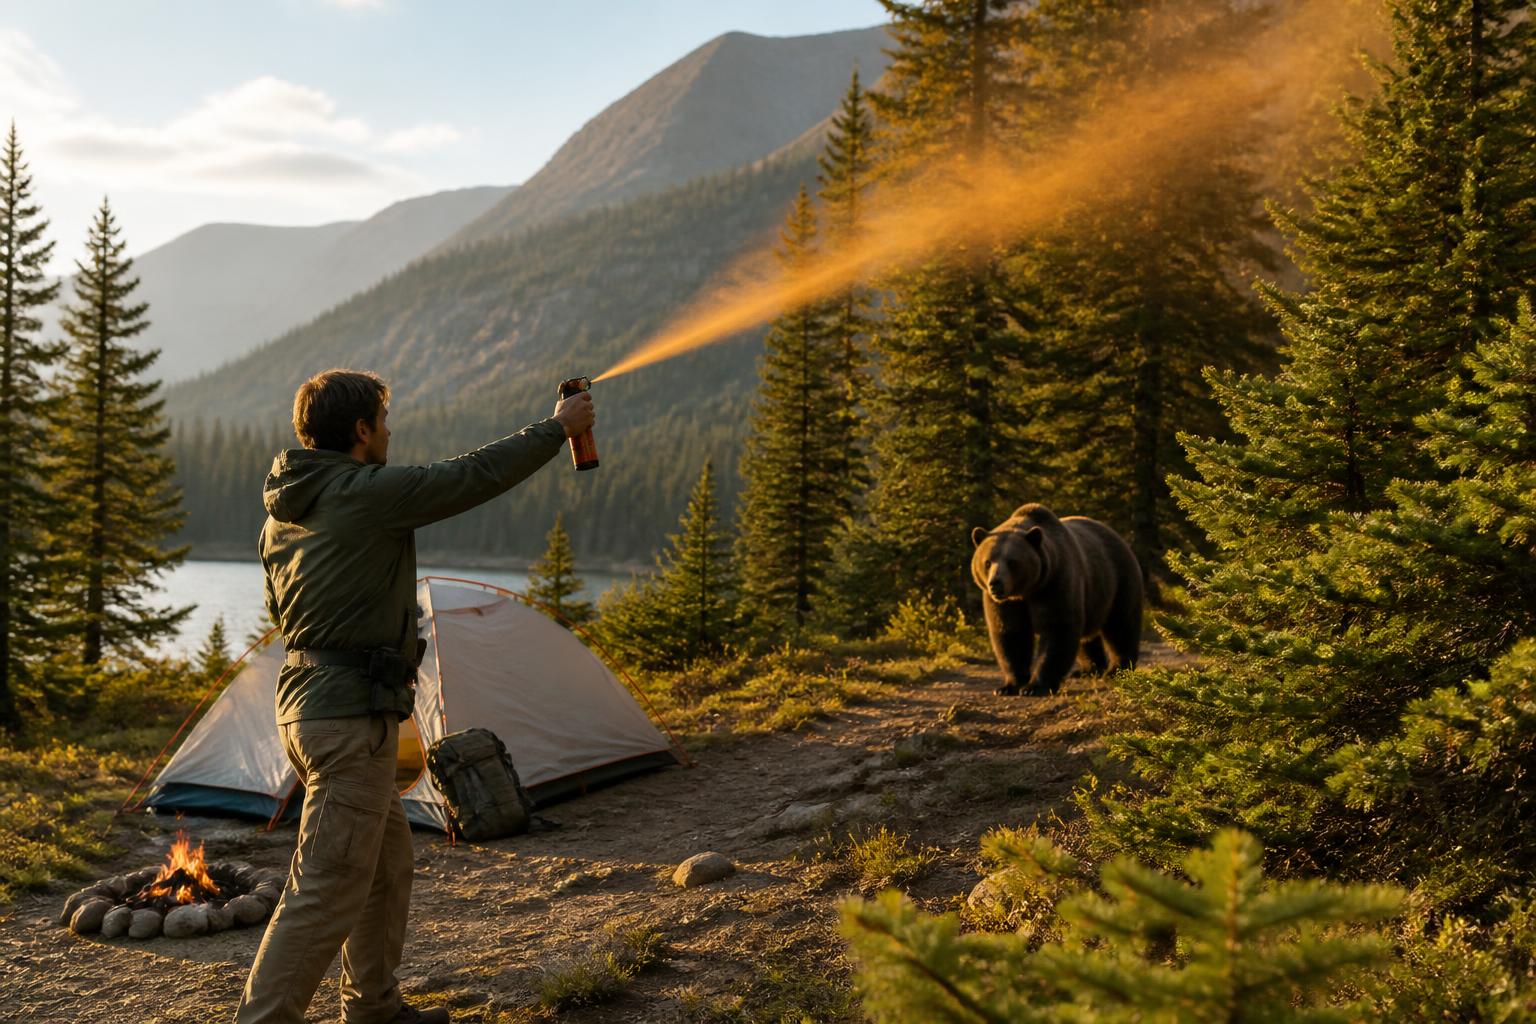
Point the canister at the bear’s face, aim slightly downward so the cloud rises into its eyes and nose, and spray in a sustained 2–3 second burst when the bear is 30–40 feet away. That single decision — where you aim and when you pull the trigger — separates a successful deterrent from a wasted canister. Wind, grip, draw speed, and follow-through all matter, but the core skill is delivering a directed cloud between you and the bear at the right distance.
The Most Common Failure Mode: Aiming Too High
The most predictable bear spray failure is aiming directly at the bear’s eyes. It sounds logical — you want to hit the eyes and nose — but the physics of the spray works against you. Bear spray exits the nozzle as a liquid stream that expands into a fog cloud. That cloud naturally rises as it travels. If you aim at eye level, the cloud lifts above the bear’s face by the time it arrives. The bear inhales mostly air, and you’ve just wasted your primary defensive tool.
How to detect it early: During dry practice drills, tape a small target at the height of a bear’s face on a tree or post. Aim, sweep, and check where your nozzle was pointed when you pressed the imaginary trigger. If your natural instinct is to aim at the “eyes” (top half of the target), you are in the failure group. Correct by aiming at the chest or lower jaw area — about 12–18 inches below where you think you should aim.
The practical fix is to aim low-center of the bear’s face, roughly at the base of the neck or upper chest. The spray will rise naturally as it exits, washing upward into the eyes, nose, and mouth. This low-center aiming point also works if the bear charges with its head down, which is common in bluff charges and real attacks.
Before You Draw: Prep That Saves Seconds
Most bear spray failures happen before the button is pressed — either the canister isn’t ready or the user doesn’t account for wind. Fix these two things first.
Clip removal. The plastic safety clip is the most common fumble. Practice pulling it off with one hand while the canister is still holstered. If you can’t do it in under a second, switch to a holster that lets you remove the clip without looking. The clip should come off as part of your draw motion, not as a separate step after drawing.
Wind check. Even a light 5 mph breeze can blow the spray back into your face. Before you even draw, toss a pinch of dust or dry leaves. If the wind is at your back, you’re in a good position. If it’s in your face, adjust your angle or wait for a gap in the gust. If it’s crossing from the side, aim slightly upwind of the bear’s face so the cloud drifts into its path.
Grip. Hold the canister upright with the nozzle pointed forward. Your dominant hand wraps around the body, thumb on the actuator. Do not tilt the canister up — the spray should exit level and rise naturally. A tilted canister sends the cloud too high or too low.
Checkpoint before you need it: If you can answer “yes” to all three — clip is accessible, you know wind direction, and canister is within easy reach — you are ready for a real encounter.
Step-by-Step Deployment Sequence
Follow this order every time. Do not skip steps.
Step 1: Remove the safety clip while the bear is still 50+ feet away. Do it as you draw, not after. The clip should be off before the bear closes to 40 feet.
Step 2: Aim low-center of the bear’s face. Do not aim at the eyes. The spray will rise as it exits, so the cloud should wash upward into the eyes and nose. Aiming low also helps if the bear is charging with its head down.
Step 3: Spray a sustained 2–3 second burst. Use one continuous sweep left-to-right across the bear’s path. Short puffs create gaps in the cloud. A full burst creates a dense barrier the bear must pass through.
Step 4: Back away while keeping the canister pointed forward. Walk backward slowly — running can trigger chase instinct. Watch the bear; if it pauses or turns, continue backing away. If it keeps coming, you have 4–7 seconds of spray remaining in a standard 8–10 oz canister. Use short half-second bursts to extend defense time.
Checkpoint after the first burst: Pause for one second and look at the bear. If it shows signs of irritation (rubbing face, backing up, turning away), stop spraying and back away. If it keeps advancing, deploy a second sustained burst.
When to Stop Spraying and What to Do If It Fails
Bear spray works in the vast majority of encounters, but no deterrent is 100%. Know the threshold where you stop attacking with spray and start protecting your body.
Stop spraying when:
– The canister is empty (you’ll feel the pressure drop)
– The bear is inside 10 feet and still advancing — spraying directly into its face at close range can still help, but you need to protect your neck and head with your arms immediately
– The bear has made physical contact — protect your vitals, do not keep trying to spray
Escalation signal: If you have used two full bursts (about 5–6 seconds of spray total) and the bear has not stopped or turned, assume the spray has failed. For brown or grizzly bears, play dead: lie face down, legs spread, hands clasped behind your neck. For black bears, fight back using any available object (rocks, sticks, the empty canister). Do not run — you cannot outrun a bear.
One practical note: If wind blew the spray back into your own face, you will feel intense burning. Turn your head away, close your eyes, and back up. The effects wear off in 30–45 minutes. Do not rub your eyes; wipe with water or a wet cloth if available. This is painful but not dangerous.
The Critical Danger Zone: 30–40 Feet
Bear spray is designed to work best at 30–40 feet. Outside that window, effectiveness drops sharply.
| Distance to bear | What to do | Why |
|---|---|---|
| Under 20 ft | Draw, spray immediately, then cover face if bear keeps coming | Too close for full cloud expansion; direct stream still hurts but may not stop charge |
| 20–40 ft | Deploy full 2–3 second burst, aim low-center of face | Ideal range: cloud expands and bear breathes it before reaching you |
| 40–60 ft | Hold ground, remove clip, wait for bear to close to 40 ft | Spraying early wastes product; wind carries it away |
| Over 60 ft | Stand still, speak calmly, slowly back away | Bear may not be aggressive yet; do not waste spray |
One model that clearly shows the 44-foot effective range on its label is the Counter Assault Bear Spray with Holster, which also offers a 10-second spray duration — enough for two full bursts and one short follow-up.
Practice Drills That Build Muscle Memory
You cannot practice with live spray indoors, but dry runs turn the sequence into reflex.
Drill 1: The Draw and Deploy — 10 reps per session. Start with the canister holstered on your hip or chest strap. Say “bear” out loud, then draw, remove clip, extend arm in one motion. Your hand should reach full extension in under 2 seconds. Time yourself. If over 3 seconds, slow down and focus on clip removal.
Drill 2: Aim and Sweep — 5 reps per session. Stand 30 feet from a tree or fence post. Draw and aim at the base of the target (represents bear’s face low-center). Sweep left-to-right in a controlled arc as if deploying a 2-second burst. Check your aiming point — are you too high or too low? This is where you catch the high-aim failure mode.
Drill 3: Wind Check Reflex — 3 reps per session. Before every practice draw, look up and feel wind on your cheek. Say the wind direction out loud: “Wind from left, aim upwind.” Builds the habit before you ever need it.
Drill 4: One-Handed Operation — 3 reps per session. Practice drawing and removing the clip with a gloved hand and bare hand. Your other hand might hold poles, a camera, or a child’s hand. If you can’t operate the canister one-handed, switch the holster to the opposite hip.
Success check: You should be able to draw, remove the clip, and aim in under 3 seconds from a holstered start. If you are slower, practice 10 reps every day for one week.
Quick Readiness Check
Before every hike in bear country, run through this mental list:
- [ ] Canister is accessible and holstered on hip or chest, not buried in backpack
- [ ] No expired canisters — check the manufacture date on the bottom; replace after 4 years
- [ ] Safety clip is intact and can be removed with one hand
- [ ] You have verified wind direction in the past 30 seconds
- [ ] Every member of your group knows where their spray is and how to deploy it
- [ ] Your dry practice (draw, aim, sweep) has been under 3 seconds in the past week
If you answer “no” to any of these, fix it before hitting the trail.
FAQ
How far should a bear be before I spray?
Spray when the bear is 30–40 feet away. If it is already inside 20 feet, spray immediately and prepare to cover your head and neck.
What happens if the wind blows the spray back at me?
You will feel intense burning on your face and in your eyes. It is not dangerous but is extremely painful. Turn your head away, close your eyes, and back up. Effects wear off in 30–45 minutes; wipe with water if available.
Can I use a small pepper spray canister instead?
No. Personal-defense pepper spray (0.5–1 oz, 8–10 foot range) lacks the volume, range, and capsaicin content to stop a bear. Use only EPA-approved bear spray labeled for bears, with at least 7 oz net weight and 30+ foot range.
How long does a single canister last in a multi-burst situation?
A standard 8–10 oz canister provides 6–10 seconds of total spray. A 2-second burst uses about 25–30% of the can. You have roughly 3–4 full bursts before empty.
Is bear spray a guarantee?
No deterrent works 100% of the time. A determined bear, especially one that is food-conditioned or protecting cubs, may still advance through the cloud. Back away while spraying and be ready to play dead for brown/grizzly bears or fight back for black bears if contact occurs.
Camping Bob has spent over 20 years camping across the US — from BLM dispersed sites in the Southwest to KOA campgrounds in the Pacific Northwest. He writes practical, no-nonsense guides to help fellow campers get outdoors with confidence.