
Find and Repair Leaks in Your Air Mattress
Quick answer
- Listen for hissing air.
- Submerge the inflated mattress in water.
- Follow the bubbles to the leak.
- Clean the area thoroughly.
- Use a patch kit for repairs.
- Test the repair before sleeping on it.
- Consider a spare mattress for longer trips.
What to check first (do this before you drive out)
Before you even think about packing the car, give your air mattress a once-over. A deflated bed in the middle of nowhere is a fast track to a rough night.
- Land manager / legality: Know who owns the land you’re camping on. Is it National Forest, BLM, State Park, or private? This impacts rules, especially fire bans and where you can legally camp. A quick check on their official website is usually all it takes.
- Access/road conditions: Can your rig actually get there? Some campsites are car-top only, others need 4WD and high clearance. Don’t get stuck on a logging road you can’t turn around on. Check recent reports if you can.
- Fire restrictions + weather + wind: This is non-negotiable. Fire bans are common, and ignoring them can have serious consequences. Check the forecast for rain, extreme heat, or high winds. Wind can ruin a campsite fast.
- Water plan + waste plan (Leave No Trace): Where are you getting water? Is it potable, or do you need to filter/treat it? What’s your plan for human waste? Pack it out or dig a cathole properly. LNT is the golden rule out there.
- Safety (wildlife, distance to help, comms): Know what critters are in the area and how to store food. How far is the nearest ranger station or town? Do you have cell service, or do you need a satellite device? Be realistic about your situation.
Step-by-step (field workflow)
Okay, so you’ve got a slow leak. Don’t panic. It happens to the best of us. Here’s how to track it down and patch it up so you can get some sleep.
1. Inflate the mattress: Pump it up good and firm. Not so much you’re about to pop it, but definitely taut.
- Good looks like: The mattress is fully shaped and feels solid.
- Common mistake: Not inflating it enough. A soft mattress makes leaks incredibly hard to find. Over-inflate slightly if you’re struggling to hear it.
To make inflation quick and effortless, consider using a reliable electric air pump. This will ensure your mattress is firm enough to easily detect leaks.
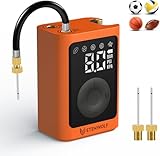
2. Listen closely: Get your ear right up to the mattress surface. Move it around. Listen for any faint hissing sounds.
- Good looks like: You can hear a distinct, albeit quiet, hiss of escaping air.
- Common mistake: Giving up too soon. Small leaks can be sneaky. Be patient and methodical.
3. Feel for the air: Run your hand slowly over the entire surface of the mattress. You might feel a subtle stream of escaping air.
- Good looks like: You feel a cool puff of air against your skin.
- Common mistake: Pressing too hard. You can miss a small leak if you’re applying too much pressure. Light, sweeping motions are best.
4. The soap-and-water test: If you have a spray bottle and a bit of dish soap, mix it with water and spray it all over the mattress.
- Good looks like: Bubbles form and grow at the site of the leak.
- Common mistake: Using too much soap. A light, even coating is all you need. Too much soap can make it hard to see the small bubbles.
5. Submerge (if possible): If you’re near a body of calm water (lake, slow river, even a large tub), submerge sections of the inflated mattress.
- Good looks like: You see a trail of bubbles rising from the leak.
- Common mistake: Using fast-moving or dirty water. It’s hard to spot small bubbles in choppy water or murky depths. Find a still spot.
6. Mark the spot: Once you find the leak, mark it clearly. Use a piece of tape, a marker, or even just a finger to keep track.
- Good looks like: The mark is directly over the hole or tear.
- Common mistake: Losing track of the spot. The mattress might shift, or you might get distracted. Mark it immediately.
7. Clean and dry the area: Thoroughly clean the area around the leak with soap and water, then dry it completely.
- Good looks like: The patch area is spotless and bone dry.
- Common mistake: Patching over dirt or moisture. The adhesive won’t stick properly, and the repair will fail.
8. Prepare the patch: Follow the instructions on your air mattress repair kit. This usually involves cutting a patch to size.
- Good looks like: The patch is large enough to cover the leak with a good margin.
- Common mistake: Making the patch too small. It needs good surface area to adhere securely.
For a quick and effective fix, a good set of self-adhesive repair patches is indispensable. Make sure you have some on hand before your next trip.

9. Apply the patch: Carefully apply the patch and adhesive according to the kit’s directions. Press down firmly.
- Good looks like: The patch is smooth, with no air bubbles underneath, and firmly adhered.
- Common mistake: Not pressing hard enough or for long enough. Give it time to bond.
10. Let it cure: Allow the patch to cure for the time recommended by the repair kit. This is crucial.
- Good looks like: The patch feels solid and integrated with the mattress material.
- Common mistake: Not waiting. Trying to inflate or use the mattress too soon will break the bond. Patience, grasshopper.
11. Re-inflate and test: Inflate the mattress again, this time to a normal sleeping pressure. Listen and look for any new leaks.
- Good looks like: The mattress holds its pressure overnight.
- Common mistake: Assuming the repair worked without testing. Always verify.
12. Pack it out: If you used tape or a marker, remove it. Leave your campsite cleaner than you found it.
- Good looks like: No trace of your repair or presence.
- Common mistake: Leaving repair materials behind. That’s just littering.
Common mistakes (and what happens if you ignore them)
| Mistake | What it causes | Fix |
|---|---|---|
| Not inflating the mattress enough | Leaks are nearly impossible to find | Inflate it firmly, even slightly over-inflated for leak detection. |
| Rushing the soap/water test | You might miss the tiny bubbles | Be patient, use a good light, and move slowly over the surface. |
| Patching a wet or dirty surface | The patch will peel off, leak returns | Clean and dry the area thoroughly before applying the patch. |
| Using a patch that’s too small | Not enough surface area for a good seal | Cut the patch larger than the damaged area. |
| Not letting the patch cure properly | The patch will fail under pressure | Follow the repair kit’s curing time instructions exactly. |
| Sleeping on a mattress with a known leak | Waking up on the cold, hard ground | Fix it properly or use a backup sleeping pad. |
| Forgetting to test the repair | Discovering the leak again at bedtime | Inflate and let it sit for a few hours before relying on it. |
| Not bringing a repair kit | A leaky mattress means a bad night’s sleep | Always pack a patch kit for your air mattress. |
| Using the wrong type of adhesive | The patch won’t bond or will degrade | Use only the adhesive recommended for your specific mattress type. |
| Over-inflating the mattress | Can stress seams and make existing leaks worse | Inflate to a firm but comfortable level. |
Decision rules (simple if/then)
- If you hear a hiss, then you have a leak because air is escaping.
- If you see bubbles forming, then you’ve found the leak because the soap highlights the escaping air.
- If you can’t find the leak after a few minutes, then try the soap and water test because it makes small leaks visible.
- If the leak is small and clean, then a patch kit should work because they are designed for minor punctures.
- If the mattress has a large tear or multiple leaks, then consider replacing it because extensive damage may be beyond simple repair.
- If you are in a remote area with no repair supplies, then try to isolate the leak by letting some air out and re-inflating until it’s just barely firm, then search again.
- If you are using a pump that requires manual effort, then be sure to inflate it fully to make leaks easier to detect.
- If you are camping in cold weather, then a leaky mattress is even worse because the ground will suck your heat away faster.
- If you are unsure about the repair, then let it sit inflated overnight before sleeping on it because this is the ultimate test.
- If the mattress is old and has multiple small leaks, then it might be time for a new one because constant repairs can be frustrating.
- If you are camping with kids, then a reliable mattress is even more important because a miserable kid is a miserable trip.
- If you are on a long trip, then bring a spare mattress or a good quality sleeping pad because a failed mattress can ruin your trip.
FAQ
How long does an air mattress patch usually last?
A well-applied patch from a quality kit can last for months or even years, holding air reliably. The lifespan depends on the patch material, the mattress material, and how much stress it’s under.
Can I use duct tape to fix an air mattress?
Duct tape is a temporary fix at best. It might hold for a night, but it’s unlikely to create a permanent, airtight seal and can leave sticky residue. Use a proper repair kit for a lasting solution.
While duct tape offers a temporary fix, for a lasting and reliable repair, always opt for dedicated self-adhesive repair patches designed for air mattresses.
What’s the best way to find tiny pinhole leaks?
The soap and water spray method is usually the most effective for pinholes. You can also try the submerged method in still water, but sometimes even that is tricky. Patience is key.
My mattress lost air overnight, but I can’t find a leak. What gives?
This often means the leak is very small, or it’s near a seam or valve. Temperature changes can also cause some air loss. Try inflating it again and letting it sit for a longer period, or try the soap test again.
Should I repair my air mattress or buy a new one?
If it’s a small puncture or tear, repair it. If the mattress is old, has multiple large leaks, or the material is degrading, it’s probably time to invest in a new one.
Is it safe to use a patched air mattress for sleeping?
Yes, if the patch is applied correctly and has cured fully, it should be perfectly safe and hold air just like the rest of the mattress. Always test it first.
What if my air mattress has a leak near the valve?
Leaks near the valve can be tricky. Make sure the valve is screwed in tightly. If the leak is in the valve itself or the surrounding material, it might require a special repair kit or replacement of the valve, which can be difficult.
Can I use super glue to fix a leak?
Super glue is generally not recommended. It can make the material brittle, and it might not create a flexible, airtight seal needed for an air mattress. Stick to flexible adhesives designed for vinyl or PVC.
What this page does NOT cover (and where to go next)
- Specific repair kit brand recommendations. (Next: Read reviews for patch kits.)
- Detailed instructions for repairing electric pumps. (Next: Consult your pump’s manual or manufacturer.)
- Advanced seam repair techniques. (Next: Search for specialized repair guides for seam failures.)
- Choosing the right air mattress for camping. (Next: Research different types of camping pads and mattresses.)
- In-depth troubleshooting for manufacturing defects. (Next: Contact the mattress manufacturer’s customer support.)

Camping Bob has spent over 20 years camping across the US — from BLM dispersed sites in the Southwest to KOA campgrounds in the Pacific Northwest. He writes practical, no-nonsense guides to help fellow campers get outdoors with confidence.