
Clean Your Camelbak Tube Thoroughly
Quick answer
- Use a long bottle brush or specialized cleaning kit.
- Rinse thoroughly with warm water after cleaning.
- For stubborn gunk, try a baking soda and water paste.
- Air dry completely before storing.
- Regular cleaning prevents mold and funky tastes.
- Don’t forget to clean the bite valve.
What to check first (do this before you drive out)
Before you hit the trail, or even start packing for your next trip, give your hydration system a once-over. A clean bladder and tube mean better-tasting water and a healthier you.
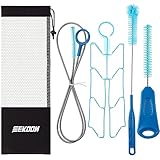
To ensure your hydration system is always in top condition, consider investing in a dedicated hydration bladder cleaning kit. These kits often include brushes and drying tools specifically designed for thorough cleaning.
- Land manager / legality: While this is about cleaning gear, it’s a good reminder that where you use your gear matters. Know the rules for the area you’re heading to, especially regarding water sources and waste disposal. Some backcountry areas have strict rules about what you can bring in and take out.
- Access/road conditions: This is less about the tube itself, and more about getting to where you’ll use it. Is the road to your trailhead rough? Do you need 4WD? A quick check of local reports or park websites can save you a headache.
- Fire restrictions + weather + wind: If you’re camping, these are critical. Always check current fire bans before planning campfires. Weather can change fast in the mountains, so pack layers and know the forecast. Strong winds can make cooking and setting up camp tricky.
- Water plan + waste plan (Leave No Trace): How will you refill your bladder? Are you treating water from natural sources? Pack the right filters or purification tablets. And remember, pack it in, pack it out. That includes all your trash, even tiny bits of food wrappers.
- Safety (wildlife, distance to help, comms): Know what critters are in the area. Store food properly. Understand how far you are from emergency services and what your cell signal will be like. A satellite messenger is a good backup for remote trips.
Step-by-step (field workflow)
Cleaning your Camelbak tube is straightforward, but doing it right makes all the difference. Here’s how to tackle it.
1. Empty the bladder and disconnect the tube.
- What “good” looks like: You’ve got a completely empty bladder and the tube is detached, ready for cleaning.
- Common mistake: Leaving some water in the bladder. This can lead to stagnant water and mold growth. Always drain it completely.
2. Rinse the tube with warm water.
- What “good” looks like: Water flows freely through the tube, flushing out loose debris.
- Common mistake: Using hot water. It can damage some bladder materials. Stick to warm or cool.
3. Insert a cleaning brush or kit.
- What “good” looks like: The brush (or flexible cleaning tool) easily navigates the entire length of the tube.
- Common mistake: Forcing a brush that’s too wide. You could damage the tube or get it stuck. Use a brush specifically designed for hydration tubes.
For the most effective cleaning, we recommend using a specialized hydration bladder cleaning kit. These kits typically come with brushes perfectly sized to navigate the entire length of your tube without causing damage.
4. Scrub the inside of the tube.
- What “good” looks like: You feel resistance as the brush cleans the inner walls, removing any slime or buildup.
- Common mistake: Not scrubbing long enough or vigorously enough. You need to actually dislodge the gunk.
5. Rinse again with warm water.
- What “good” looks like: All soap residue (if you used any) and loosened debris are washed away.
- Common mistake: Not rinsing thoroughly. Leftover soap can make your water taste bad.
6. Clean the bite valve.
- What “good” looks like: The bite valve is free of any visible grime and the mechanism moves freely.
- Common mistake: Neglecting the bite valve. It’s a prime spot for mold and bacteria. Gently pull it apart if possible and clean all parts.
7. Dry the tube and valve.
- What “good” looks like: The tube is hanging upside down or laid out so air can circulate freely, and the valve is open.
- Common mistake: Storing it wet. This is the fastest way to grow mold. Let it air dry completely.
8. Clean the bladder.
- What “good” looks like: The bladder is rinsed out, and if needed, scrubbed with a suitable brush or cleaning solution.
- Common mistake: Not cleaning the bladder itself. The tube is only part of the system.
9. Air dry the bladder thoroughly.
- What “good” looks like: The bladder is open, ideally hung from its opening, allowing air to reach all interior surfaces.
- Common mistake: Stuffing it back in your pack while still damp. Again, moisture equals mold.
10. Reassemble and store.
- What “good” looks like: Everything is clean, dry, and reconnected, ready for your next adventure.
- Common mistake: Storing the bladder full or the tube kinked. This can lead to smells and damage.
Common mistakes (and what happens if you ignore them)
| Mistake | What it causes | Fix |
|---|---|---|
| Not cleaning the tube regularly | Mold, mildew, and bacteria growth; funky-tasting water | Use a cleaning brush or kit after every few uses, or at least monthly. |
| Using hot water to clean | Can degrade or warp bladder and tube materials | Always use warm or cool water. |
| Forcing a brush that’s too large | Damaging the tube interior or getting the brush stuck | Use brushes specifically designed for hydration tubes; test flexibility first. |
| Not rinsing thoroughly | Soap residue, which imparts a bad taste to your water | Rinse multiple times until you’re sure all cleaning agents are gone. |
| Leaving the bladder or tube damp | Mold and mildew, creating a persistent musty smell and taste | Ensure everything is completely air-dried before storage. Hang components to maximize airflow. |
| Storing the bladder full or compressed | Can lead to mold growth and permanently deform the bladder | Store empty and slightly open, or fully dry and loosely coiled. |
| Neglecting the bite valve | Bacteria and mold buildup, leading to illness and bad taste | Clean the bite valve carefully; disassemble if possible and scrub all parts. |
| Using harsh chemicals (bleach, etc.) | Can damage materials and leave unsafe residues | Stick to mild soap, baking soda, or specialized hydration cleaning solutions. |
| Not cleaning the bladder itself | Stagnant water and mold within the main reservoir | Clean the bladder with the same care as the tube, using appropriate brushes and solutions. |
| Not drying the tube completely before use | Water sitting in the tube can develop a stale taste or start to grow funk | Always give it a final quick rinse and shake-out before filling for a trip. |
To avoid common mistakes like not cleaning regularly or using the wrong tools, a good hydration bladder cleaning kit is invaluable. It provides everything you need for a proper, damage-free clean.
Decision rules (simple if/then)
- If you notice a persistent bad taste, then clean the entire system thoroughly because old residue is likely the culprit.
- If you’ve used the hydration system for more than a week of heavy use without cleaning, then perform a deep clean because buildup is probable.
- If you see any black or colored spots inside the tube or bladder, then clean it immediately because that’s mold.
- If you’re storing the hydration system for more than a month, then ensure it’s bone dry before putting it away because moisture is mold’s best friend.
- If you’re refilling from a natural water source, then always use a filter or purification method, regardless of how clean the water looks, because unseen contaminants are a real risk.
- If the tube feels sticky or slimy, then it’s time for a good scrub because that’s the early stage of gunk buildup.
- If you’re unsure about the cleaning solution, then stick to warm water and a bit of baking soda because it’s safe and effective for most situations.
- If you’re about to drink and the water tastes off, then don’t drink it and clean the system before your next outing because it’s not worth the risk.
- If you’re in a pinch and need to clean it quickly, then run hot water through it and give it a good shake, but plan a proper clean later because a quick rinse isn’t a substitute for a real cleaning.
- If the bite valve is difficult to open or feels stiff, then it likely needs a good cleaning or might be time for a replacement because it’s a critical component.
FAQ
How often should I clean my Camelbak tube?
For regular use, aim for a rinse after every few uses and a more thorough clean every month. If you’re using it daily on a trip, clean it more often.
For consistent and effective cleaning, especially for regular users, a dedicated hydration bladder cleaning kit makes the process much easier and more thorough. It helps maintain hygiene and prolong the life of your gear.
What’s the best way to dry the tube and bladder?
The best method is air drying. Hang the bladder by its opening and lay the tube out or hang it so air can circulate freely through both.
Can I use dish soap to clean it?
Yes, a mild dish soap is generally safe for cleaning your hydration system. Just be sure to rinse it out very thoroughly to avoid any soapy taste.
What if I have really stubborn gunk?
Try a paste of baking soda and water. Let it sit in the tube or bladder for a bit, then scrub and rinse well. Specialized cleaning tablets are also an option.
Does cleaning prevent mold?
Absolutely. Regular cleaning and, most importantly, thorough drying are the best defenses against mold and mildew.
What happens if I don’t clean it?
You’ll end up with unpleasant tastes and smells, and potentially harmful bacteria or mold growing in your water supply.
Can I put my Camelbak bladder in the dishwasher?
Some manufacturers say yes, but it’s often best to hand wash. High heat can warp or damage the material over time. Always check your specific model’s care instructions.
My water tastes like plastic. What gives?
New bladders can sometimes have a slight plastic taste. Cleaning it thoroughly and using it a few times usually resolves this. Some people also recommend filling it with a bit of water and a few drops of lemon juice or a tea bag for a day.
What this page does NOT cover (and where to go next)
- Specific repair instructions for leaks or damaged components. (Check manufacturer support for this.)
- Detailed recommendations for water filtration and purification methods. (Research water treatment options for backcountry travel.)
- Advanced cleaning techniques for extreme contamination. (Consult specialized outdoor gear cleaning guides.)
- Choosing the right hydration pack for your needs. (Explore reviews and guides on pack selection.)
- Packing your hydration system for different types of trips. (Look for trip-specific packing checklists.)

Camping Bob has spent over 20 years camping across the US — from BLM dispersed sites in the Southwest to KOA campgrounds in the Pacific Northwest. He writes practical, no-nonsense guides to help fellow campers get outdoors with confidence.