
Brewing Coffee with a Camp Percolator
Quick answer
- Grab a sturdy camp percolator. Stainless steel or enamel is good.
- Use coarse-ground coffee. Too fine and it’ll clog.
- Water to coffee ratio is key. Aim for about 1:15.
- Heat it steady, not a rolling boil. Gentle simmer is the sweet spot.
- Watch for the coffee to start bubbling up. That’s your cue.
- Let it perk for 7-10 minutes. Taste it.
- Pour carefully and enjoy that campfire brew.
What to check first (do this before you drive out)
Before you even think about grinding beans, there are a few things to get straight. This isn’t just about good coffee; it’s about being prepared.
- Land manager / legality: Who’s in charge of the land where you’re camping? Is it National Forest, BLM, a State Park, or private? Each has its own set of rules, especially regarding campfires and dispersed camping. A quick check on their official website or a call to a ranger station can save you a headache.
- Access/road conditions: Can your rig actually get there? Some forest service roads are rough. Think about your vehicle’s clearance and whether you need 4WD. Mud, snow, or washouts can turn a quick trip into a tow truck call. Always check recent conditions if possible.
- Fire restrictions + weather + wind: This is huge. Fire bans mean no campfire coffee, period. Check the current restrictions for your specific area. Also, look at the forecast. High winds can make campfires dangerous and affect how evenly your percolator heats. A sudden storm can ruin your morning, and your coffee.
If fire restrictions are in place, a reliable portable camping stove like this one can be a lifesaver for brewing your morning coffee.
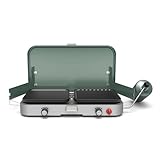
- Water plan + waste plan (Leave No Trace): Where are you getting your water? If it’s from a stream, you’ll need to filter or treat it. And what about cleaning your percolator? Pack out all grounds and any used filters. Leave No Trace principles apply to your coffee-making too.
- Safety (wildlife, distance to help, comms): Keep food secured from critters. Know how far the nearest ranger station or town is. Cell service is often spotty out there, so let someone know your plans. A little awareness goes a long way.
Step-by-step (field workflow)
Alright, you’ve got the basics covered. Now let’s get that coffee brewing.
1. Gather your gear: You’ll need your percolator, coffee, water, a heat source (campfire, stove), and a mug.
- Good looks like: Everything is within easy reach and you’re not scrambling.
- Common mistake: Forgetting the coffee or the mug. Happens to the best of us. Lay it all out before you start.
For a consistent heat source, consider bringing a portable camping stove; it offers more control than an open fire.
2. Add water to the percolator: Fill it to just below the spout. Don’t overfill.
- Good looks like: The water level is clearly visible and you know how much you’ve added.
- Common mistake: Filling it to the brim. This can lead to overflow when it heats up.
3. Insert the coffee basket: Place the basket inside the percolator, making sure it sits correctly.
- Good looks like: The basket is seated securely and the center tube is clear.
- Common mistake: Not putting the basket in, or putting it in crooked. This means coffee grounds will go everywhere.
4. Add coffee grounds: Use coarse-ground coffee. Fill the basket, but don’t pack it down.
- Good looks like: The grounds are evenly distributed in the basket.
- Common mistake: Using fine grounds. This will clog the basket and make your coffee taste sludgy. Trust me on this.
5. Assemble the percolator: Put the lid on, making sure the glass knob (if it has one) is secure.
- Good looks like: A solid, sealed unit ready for heat.
- Common mistake: Leaving the lid loose. It can rattle and let heat escape.
6. Place on heat source: Put the percolator on your campfire coals or stove.
- Good looks like: It’s stable and centered. Heat is applied evenly.
- Common mistake: Placing it directly in roaring flames. This can scorch the coffee and damage the pot. Gentle, steady heat is best.
Whether you’re using campfire coals or a portable camping stove, ensure your percolator is stable and centered for even heating.
7. Watch for the “perking”: You’ll start to hear a gurgling sound, and coffee will begin to bubble up through the spout or glass knob.
- Good looks like: A gentle, rhythmic bubbling.
- Common mistake: Waiting too long to reduce heat. This leads to over-extraction and bitter coffee.
8. Reduce heat and time: Once it starts perking, reduce the heat to maintain a steady simmer. Let it brew for 7-10 minutes.
- Good looks like: A consistent, gentle bubble. You’re not getting a violent boil.
- Common mistake: Letting it boil vigorously. This can make the coffee bitter and wash out flavor.
9. Test a small amount: Carefully lift the lid and tilt to check the color. Or, if it has a glass knob, watch the color through it.
- Good looks like: A rich, dark brown color.
- Common mistake: Not checking. You might end up with weak coffee or burnt coffee.
10. Remove from heat: Once it’s the color you like, take it off the heat. Let it sit for a minute or two.
- Good looks like: It’s cooling slightly, allowing the grounds to settle.
- Common mistake: Pouring immediately. Giving it a short rest helps the grounds settle to the bottom.
11. Pour and enjoy: Carefully pour the coffee into your mug, holding the lid slightly ajar to avoid grounds coming out.
- Good looks like: A clean pour into your mug.
- Common mistake: Pouring too fast or too aggressively. This can stir up the grounds.
Common mistakes (and what happens if you ignore them)
| Mistake | What it causes | Fix |
|---|---|---|
| Using fine coffee grounds | Sludgy coffee, clogged basket, weak flavor | Use coarse-ground coffee specifically for percolators or French press. |
| Overfilling with water | Spills, messes, potential burns | Fill water to just below the spout. |
| Packing coffee grounds down | Restricts water flow, uneven extraction | Fill the basket loosely. |
| Letting it boil vigorously | Bitter, burnt taste, potential damage to pot | Reduce heat to a gentle simmer once it starts perking. |
| Not letting it rest after brewing | Grounds in your cup, muddy coffee | Let it sit for 1-2 minutes off the heat before pouring. |
| Using a dirty percolator | Off-flavors, metallic taste | Clean thoroughly after each use. |
| Placing directly in high flames | Scorched coffee, damaged pot exterior | Use moderate heat, coals, or a stove. Avoid direct, intense flames. |
| Not checking fire restrictions | Illegal campfire, fines, potential wildfire | Always verify current fire restrictions with the land manager before heading out. |
| Not securing the lid | Heat loss, potential spills, rattling noise | Ensure the lid is snug and secure. |
| Using tap water with strong minerals | Off-flavors, can affect coffee taste | Use filtered or good-tasting water. |
| Forgetting to pack out coffee grounds | Littering, disrespecting Leave No Trace principles | Pack out all coffee grounds and used filters. |
Decision rules (simple if/then)
- If the fire danger is high, then do not plan on a campfire for coffee, because fire restrictions are absolute.
- If you have a 2WD vehicle, then check road conditions thoroughly before attempting rough terrain, because you don’t want to get stuck.
- If the forecast calls for high winds, then consider a camp stove instead of a campfire, because wind can make campfires difficult and dangerous.
- If you are using water from a natural source, then always treat or filter it, because drinking untreated water can make you sick.
- If your coffee tastes bitter, then you likely over-perked it, so reduce the simmering time next time.
- If your coffee tastes weak, then you might need more grounds or a slightly longer brew time, but be careful not to over-perk.
- If you are in bear country, then store your coffee grounds securely with your food, because animals are attracted to the smell.
- If you are unsure about the land regulations, then err on the side of caution and check the official land manager’s website or call them, because ignorance is not a defense.
- If you are camping in a designated campground, then be mindful of your neighbors and keep noise to a minimum during early morning coffee brewing.
- If your percolator has a glass knob, then watch it closely for the coffee color, because it’s a great visual cue.
- If you are running low on water, then plan your coffee brewing accordingly, because you don’t want to waste precious water.
FAQ
Q: What kind of coffee grounds should I use?
A: You need coarse-ground coffee. Think the consistency of sea salt. Fine grounds will go right through the basket and make your coffee muddy.
Q: How much coffee do I use?
A: A good starting point is a 1:15 ratio of coffee to water by weight. For a standard 6-cup percolator (about 3 cups of water), that’s roughly 3-4 tablespoons of coffee. Adjust to your taste.
Q: How long does it take to brew?
A: Once it starts perking, let it simmer for about 7-10 minutes. The total time from putting it on the heat to pouring can be around 15-20 minutes, depending on your heat source.
Q: Can I use my percolator on a camp stove?
A: Absolutely. A camp stove offers more controlled heat than a campfire, which can actually make for a more consistent brew. Just use medium heat.
Absolutely, using a portable camping stove can provide more controlled heat, leading to a more consistent and delicious brew.
Q: My coffee tastes burnt. What did I do wrong?
A: You likely let it boil too hard for too long. Once it starts perking, reduce the heat to a gentle simmer. The goal is to heat, not boil.
Q: How do I clean my percolator in the field?
A: Empty the grounds into your trash bag. Rinse with water, and if it’s really dirty, use a little biodegradable soap and a scrub brush. Make sure to rinse thoroughly.
Q: What if I don’t have a percolator?
A: You can still make great coffee! A French press is a popular camping option, or you can use a pour-over cone with filters. Or, just go instant and call it a day!
Q: Can I leave the coffee on the heat all morning?
A: No, don’t do that. Letting it sit on the heat will continue to extract from the grounds, making it increasingly bitter and unpleasant. Brew it, then remove it from the heat.
What this page does NOT cover (and where to go next)
- Specific campsite reservations or fees.
- Detailed navigation or GPS coordinates for remote locations.
- In-depth wildlife identification and avoidance strategies.
- Advanced campfire building techniques.
- The history of coffee cultivation.

Camping Bob has spent over 20 years camping across the US — from BLM dispersed sites in the Southwest to KOA campgrounds in the Pacific Northwest. He writes practical, no-nonsense guides to help fellow campers get outdoors with confidence.