Campfire Safety: Rules, Fire Restrictions & How to Extinguish Properly
The most important campfire safety rule is simple: never leave a fire unattended, and make sure it’s completely out before you leave. But even careful campers miss a critical step—a fire isn’t truly out until the ashes are cold to the touch. Embers can smolder for hours, then reignite when wind kicks up. This guide covers the safety rules that actually matter, how to check for fire restrictions where you’re camping, and the step-by-step method to extinguish a fire completely.
Essential Campfire Safety Rules
Follow these rules every time you light a fire. They apply whether you’re in a backyard fire pit or a national forest.
- Pick the right spot. Clear all leaves, grass, and debris within a 10‑foot radius of the fire ring. Keep the fire at least 15 feet from tents, trees, and any flammable structures. Never build a fire directly on bare ground unless a designated ring or pit is provided.
- Keep water and a shovel nearby. Have a bucket of water, a hose, or a dirt source within arm’s reach before you strike a match. A PLACHIDAY Digging Shovel works for both digging the pit and stirring ashes later.
- Use a long‑reach lighter. Keep your hands and face away from the flames. A Flame bird 2 Pack Flexible Multi-Purpose Lighter gives you a safe distance and works in wind.
- Never use accelerants. Gasoline, lighter fluid, or kerosene can cause explosive flare‑ups. Use a Fiber Light Fire Starter Kit instead—it ignites damp wood reliably without accelerants.
- Keep the fire small. A knee‑high flame is plenty for cooking and warmth. Large fires are harder to control and harder to extinguish completely.
- Never leave it unattended. Even a small breeze can spread embers. If you step away for any reason, someone responsible stays at the fire.
Public vs. Private Land Rules
On private land, you usually need a fire ring or pit at least 10 feet from structures. Check local ordinances—some counties require a permit for any outdoor burning.
On public land (national forests, BLM, state parks), fire restrictions vary by season and drought level. Always check the agency’s website or call the ranger station before you go.
Fire Restrictions: When Campfires Are Banned or Limited
Fire restrictions are issued based on drought conditions, wind, and fire danger. They fall into three levels:
- Stage 1: Restricted. Campfires are allowed only in designated fire rings or grills at developed campsites. Wood fires may be allowed; charcoal grills are usually okay. No smoking outside of vehicles or buildings.
- Stage 2: Banned. No campfires, charcoal grills, or even portable gas stoves without a shut‑off valve. Only liquid‑fuel or propane stoves with an on/off switch are permitted. This is common during high fire‑danger periods.
- Total fire ban. Everything with a flame is prohibited, including candles and tiki torches. Even gas stoves may be restricted. These are rare and usually issued during extreme drought.
How to check: Visit the agency’s website (U.S. Forest Service, National Park Service, state parks) or call the local ranger station. Do not rely on a general weather app—restrictions change daily.
Step-by-Step: How to Properly Extinguish a Campfire
Most people think adding water until the smoke stops is enough. It isn’t. Here’s the operator flow that actually works.
Preparation
Before you start the fire, have a shovel, a bucket of water, and a container of dirt or sand within reach. Make sure the fire is small enough to extinguish quickly—don’t let it burn for hours unchecked.
Early Checkpoints
Check the wind. If wind is picking up, extinguish before leaving. Even a 10 mph gust can send embers into dry grass.
Check for dry conditions. If the ground around your fire ring is dusty or crisp, the fire poses higher risk. Extinguish fully before walking away.
Ordered Steps to Put It Out
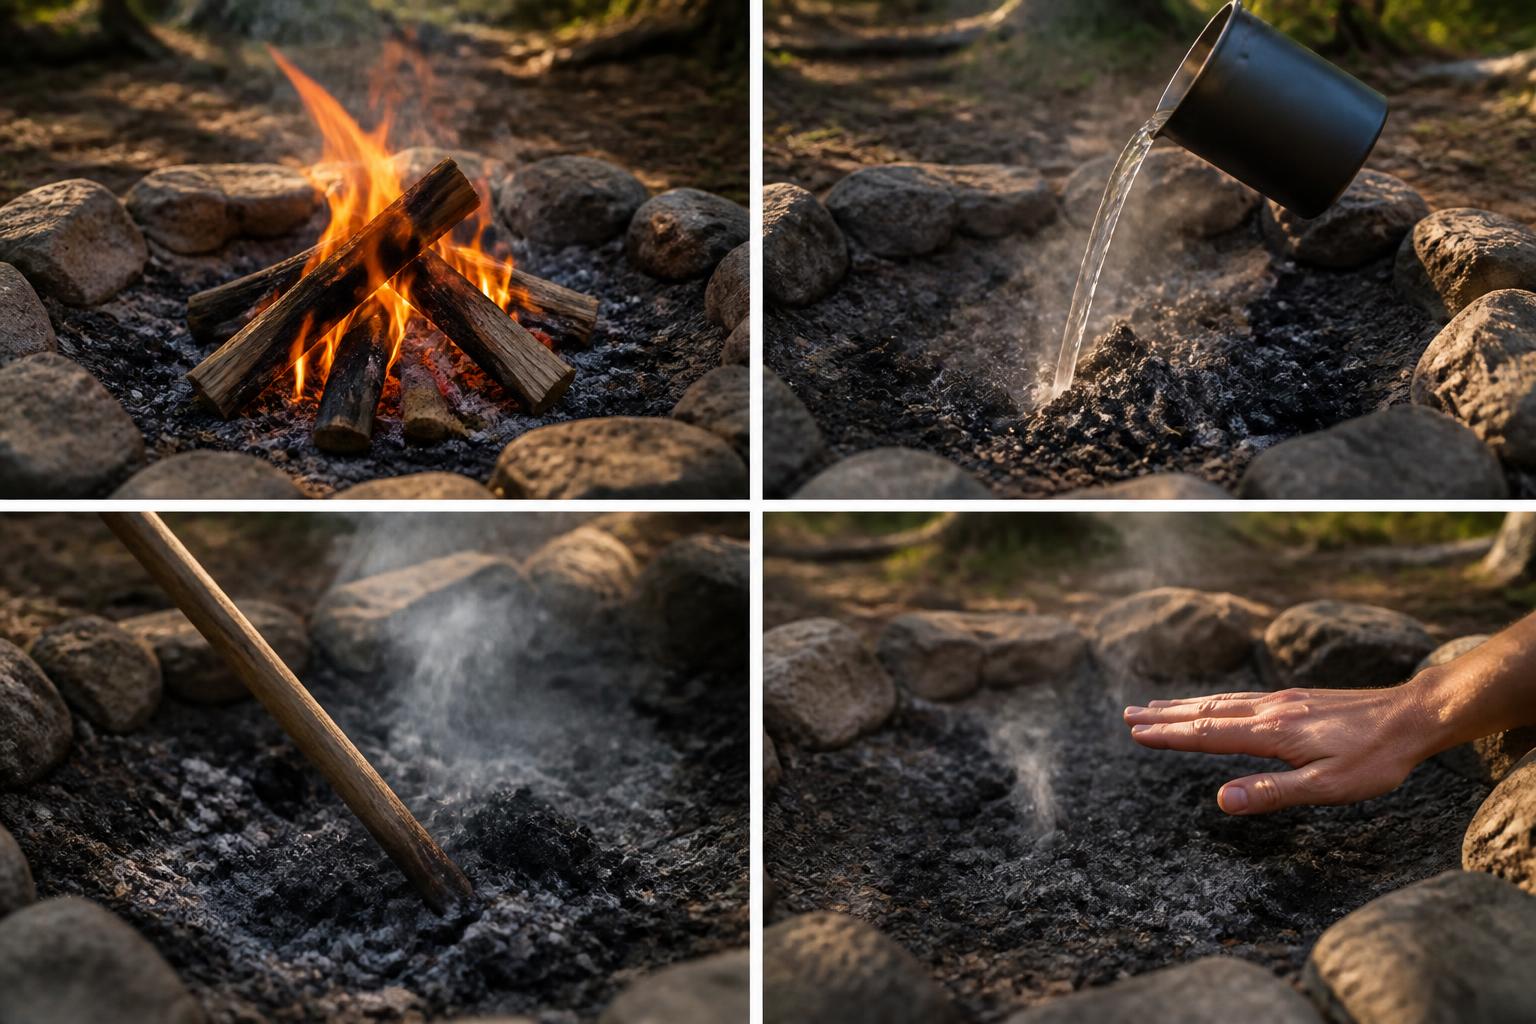
- Douse with water. Pour water directly onto the coals and logs, aiming for the center. Use enough to soak everything—stop when you see steam stop rising. For a medium fire about 2 feet wide, you’ll need at least 2 to 3 gallons.
- Stir the ashes. Use your shovel to mix the wet coals, dirt, and ash. Break apart any unburned wood. Embers often hide under the top layer.
- Douse again. Pour another round of water over the stirred mixture. Stir again. Repeat until there is no hissing, no steam, and no visible smoke.
- Feel for heat. Turn the back of your hand over the ashes—do not touch them directly. Hold your hand 2 to 3 inches above the surface. If you feel any warmth, repeat steps 1 through 3.
- Final check. Leave the fire ring and come back in 10 minutes. Feel again. If it’s still warm, douse and stir once more.
The Cold‑Ashes Rule
You might think a fire is out when it stops smoking. In reality, buried embers can smolder for 12 hours or more. The only reliable confirmation is that the ashes are cold to the touch—no warmth at all. If you’re in a high‑wind area or under a burn ban, don’t risk it. Extinguish until you can safely put your bare hand on the ashes without flinching.
Likely Causes of an Incomplete Extinguish
- Using too little water, just one splash.
- Not stirring: water runs off a log but leaves a dry core.
- Pouring water on top of unbroken logs: the bottom stays hot.
- Leaving the site while ashes are still warm: wind can expose hot coals.
Escalation Signals
If you see flames after you thought the fire was out, you missed a hot spot. Immediately pour more water, stir, and keep stirring until no heat remains. If the fire has spread beyond your fire ring, stop all DIY extinguishing and call 911. Do not try to fight a wildfire with a bucket. That’s your concrete stop threshold: flames outside your ring mean it’s time to evacuate and get professional help.
Campfire Safety Checklist
Use this checklist before and after every fire. Each item is a pass‑or‑fail check: if you can’t mark yes, do not light the fire or do not leave.
| Item | Yes / No |
|---|---|
| The fire ring is at least 15 feet from tents, trees, and structures | ☐ |
| No dry grass, leaves, or pine needles within 10 feet of the fire | ☐ |
| A shovel and a full bucket of water are within 5 feet of the fire | ☐ |
| The fire is small (flames no higher than your knee) | ☐ |
| No accelerants were used to start the fire | ☐ |
| The fire has been doused, stirred, and doused again until cold to the touch | ☐ |
| You have checked the current fire restrictions for your area | ☐ |
| Someone responsible stays with the fire at all times | ☐ |
If any box is marked no, fix it before lighting or before leaving the site.
FAQ
Can I pour water on a campfire?
Yes, water is the most effective way to extinguish a campfire. But you must stir the ashes and coals completely after pouring—otherwise the water only cools the surface.
How long should I wait before leaving a campfire?
Wait until the ashes are cold to the touch. That usually means dousing, stirring, and feeling after about 10 to 15 minutes of soaking. If you feel any warmth, repeat the process.
Are fire restrictions the same in every state?
No. Restrictions are set locally by the land management agency. Always check the specific forest, park, or county website the day of your trip. A Stage 2 ban in one area may allow stoves, while another may not.
What do I do if a fire ban is in effect?
Use a propane or butane camp stove with an on/off switch. No wood fires, charcoal grills, or open flames of any kind are allowed under a Stage 2 ban.
Camping Bob has spent over 20 years camping across the US — from BLM dispersed sites in the Southwest to KOA campgrounds in the Pacific Northwest. He writes practical, no-nonsense guides to help fellow campers get outdoors with confidence.