
Using a Camping Coffee Pot: Your Guide to Trailside Brews
Quick answer
- Pack your favorite ground coffee and a reliable camping coffee pot.
- Find a safe, level spot away from flammable materials for your stove.
- Heat water to just off the boil, then add coffee grounds.
- Let it steep for 4-5 minutes.
- Pour slowly and enjoy your fresh brew.
- Always clean up thoroughly, leaving no trace.
What to check first (do this before you drive out)
Before you even think about that first sip of morning coffee, a few things need your attention. It’s not just about the pot.
- Land manager / legality: Who’s in charge of this patch of dirt? Is it National Forest, BLM land, a State Park, or private? Each has its own rules. You don’t want to set up shop where you’re not supposed to. A quick look at the agency’s website or a call ahead can save a lot of hassle.
- Access/road conditions: Can your rig actually get there? Some spots are car-friendly, others need 4WD and good clearance. Getting stuck miles from anywhere with a hankering for coffee is a bad look. Check recent conditions if you can. Mud, snow, or washouts can change everything.
- Fire restrictions + weather + wind: This is crucial. Is there a fire ban? If so, your camp stove might be your only option for that hot water. Check the forecast, too. A sudden downpour or high winds can make brewing a miserable, or even dangerous, affair. Seriously, wind can blow your whole setup over.
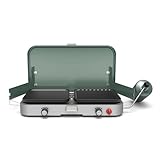
If fire restrictions are in place, a reliable portable camping stove like this one becomes your essential tool for that morning brew.
- Water plan + waste plan (Leave No Trace): Do you have enough water for brewing and cleaning? Don’t assume you can just dip your pot in any old stream. Pack it in, pack it out. This includes coffee grounds and any used filters. Leave your campsite cleaner than you found it. That’s the golden rule.
- Safety (wildlife, distance to help, comms): Be aware of your surroundings. Are there bears, or just squirrels? Keep food secured. Know how far you are from help, and if you have cell service. It’s easy to get lost in the moment of a good brew, but staying safe is always priority number one.
Step-by-step (field workflow)
Alright, you’ve done your homework. Now, let’s make that coffee. This is for a percolator-style pot, the classic.
1. Gather your gear: Get your camping coffee pot, your stove, fuel, mug, coffee grounds, and water.
- Good looks like: Everything is organized and within easy reach. No digging through your pack for the grounds.
- Common mistake: Forgetting the fuel for the stove. Or worse, bringing the wrong size fuel canister. Double-check before you leave home.
Don’t forget your portable camping stove and fuel! This portable camping stove is a great option for consistent heat.
2. Find a stable spot: Set up your stove on a flat, level surface. Make sure it’s clear of dry leaves, grass, or anything that could catch fire.
- Good looks like: The stove sits solid, no wobbles. The area around it is clear for at least a few feet.
- Common mistake: Setting up on uneven ground. This can lead to spills or the pot tipping. Take an extra second to find solid footing.
3. Add water: Pour fresh water into the coffee pot, up to the fill line or just below the spout.
- Good looks like: The water level is visible and correct. You’re not over or underfilling.
- Common mistake: Using dirty water or not filling enough. You’ll end up with weak coffee or have to refill, wasting time and fuel.
4. Assemble the pot: Place the basket with the coffee grounds into the pot. Make sure the stem is seated properly.
- Good looks like: The basket and stem are snug and secure. No rattling.
- Common mistake: Not seating the stem correctly. This means the coffee won’t percolate properly, leading to weak or gritty coffee.
5. Heat the water: Place the pot on your stove and turn on the heat. Aim for medium-high.
- Good looks like: The flame is steady and centered under the pot. You can hear the water starting to heat.
- Common mistake: Blasting the heat on high. This can scorch the coffee and make the pot unstable. Patience is key here.
6. Watch for percolation: As the water heats, it will rise through the stem and drip onto the grounds, then flow back down. You’ll hear it gurgling.
- Good looks like: A steady, rhythmic bubbling sound. You might see coffee dripping back into the pot.
- Common mistake: Leaving it unattended for too long. It can boil over. Keep an eye on it.
7. Reduce heat and steep: Once it’s percolating well, reduce the heat to low. Let it brew for about 4-5 minutes.
- Good looks like: A gentle simmer, not a rolling boil. The aroma of coffee fills the air.
- Common mistake: Boiling it vigorously for too long. This can make the coffee bitter.
8. Remove from heat and let settle: Take the pot off the stove and let it sit for a minute or two. This lets the grounds settle.
- Good looks like: The bubbling stops completely. The pot is stable.
- Common mistake: Pouring immediately. You’ll get grounds in your mug. Just wait a beat.
9. Pour and enjoy: Carefully pour your fresh coffee into your mug.
- Good looks like: A smooth pour, no grounds in the cup. A steaming mug of deliciousness.
- Common mistake: Pouring too fast or tilting the pot too much. This can stir up the grounds.
10. Clean up: Empty the grounds in a designated area or pack them out. Rinse the pot thoroughly.
- Good looks like: The pot is clean, and the area is free of debris. You’ve left no trace.
- Common mistake: Leaving grounds in the pot or the campsite. This attracts critters and is just plain bad form.
Common mistakes (and what happens if you ignore them)
| Mistake | What it causes | Fix |
|---|---|---|
| Not checking fire restrictions | Wildfire, hefty fines, or being kicked out. | Always check the local land manager’s website or call ahead for current fire bans. |
| Using a dirty coffee pot | Bitter, off-tasting coffee; potential stomach upset. | Wash your pot thoroughly after each use. Store it dry. |
| Overfilling the water reservoir | Boiling over, messy cleanup, wasted coffee. | Use the fill line on your pot. If there isn’t one, err on the side of slightly underfilling. |
| Using stale or wet coffee grounds | Weak, flavorless coffee. | Store grounds in an airtight container, preferably in a cool, dry place. Bring fresh grounds. |
| Boiling coffee too vigorously for too long | Bitter, burnt taste. | Reduce heat to a gentle simmer once percolating, and steep for only 4-5 minutes. |
| Pouring too quickly without settling | Grounds in your mug. | Let the pot sit for a minute after removing from heat before pouring. Pour slowly. |
| Not securing the stove properly | Spilled hot water/coffee, fire hazard, damaged gear. | Always set up your stove on a flat, stable surface. Ensure it’s not wobbly. |
| Not packing out coffee grounds | Attracts wildlife, unsightly campsite, violates LNT. | Pack out all coffee grounds in a bag or dispose of them properly away from your campsite. |
| Assuming any water source is potable | Sickness from contaminated water. | Always treat or filter water from natural sources. Pack enough potable water for brewing. |
| Forgetting essential gear (stove, fuel) | No coffee. | Make a checklist and pack all necessary items before you leave. Double-check your fuel supply. |
Decision rules (simple if/then)
- If the land is managed by the US Forest Service, then check their regional alerts page for any specific rules, because regulations can vary by forest district.
- If the road to your campsite is rough or unpaved, then consider bringing an AWD or high-clearance vehicle because a standard car might get stuck.
- If there’s a “Red Flag Warning” or high wind advisory, then consider skipping the campfire and sticking to your camp stove, because open flames are dangerous in these conditions.
- If you’re camping in bear country, then store your coffee grounds securely with your food, because they can attract bears.
- If you’re using a French press camping pot, then use a coarser grind of coffee because a fine grind can slip through the filter.
- If your coffee tastes weak, then you might need to steep it a bit longer or use more grounds next time, because brewing is an art.
- If you’re unsure about water sources, then bring all the water you need for brewing and cleaning, because it’s better to be safe than sorry.
- If you’re camping in a designated campground, then check their specific rules about stoves and fires, because they can be stricter than dispersed camping areas.
- If the weather is cold, then pre-heat your mug with hot water, because it will keep your coffee warmer for longer.
- If you’re in a hurry, then consider instant coffee, because it’s faster, though arguably not as satisfying.
- If you have a lot of coffee grounds to pack out, then use a sturdy zip-top bag to prevent leaks, because nobody wants coffee grounds in their backpack.
FAQ
What kind of coffee pot is best for camping?
The classic percolator is durable and makes a good brew, but a French press is also popular for its simplicity and rich flavor. For ultra-light trips, consider a pour-over cone with filters.
How much coffee should I use for my camping pot?
A general rule is 1-2 tablespoons of grounds per 6 ounces of water. Adjust to your taste. For a percolator, fill the basket about halfway to two-thirds full.
Can I use a campfire to heat my coffee pot?
If fire restrictions allow, yes, but it’s trickier. You need a stable spot for the pot and good control over the heat. A camp stove is usually easier and safer.
While campfires can work, a portable camping stove offers much better control and is often safer, especially with fire restrictions.
How do I clean my camping coffee pot in the field?
Rinse it out thoroughly with water. If it’s really dirty, use a bit of biodegradable soap and a brush. Make sure to pack out any used grounds.
What if my coffee pot boils over?
It happens. Reduce the heat immediately. You might lose some coffee, but it’s not the end of the world. Just be careful cleaning up the mess.
Can I leave my coffee pot on the stove unattended?
No, never. Keep an eye on it while it’s heating and brewing. Things can go wrong quickly.
What’s the deal with coffee grounds and Leave No Trace?
Coffee grounds are organic matter. While generally harmless, leaving them around your campsite can attract animals and is unsightly. Pack them out or scatter them thinly away from your site.
My coffee tastes bitter. What did I do wrong?
You likely boiled it too hard or for too long. Try reducing the heat once it starts percolating and stick to that 4-5 minute steep time.
What this page does NOT cover (and where to go next)
- Specific coffee brewing techniques for every type of camping pot (e.g., Moka pots, Aeropress).
- Detailed reviews of specific camping coffee pot brands and models.
- Advanced water purification methods beyond basic filtering.
- Recipes for coffee-based camping drinks or cocktails.
- Detailed information on backcountry nutrition and meal planning.

Camping Bob has spent over 20 years camping across the US — from BLM dispersed sites in the Southwest to KOA campgrounds in the Pacific Northwest. He writes practical, no-nonsense guides to help fellow campers get outdoors with confidence.