Serving Ice at Your Party: Tips for Keeping Drinks Cold
Quick answer
- Plan for more ice than you think you need. Seriously.
- Use insulated coolers or buckets. It’s not fancy, but it works.
- Keep coolers out of direct sun. Shade is your friend.
- Don’t let drinks sit in melted ice water for too long. Drain it.
- Mix ice types: cubes for drinks, block ice for cooling.
- Pre-chill everything. Cold drinks go into cold coolers.
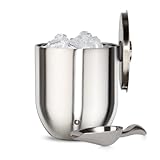
- Consider a dedicated ice bucket for serving.
What to check first (do this before you drive out)
Before you even think about packing the car, a little prep goes a long way.
- Event scope & guest count: How many people? How long is the party? This dictates how much ice you’ll need. A short backyard BBQ for ten is different from a full-day wedding reception.
- Cooler/storage capacity: Do you have enough space to keep all your drinks cold? Think about cooler size, ice chests, or even a kiddie pool if you’re really in a pinch.
For optimal cold retention, consider investing in a high-quality insulated cooler. It makes a significant difference in keeping your ice and drinks cold for longer.

- Ice source & quantity: Where are you getting your ice? How much can you transport? Bagged ice from the store is common, but for larger events, consider renting a commercial ice machine or buying in bulk. Aim for at least 1-2 pounds of ice per guest for a few hours.
- Serving plan: How will guests access drinks? Will there be a self-serve station? A bartender? This affects how you’ll manage the ice and keep things flowing.
- Weather forecast: Hot days mean faster melting. If it’s scorching, you’ll need more ice and better insulation. Windy days can also affect cooler performance.
Step-by-step (field workflow)
Here’s how to keep that ice from turning into a sad puddle.
1. Acquire plenty of ice.
- What “good” looks like: You have more ice than you think you’ll need, in various forms (cubes, maybe some block ice).
- Common mistake: Underestimating how fast ice melts, especially in warm weather or with frequent cooler opening. Avoid this by doubling your initial estimate.
2. Pre-chill your coolers/storage.
- What “good” looks like: Coolers are cold inside before any drinks or ice go in.
- Common mistake: Loading warm drinks into a warm cooler. This makes the ice work overtime from the start. A few bags of sacrificial ice or ice packs overnight does wonders.
To pre-chill your coolers efficiently without wasting party ice, reusable ice packs are a fantastic option. They can be frozen beforehand and placed in the cooler overnight.

3. Add block ice first (if using).
- What “good” looks like: A solid base of large ice blocks at the bottom of your main cooler.
- Common mistake: Only using cubes. Cubes melt fast. Block ice melts slowly and provides a sustained chill.
4. Load drinks strategically.
- What “good” looks like: Drinks are packed snugly, with minimal air pockets.
- Common mistake: Leaving large gaps. Air pockets allow warm air to circulate, melting ice faster. Fill empty spaces with more ice or towels.
5. Top off with cubed ice.
- What “good” looks like: Cubes fill the remaining space, surrounding the drinks.
- Common mistake: Not filling all the nooks and crannies. Every bit of ice contact counts.
6. Keep coolers closed as much as possible.
- What “good” looks like: Coolers are opened only when necessary to retrieve a drink, and then quickly shut.
- Common mistake: Leaving the lid ajar. This is like leaving the fridge door open – a fast track to melted ice.
7. Place coolers in shade.
- What “good” looks like: Coolers are tucked away from direct sunlight, under a tree, umbrella, or tarp.
- Common mistake: Leaving coolers out in the blazing sun. Heat is the enemy of ice.
8. Drain meltwater periodically.
- What “good” looks like: Water is drained from the cooler every few hours, especially if drinks are not submerged.
- Common mistake: Letting drinks sit in a pool of icy water. While it keeps them cold, it can make labels soggy and potentially affect taste if the ice is impure. Plus, the water itself is no longer as cold as solid ice.
9. Use a separate serving bucket for drinks in use.
- What “good” looks like: A smaller, insulated bucket or ice chest holds drinks that are actively being served.
- Common mistake: Constantly opening the main storage cooler for individual drinks. This compromises the main ice supply.
For elegant and practical serving, a stainless steel ice bucket is perfect for holding drinks that are actively being consumed. This prevents frequent opening of your main cooler.
10. Replenish ice as needed.
- What “good” looks like: You have a plan for getting more ice if your initial supply dwindles.
- Common mistake: Running out of ice mid-party. Have a backup plan or a nearby store.
Common mistakes (and what happens if you ignore them)
| Mistake | What it causes | Fix |
|---|---|---|
| Underestimating ice needs | Warm drinks, disappointed guests, running out of ice halfway through the party. | Always buy more than you think you need. Better to have extra than not enough. |
| Not pre-chilling coolers | Ice melts much faster trying to cool down both the cooler and the drinks. | Chill coolers overnight with ice packs or sacrificial ice before loading. |
| Leaving coolers in direct sun | Rapid ice melt, less effective cooling, potential for drinks to get warm. | Find shade. Use umbrellas, tarps, or position coolers under trees or structures. |
| Opening coolers too frequently | Warm air gets in, melts ice, makes cooling less efficient. | Keep lids closed. Encourage guests to grab drinks quickly or use a separate serving bucket. |
| Using only cubed ice | Cubes melt quickly, requiring constant replenishment. | Use block ice for the base and cubed ice for filling gaps. |
| Not draining meltwater | Drinks can get soggy, potentially affect taste, cooler is less efficient. | Drain water every few hours, especially if drinks aren’t fully submerged. |
| Packing coolers too loosely | Air pockets allow warm air to circulate, increasing melt rate. | Fill all empty spaces with ice, towels, or crumpled newspaper. |
| Not having a backup ice plan | Running out of ice when you need it most, leading to warm drinks. | Know where the nearest store is, or have a plan for ice delivery or machine rental. |
| Using non-insulated containers | Ice melts extremely fast, making it difficult to keep anything cold. | Invest in good quality coolers or insulated tubs. Even a decent ice chest makes a huge difference. |
| Forgetting about ambient temperature | Hotter weather means faster melting, regardless of cooler quality. | Adjust ice quantity and cooler placement based on the forecast. |
To avoid the common mistake of using non-insulated containers, a good insulated cooler is a worthwhile investment. It will drastically improve your ice retention.
Decision rules (simple if/then)
- If the party is longer than 4 hours, then plan for at least 2 pounds of ice per person because ice volume decreases steadily over time.
- If the forecast is above 80°F, then double your estimated ice quantity because heat accelerates melting significantly.
- If you’re using a cheap styrofoam cooler, then expect to drain meltwater more often because they have poor insulation.
- If you can’t find a shady spot, then consider building a temporary shade structure because direct sun is a major ice killer.
- If guests are constantly grabbing drinks, then use a separate, smaller cooler for active serving because it keeps your main ice supply colder.
- If you have a large block of ice, then put it at the bottom of the cooler because it melts slower and provides a solid foundation for chilling.
- If you’re transporting ice a long distance, then pre-chill your vehicle’s cargo area because a hot car will start melting ice before you even arrive.
- If you have a lot of cans or bottles, then pack them tightly and fill the gaps with ice because minimizing air space improves cooling efficiency.
- If you’re serving a drink that you want to stay very cold (like champagne), then consider a dedicated ice bucket for that specific item because it prevents cross-contamination of temperatures and odors.
- If you’re unsure about water quality for your ice, then use filtered water or buy commercially made ice because impurities can affect taste and clarity.
FAQ
How much ice do I really need?
For a party, aim for about 1 to 2 pounds of ice per guest for every few hours of the event. It’s always better to have too much than too little.
What’s the difference between block ice and cubed ice?
Block ice melts much slower and provides a sustained chill, making it great for the bottom of coolers. Cubed ice is convenient for filling gaps and chilling drinks directly.
Can I just use a regular trash can?
Only if it’s a brand new, food-grade trash can that you’ve thoroughly cleaned. Otherwise, stick to dedicated coolers or ice chests to avoid contamination.
How do I stop drinks from getting soggy labels?
Drain the meltwater regularly. If you’re really concerned, you can also use waterproof sleeves or remove labels beforehand.
What if my cooler is old and doesn’t insulate well?
You’ll need to compensate with more ice and more frequent draining. Consider wrapping the cooler in a blanket or towels to add a layer of insulation.
Should I put ice in the drinks or put drinks in the ice?
Both! Use cubed ice in the drinks themselves. Use larger blocks or bags of ice in the cooler to keep the drinks cold.
What’s the best way to transport a lot of ice?
Use well-insulated coolers. If you have a lot, consider a large chest freezer in a truck or a dedicated ice transport bin.
Does the type of cooler material matter?
Yes. Rotomolded coolers offer the best insulation and ice retention, followed by good quality hard-sided coolers. Styrofoam is cheap but has the least ice retention.
What this page does NOT cover (and where to go next)
- Specific ice-making machine rental services. (Search for local party rental companies.)
- Detailed recipes for ice-based cocktails. (Look for mixology guides.)
- Commercial-grade refrigeration solutions. (Consult with catering equipment suppliers.)
- The science of thermodynamics and ice melt rates. (Explore physics resources.)
- How to make your own giant ice blocks. (Search for DIY ice block tutorials.)
Camping Bob has spent over 20 years camping across the US — from BLM dispersed sites in the Southwest to KOA campgrounds in the Pacific Northwest. He writes practical, no-nonsense guides to help fellow campers get outdoors with confidence.