Securely Tying Luggage to Your Roof Rack
Quick answer
- Use a roof rack with good tie-down points.
- Get quality straps – cam straps or ratchet straps are best.
- Pack your gear tight and evenly in the rack.
- Always use a minimum of two straps per item, crisscrossed if possible.
- Pull straps tight and check them often, especially after rough terrain.
- Cover gear with a tarp if it’s not waterproof.
- Know your load limits.
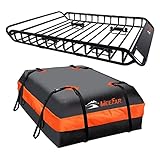
Before you even start, make sure you have a sturdy roof rack cargo carrier to safely transport your gear.
What to check first (do this before you drive out)
Before you even think about strapping down that gear, do a quick systems check. This ain’t just about a smooth ride; it’s about keeping your stuff, and everyone else on the road, safe.
- Land manager / legality: Who owns this road? Is it a national forest road, BLM land, or a state park trail? Different agencies have different rules about vehicle use and what you can haul. Always check the official land manager’s website or call their local office. Ignorance ain’t a defense, my friend.
- Access/road conditions: Is that dirt road going to turn into a mud pit? Do you have the right rig for it? A lifted Jeep with chunky tires handles a washboard road way better than a stock sedan. Know your vehicle’s limits and the road’s potential. A little reconnaissance can save you a tow.
- Fire restrictions + weather + wind: This is huge. Are campfires allowed? Are there any burn bans in effect? Check the local fire danger level. Also, look at the forecast. High winds can make strapping down gear tricky and dangerous. A sudden storm can soak your unprotected gear.
- Water plan + waste plan (Leave No Trace): Where will you get water? And just as important, where will you put your trash? Pack it in, pack it out. That’s the golden rule. Make sure you have containers for both. Don’t leave your garbage for the squirrels to find.
- Safety (wildlife, distance to help, comms): What critters roam this area? Bears, mountain lions, snakes? Know what to do. How far is the nearest ranger station or town? Do you have cell service? A satellite messenger or a good old-fashioned map and compass might be your best friends. Don’t get caught out there without a plan.
Step-by-step (field workflow)
Alright, let’s get this done right. Follow these steps, and your gear will stay put.
1. Assess your gear: What are you hauling? Is it soft bags, hard cases, or a mix? Is it waterproof? This determines how you’ll pack and what protection it needs.
- Good looks like: Knowing exactly what needs covering and how to secure it.
- Common mistake: Just throwing everything on top. You end up with a messy, unstable pile.
2. Position gear on the rack: Place heavier items at the bottom and center. Distribute weight evenly. Don’t stack things too high if you can avoid it.
- Good looks like: A stable, low-profile load.
- Common mistake: Piling everything on one side or the back, making the vehicle top-heavy.
3. Use a tarp (if needed): If your gear isn’t waterproof, cover it with a sturdy tarp. Tuck the edges under the gear to prevent wind from catching it.
- Good looks like: A taut, well-secured tarp that won’t flap.
- Common mistake: Leaving tarp edges loose, turning it into a sail.
4. Thread your first strap: Run a strap under a crossbar of your roof rack, over your gear, and back under the other side of the crossbar. Or, loop it around a dedicated tie-down point.
- Good looks like: The strap is positioned to effectively hold the load down.
- Common mistake: The strap is twisted or rubbing against a sharp edge of the rack.
5. Secure the strap: Use a cam buckle or ratchet mechanism to tighten the strap. Pull it snug, but don’t overtighten to the point of damaging your gear or rack.
- Good looks like: The strap is firm, with minimal slack.
- Common mistake: Not pulling the strap tight enough, leaving room for the gear to shift.
For reliable tension without overtightening, consider using quality cam buckle straps to secure your load.

6. Add a second strap: Use another strap, ideally at a 90-degree angle to the first, to further secure the load. This adds stability.
- Good looks like: A secure load held by at least two independent straps.
- Common mistake: Relying on just one strap, which can fail.
7. Check tie-down points: Make sure the straps are attached to solid points on your roof rack or vehicle. Avoid flimsy plastic bits.
- Good looks like: Straps are firmly anchored to structural parts of the rack.
- Common mistake: Attaching straps to decorative roof trim or weak points.
8. Test the load: Give your gear a good shake. It shouldn’t move or shift significantly.
- Good looks like: The load feels solid and integrated with the rack.
- Common mistake: Not performing this check, only to discover a loose load miles down the road.
9. Tie off excess strap: Secure any loose ends of the straps so they don’t flap in the wind or get caught.
- Good looks like: Cleanly tied-off straps that won’t cause noise or damage.
- Common mistake: Leaving long straps dangling, which can fray or get tangled.
10. Drive slowly and check: Take it easy for the first few miles. Pull over and re-check the tension on all your straps.
- Good looks like: Straps are still tight after the initial drive and bumps.
- Common mistake: Assuming the straps will stay tight without a re-check.
11. Check periodically: On longer trips, especially over rough terrain, stop and check your straps every few hours or after significant bumps.
- Good looks like: Proactive maintenance that ensures continued security.
- Common mistake: Forgetting about the straps until something comes loose.
Common mistakes (and what happens if you ignore them)
| Mistake | What it causes | Fix |
|---|---|---|
| Using old, frayed straps | Strap failure, gear falling off, accidents | Inspect straps regularly; replace any with cuts, UV damage, or fraying. |
| Not using enough straps | Gear shifting, unstable load, potential for items to fall off | Use at least two straps per item; more for larger or heavier loads. |
| Over-tightening straps (cam/ratchet) | Damaging gear, denting roof/rack, weakening strap | Tighten until snug, then a little more. Feel the tension. Don’t crank it until something creaks or deforms. |
| Using bungee cords or rope alone | Inability to hold a secure, consistent tension; snapping under stress | Use cam straps or ratchet straps designed for load security. Bungees are for light, temporary securing, not highway travel. |
| Loading unevenly or top-heavy | Vehicle instability, poor handling, increased risk of rollover | Place heavier items low and centered. Distribute weight across the rack. |
| Not covering waterproof gear | Water damage to tents, sleeping bags, clothing, electronics | Use a waterproof bag or a tarp properly secured over non-waterproof items. |
| Not checking straps after initial drive | Straps loosening due to vibration and settling of the load | Pull over after 5-10 miles and re-tighten all straps. |
| Attaching straps to weak points | Straps pulling free, rack damage, gear falling off | Use dedicated tie-down points or solid structural parts of the roof rack. |
| Not tying off excess strap ends | Straps flapping, creating noise, fraying, or getting caught on objects | Tuck and tie off excess strap length securely to the main strap or rack. |
| Ignoring rack weight limits | Rack failure, damage to vehicle roof, unstable load | Know your rack’s static and dynamic load ratings. Don’t exceed them. |
| Driving too fast with a loaded rack | Increased wind resistance, stress on straps and rack, potential for failure | Adapt your speed to conditions, especially wind. Higher speeds increase forces dramatically. |
| Not accounting for gear expansion/settling | Straps becoming too loose as gear compacts or shifts | Periodically check and re-tighten straps, especially after hitting rough patches or over time. |
Decision rules (simple if/then)
- If you’re hauling soft bags that aren’t waterproof, then use a tarp because waterlogged gear is heavy and can damage items.
- If you’re driving on a washboard road, then check your straps more frequently because vibrations loosen them faster.
- If you have a large, bulky item, then use at least three straps because it needs more points of securement.
- If you’re unsure about your rack’s tie-down points, then consult the rack manufacturer’s manual because using the wrong points can lead to failure.
- If you notice a strap is starting to fray, then replace it immediately because a failing strap is a major safety hazard.
- If you’re driving in windy conditions, then reduce your speed because wind puts extra stress on your load and rack.
- If you’re packing items that could be damaged by overtightening, then use cam straps instead of ratchet straps because they offer more controlled tension.
- If you’re going on a long trip, then plan to stop and check your load at least every 100 miles because things can shift.
- If your gear is very heavy, then ensure your roof rack is rated for that weight because exceeding limits can damage your vehicle.
- If you have items that could shift independently, then strap them together first before securing them to the rack because a unified load is more stable.
- If you’re using a roof bag, then make sure it’s designed for roof rack use and has integrated tie-down points because they are built to withstand the forces.
- If you’re in doubt about any aspect of securing your load, then err on the side of caution and use more straps or a different method because safety is paramount.
FAQ
What’s the best type of strap for a roof rack?
Cam straps are good for general use and offer easy tensioning. Ratchet straps provide very high tension and are best for heavy, bulky items. Always use straps rated for outdoor use.
For general use and easy tensioning, cam buckle straps are an excellent choice for securing items to your roof rack.
Can I use rope to tie down my luggage?
While rope can work in a pinch, it’s generally not ideal for securing loads on a roof rack. It can stretch, slip, and doesn’t offer consistent tension like dedicated straps. Stick to cam or ratchet straps for reliability.
How tight should I make the straps?
You want them snug enough that the gear doesn’t move at all, but not so tight that you’re deforming the gear, denting your rack, or risking strap failure. You should be able to press down on the gear and feel solid resistance.
How often should I check my straps?
After the initial drive of 5-10 miles, re-tighten everything. Then, stop and check them every few hours or after encountering significant bumps or rough terrain on longer trips.
What if my roof rack doesn’t have good tie-down points?
Some racks have integrated slots or bars. If yours is basic, you might need to get creative, but always use structural parts of the rack. Avoid attaching to plastic trim. Consider adding aftermarket tie-down points if your rack allows.
Does the type of car matter for roof rack loading?
Yes. Smaller cars might have lower weight limits for their roof racks and suspension. Larger SUVs and trucks can generally handle more weight. Always check your vehicle’s owner’s manual for roof load capacity.
Should I put a tarp over everything?
It’s a good idea if any of your gear isn’t fully waterproof. Tents, sleeping bags, and camp chairs can get soaked. A tarp adds a crucial layer of protection against rain and wind.
What are the risks of not securing my load properly?
The biggest risks are gear falling off your vehicle, which can cause accidents for you and others, or the load shifting and making your vehicle unstable, leading to loss of control.
What this page does NOT cover (and where to go next)
- Specific roof rack installation guides for every vehicle model.
- Detailed advice on aerodynamics and fuel efficiency with roof-top loads.
- Legal requirements for load security in specific states or municipalities.
- Advanced load balancing techniques for extreme off-road conditions.
- Choosing the right type of roof rack for your specific vehicle and needs.
Camping Bob has spent over 20 years camping across the US — from BLM dispersed sites in the Southwest to KOA campgrounds in the Pacific Northwest. He writes practical, no-nonsense guides to help fellow campers get outdoors with confidence.