
Inflate Your Air Bed Quickly and Easily for a Restful Night
Quick answer
- Pack the right pump. Battery-powered or manual are your go-to choices.
- Find a flat, smooth spot for your bed. Rocks and roots are the enemy.
- Unroll and orient your bed before inflating. Makes life easier.
- Inflate in stages. Don’t go full blast right away.
- Check firmness as you go. Too soft or too hard? Adjust.
- Secure your bed if it’s windy. Don’t want your sleep space blowing away.
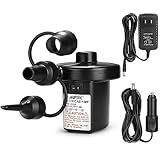
For ultimate convenience, consider a battery-powered air pump. It makes quick work of inflation, especially when you’re off-grid.
What to check first (do this before you drive out)
Before you even think about hitting the trail or setting up camp, get your gear dialed.
- Land manager / legality: Who’s in charge here? Is it National Forest, BLM, State Park, or private land? Each has its own rules about camping and campfires. A quick check on the managing agency’s website is smart. Don’t assume you can just pull over anywhere.
- Access/road conditions: Can your rig actually get there? Is the road paved, gravel, or just a suggestion of a track? If it’s rough, know your vehicle’s clearance. Mud and snow can turn a scenic drive into a recovery mission. Check recent reports if you can.
- Fire restrictions + weather + wind: This is huge. Fire bans are common, especially in dry seasons. Always check current restrictions. Weather can change fast in the backcountry. And wind? It can make setting up camp a real pain, and a chilly one at that. Pack layers, even if the forecast looks good.
- Water plan + waste plan (Leave No Trace): Do you have enough water, or know where to get and treat it? And what about trash? Pack it in, pack it out. That’s the golden rule. No exceptions. Figure out where you’ll manage human waste too, especially if there are no facilities.
- Safety (wildlife, distance to help, comms): What critters live here? Know how to store food properly. How far is the nearest ranger station or town? Cell service is often spotty or non-existent. A satellite messenger or personal locator beacon (PLB) is a good idea for remote trips.
Step-by-step (how to inflate air bed)
This is how you get from a deflated sack to a comfy sleep spot.
1. Unpack your air bed and pump.
- What “good” looks like: Everything is accounted for. No mystery holes in the bag. Pump works.
- Common mistake: Leaving the pump at home. Yep, I’ve done it. Double-check your gear bag.
If you prefer a reliable, no-power-needed option, a foot pump for an air mattress is a great choice. It’s simple, effective, and always ready to go.
2. Choose your spot.
- What “good” looks like: A relatively flat, clear area. No sharp rocks, roots, or pinecones.
- Common mistake: Setting up on uneven ground. You’ll feel every bump all night. Clear the area before you lay out the bed.
3. Unroll the air bed.
- What “good” looks like: The bed is spread out, ready to go. Valve is accessible.
- Common mistake: Trying to inflate it while it’s still mostly rolled up. You’ll get an uneven shape.
4. Locate and open the inflation valve.
- What “good” looks like: The valve cap is off, and the valve itself is open and ready for the pump.
- Common mistake: Forgetting to open the valve. The pump just pushes air back out.
5. Attach the pump.
- What “good” looks like: A secure connection between the pump and the valve. No air is leaking out.
- Common mistake: A loose connection. You’ll be pumping forever and getting nowhere. Make sure it’s snug.
6. Begin inflating.
- What “good” looks like: The bed starts to take shape. Air is filling it.
- Common mistake: Going too fast or too hard initially. You can over-inflate and stress the seams.
7. Inflate in stages.
- What “good” looks like: You’re adding air, pausing to let it settle, and checking firmness.
- Common mistake: Pumping until it’s rock hard. This makes it uncomfortable and can damage the bed over time.
8. Check firmness periodically.
- What “good” looks like: You’re pressing down, feeling the resistance. You’re aiming for supportive but not rigid.
- Common mistake: Not checking. You end up with a bed that’s either a hammock or a brick.
9. Stop when it feels right.
- What “good” looks like: The bed is firm enough to support you comfortably without being overly taut.
- Common mistake: Over-inflating because you think “more is better.” It’s not.
10. Close and secure the valve.
- What “good” looks like: The valve cap is back on, and the valve is sealed tight. No hissing.
- Common mistake: Leaving the valve open. Your bed will slowly deflate overnight.
11. Add a sleeping pad if needed.
- What “good” looks like: A layer of insulation and cushioning on top of your air bed.
- Common mistake: Relying solely on the air bed for warmth. Air beds can get cold.
12. Test it out.
- What “good” looks like: Lie down. Does it feel good? Is it supportive?
- Common mistake: Not testing before you’re exhausted and it’s dark. A quick lie-down can save you a rough night.
Common mistakes (and what happens if you ignore them)
| Mistake | What it causes | Fix |
|---|---|---|
| Forgetting the pump | No air bed. You’re sleeping on the ground. | Double-check your gear list before you leave. Pack it in your main camping bin. |
| Inflating on rough ground | Punctures, leaks, discomfort. You’ll feel every pebble. | Clear the area thoroughly. Use a ground tarp or footprint for extra protection. |
| Over-inflating | Stressed seams, potential leaks, a rock-hard sleeping surface. Uncomfortable. | Inflate in stages, check firmness by pressing down, and stop when it feels supportive but not rigid. |
| Under-inflating | A saggy, hammock-like bed. You’ll sink to the ground. Poor support. | Keep pumping until it feels firm and supportive. A quick lie-down test helps. |
| Not checking valve is sealed | Slow deflation overnight. You wake up on the ground. | Ensure the valve is fully closed and the cap is secured. Listen for any hissing. |
| Using a faulty pump | Takes forever to inflate, or doesn’t inflate at all. | Test your pump before your trip. Check batteries or if it’s a manual pump, ensure it’s functioning. |
| Not considering wind | Your air bed can become a kite. Difficult setup. | Stake down your air bed or weigh it down with gear before inflating fully. |
| Relying solely on air bed for warmth | You’ll get cold. Air transfers heat quickly. | Always use an insulated sleeping pad on top of your air bed for warmth and comfort. |
| Not letting the bed settle | You might think it’s firm, but it can sag as the material stretches. | After initial inflation, let it sit for a few minutes, then top it off if needed. |
| Ignoring manufacturer instructions | Can lead to damage, voiding warranty, or poor performance. | Read the manual. It’s usually short and to the point. |
Decision rules (simple if/then)
- If the ground is rocky, then use a ground tarp because it protects your air bed from punctures.
- If it’s windy, then stake down your air bed before fully inflating because it won’t blow away.
- If you have a battery-powered pump, then bring extra batteries because they can die unexpectedly.
- If you have a manual pump, then ensure you have the energy to use it because it takes effort.
- If the air bed feels too firm, then release a little air because comfort is key.
- If the air bed feels too soft, then add more air because you need proper support.
- If you’re camping in cold weather, then use an insulated sleeping pad on top because air beds alone don’t retain heat well.
- If you hear hissing, then check the valve and seams because you have a leak.
- If you’re unsure about road conditions, then check recent trip reports or call the land manager because getting stuck is no fun.
- If you’re in bear country, then store your food away from your sleeping area because you don’t want an unwanted visitor.
- If you’re going far from help, then pack a communication device because cell service is unreliable.
If you opt for a battery-powered pump, remember to pack extra batteries to ensure you’re never left deflated.
FAQ
How do I know when my air bed is inflated enough?
It should feel firm and supportive, but not so rigid that it’s uncomfortable to lie on. You should be able to press down and feel some give.
Can I use my mouth to inflate an air bed?
Technically, yes, but it’s exhausting and not recommended for most air beds. Plus, moisture from your breath can lead to mold inside. A pump is much better.
What’s the best type of pump for camping?
Battery-powered pumps are convenient and fast. Manual pumps are reliable and don’t need batteries but require more effort. Choose based on your trip and preference.
While battery-powered pumps offer speed, a sturdy foot pump for an air mattress is a dependable, effort-based alternative that never runs out of charge.
Should I inflate my air bed all the way at home before a trip?
No, it’s generally not necessary and can even stress the material if stored for long periods while fully inflated. Inflate it fresh at the campsite.
My air bed feels softer in the morning. What happened?
Cold temperatures can cause air to contract, making the bed feel softer. Also, the material might stretch slightly after the first inflation. Top it off as needed.
How can I keep my air bed from sliding around on the tent floor?
Some tent floors have a grippy texture. You can also place a non-slip rug or a piece of fabric under the air bed to help keep it in place.
What if I don’t have a pump that fits my air bed valve?
Many pumps come with multiple adapters. Check the pump’s packaging. If not, you might need to get a universal adapter or a pump designed for your specific bed.
Is it okay to sleep directly on an air bed without a sleeping pad?
It’s okay for comfort, but not for warmth. Air beds can be cold, so an insulated sleeping pad is crucial for staying warm in cooler temperatures.
What this page does NOT cover (and where to go next)
- Specific air bed repair techniques (like patching holes).
- Detailed reviews of different air bed brands and models.
- Advanced camping setup strategies for extreme weather.
- Information on specific campgrounds or backcountry regulations.
- Choosing the right sleeping bag for your climate.

Camping Bob has spent over 20 years camping across the US — from BLM dispersed sites in the Southwest to KOA campgrounds in the Pacific Northwest. He writes practical, no-nonsense guides to help fellow campers get outdoors with confidence.