Tent Repair: Patch a Tear, Fix a Pole, and Seal a Leak
A tent usually fails in boring ways: a tiny rip that grows, a pole that kinks, or a seam that “mists” in heavy rain. The good news: most problems are field-fixable if you know the right order (clean → stabilize → patch → cure).
Quick triage (60 seconds)
Use this to decide what to fix now vs what can wait.
| Problem | Safe to sleep tonight? | Field fix that works | Fix later at home |
|---|---|---|---|
| Small fabric tear (≤ 1 in / 2.5 cm) | Yes | Tenacious-style tape patch both sides | Sew + seam seal if high-stress area |
| Mesh hole | Yes | Mesh patch or tape + mesh patch | Sew/replace mesh panel |
| Seam leak / seam “misting” | Usually | Seam sealer (if you can cure) | Full seam-seal + DWR refresh |
| Bent pole (not cracked) | Sometimes | Sleeve splint + tape | Replace section or pole |
| Cracked pole section | Risky | Sleeve splint + tape (temporary) | Replace section/pole ASAP |
| Zipper stuck / separating | Usually | Clean + lube + tension relief | Replace slider or zipper run |
What to keep in a simple repair kit
Minimum kit (most value per ounce):
- Repair tape (for fabric) + alcohol wipes
- Pole splint sleeve (often comes with tent)
- A few feet of strong tape (duct or Gorilla)
- Needle + strong thread (or dental floss) + small scissors
- Seam sealer (tiny tube) if your tent is seam-taped or older
- 2–4 spare guyline pieces + 2 mini cord locks
Nice-to-have: patch material scraps, zipper lube, a tiny brush, spare stake loop webbing.
In this hub: Tents & Shelter — choose, set up, and keep your tent dry.
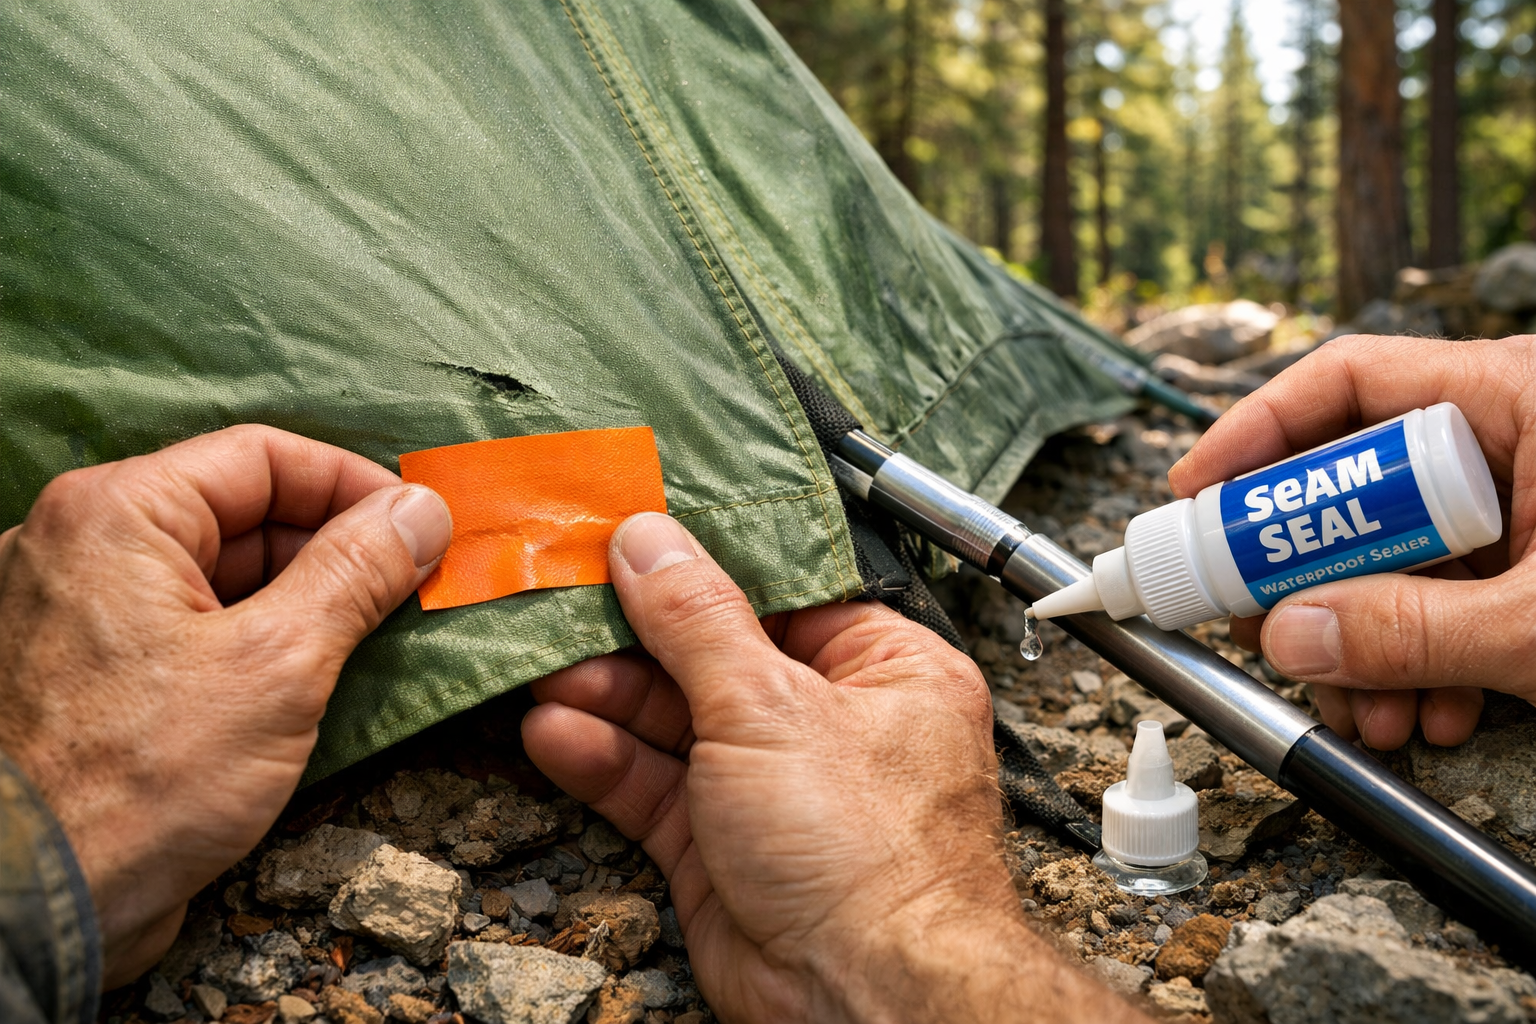
Repair 1: Patch a tent fabric tear (the “doesn’t fail later” method)
Step-by-step
- Make it clean and dry. Wipe 1–2 inches around the tear with alcohol and let it dry fully.
- Stop the rip from growing. If it’s a straight cut, you’re fine. If it’s a jagged rip, use tiny scissors to trim loose threads.
- Round your patch corners. Rounded corners resist peeling.
- Patch the inside first. Apply a patch that extends at least 1 inch (2.5 cm) beyond the tear on all sides. Press hard for 30–60 seconds.
- Patch the outside (optional but stronger). If this is a high-stress area (near tie-outs, corners, or pole sleeves), add a second patch on the outside.
- Warm + pressure = better bond. If you can, warm the patch with body heat or sunlight and press again.
Mistake → consequence → correct
| Mistake | What happens | Do this instead |
|---|---|---|
| Patching over dirt/sunscreen | Patch peels in hours | Alcohol wipe + dry fully |
| Patch too small | Rip continues past edge | Extend ≥ 1 inch past damage |
| Sharp-corner patch | Corners lift first | Round corners |
| Only outside patch on stressed area | Peel under tension | Patch inside + outside |
Repair 2: Fix a torn mesh panel
Mesh tears are annoying but easy.
- Clean and dry like above.
- Use a mesh repair patch (preferred) or patch tape + mesh patch.
- For bigger holes, stitch a quick perimeter (wide, loose stitches), then patch.
Pro tip: If bugs are the bigger enemy than rain, prioritize a tight mesh patch even if it’s not pretty.
Repair 3: Fix a bent or cracked tent pole
If the pole is bent (no crack)
- Straighten gently over your thigh or a rounded rock (avoid sharp kinks).
- Slide on the pole splint sleeve centered over the bend.
- Wrap tightly with strong tape.
If the pole is cracked
- Align the crack so the pole is straight.
- Sleeve splint over the crack.
- Tape the entire sleeve (spiral wrap).
When to replace instead of repair:
- Crack near a joint/ferrule
- Multiple cracks
- Pole section keeps re-bending on setup
Repair 4: Seal a leak (seams, pinholes, and “misting”)
First: identify where the water is coming from
- Seams dripping: seam tape failed or seam sealer needed.
- Fabric wetting through: DWR is worn; you’re seeing “wet-out,” not a hole.
- Pinholes at stress points: fabric abrasion.
Seam sealing (best done at home, but possible in the field)
- Pitch the tent tight.
- Clean seam with a damp cloth; let dry.
- Apply seam sealer thin and even along stitching.
- Let cure as long as possible (overnight is ideal).
Refresh water resistance (DWR) for wet-out
- Clean the rainfly (gentle soap) and reapply a DWR spray per label.
Repair 5: Fix zipper problems (stuck, separating, or snagging)
Zipper stuck
- Brush out grit (old toothbrush works).
- Run the zipper back and forth slowly.
- Add zipper-safe lube (or wax lightly).
Zipper separating (slider worn)
- Relieve fabric tension (re-stake corners).
- If it still separates, the slider is likely worn.
- Field workaround: pinch slider very gently with pliers (careful), then replace at home.
A simple after-trip “keep it from happening again” routine
- Dry completely (rainfly + inner + footprint).
- Remove grit from zippers and stake loops.
- Spot-check seams and pole sections.
- Store loose, not compressed, in a cool dry place.
Authority sources (for credibility cues inside your page)
- REI Co-op Expert Advice: tent care/maintenance and common repairs.
- NPS / Leave No Trace guidance: site selection and minimizing impact (helps prevent abrasion and wear).