Mastering Your Camping Coffee Pot: Brewing Tips for the Trail
Quick answer
- Pack a reliable camping coffee pot and your favorite grounds.
- Know your water source and purification method.
- Understand local fire restrictions before you even think about a flame.
- Master the heat control – too much is a fast track to bitter brew.
- Pre-grind beans at home for easier camp prep.
- Always pack out your grounds and any packaging.
- Test your setup at home first. It’s way easier there.
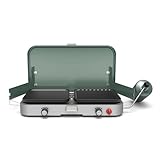
For reliable heat control, consider a portable camping stove, which offers consistent performance even in windy conditions.
What to check first (do this before you drive out)
Before you even load the car, a few things need your attention. This isn’t just about good coffee; it’s about being prepared.
- Land manager / legality: Who’s in charge of the land you’re heading to? Is it National Forest, BLM, a State Park, or private? Each has its own set of rules, especially regarding campfires and dispersed camping. A quick look at the managing agency’s website is usually all it takes. Don’t get caught off guard.
- Access/road conditions: Is that “road” to your perfect spot really passable for your rig? Check recent reports if available. A high-clearance 4WD might be fine, while a standard sedan could be stuck before it even gets rolling. Mud, snow, or washouts can turn a scenic drive into a recovery mission.
- Fire restrictions + weather + wind: This is crucial for coffee and camp safety. Fire bans are common and strictly enforced. Check the local ranger district or park service for current restrictions. Beyond fires, look at the forecast. High winds can make brewing tricky and increase fire risk. Rain? Well, that just adds to the adventure, but it affects your brewing setup.
- Water plan + waste plan (Leave No Trace): Where’s your water coming from? Is it potable, or do you need to filter/purify it? Don’t assume you can just fill up from any stream. And what about your coffee grounds and packaging? Pack it in, pack it out. That includes all your coffee-related trash. Leave No Trace principles are non-negotiable out there.
- Safety (wildlife, distance to help, comms): While brewing coffee, think about your surroundings. Are there bears? Store food properly. How far are you from help if something goes wrong? Cell service is often spotty or non-existent. Let someone know your itinerary and expected return time. A satellite messenger can be a good backup.
Step-by-step (field workflow)
This is how you get that perfect cup when you’re miles from anywhere.
1. Gather your gear: Collect your camping coffee pot, fuel/fire starter, coffee grounds, water, and mug.
- Good looks like: Everything is organized and ready to go. No frantic searching when you’re cold and want that caffeine kick.
- Common mistake: Forgetting a crucial item, like the mug. You can brew it, but then what? Double-check your kit before you leave home.
2. Set up your brewing station: Find a stable, level spot away from flammable materials. If using a stove, ensure it’s on a flat surface. If using a campfire, make sure you’re in a designated fire ring or a safe, cleared area.
- Good looks like: A secure, safe setup that won’t tip over or start a wildfire.
- Common mistake: Setting up too close to dry grass or over a rocky outcrop that could roll. Always clear a wide perimeter.
3. Measure your water: Pour the desired amount of water into your coffee pot. Most pots have measurement lines, or you can use your mug as a guide.
- Good looks like: Accurately measuring for the right number of cups.
- Common mistake: Guessing and ending up with weak coffee or too little. Measure twice, brew once.
4. Heat the water: Place the pot over your heat source – a camping stove or a campfire.
- Good looks like: Consistent, controlled heat.
- Common mistake: Blasting it on high heat. This burns the coffee and can make the pot boil over too quickly. Patience is key.
5. Add coffee grounds: Once the water is hot but not yet boiling vigorously, add your coffee grounds. The amount depends on your preference, but a general rule is 1-2 tablespoons per 6 ounces of water.
- Good looks like: Grounds are evenly distributed.
- Common mistake: Adding grounds to boiling water. This can cause grounds to float and make the coffee bitter. Wait for that initial rolling boil to subside slightly.
6. Brewing time: Let the coffee steep. For percolators, this means letting it cycle. For other types, let it sit off the heat for a few minutes.
- Good looks like: Coffee is steeping properly, developing flavor.
- Common mistake: Over-steeping. This extracts bitter compounds. Know your pot’s typical brew time.
7. Remove from heat: Once brewed, carefully remove the pot from the heat source.
- Good looks like: Pot is safely moved to a cool, stable spot.
- Common mistake: Leaving it on the heat too long, leading to burnt coffee or boil-overs.
8. Pour and enjoy: Carefully pour your fresh coffee into your mug.
- Good looks like: A steaming mug of delicious coffee.
- Common mistake: Pouring too fast and getting grounds in your cup. A slow, steady pour helps.
9. Clean up: Empty coffee grounds in an appropriate spot (away from water sources, or packed out) and clean your pot.
- Good looks like: Your campsite is cleaner than you found it.
- Common mistake: Leaving grounds scattered around. This attracts critters and is bad Leave No Trace.
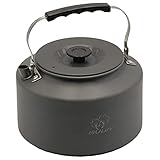
To ensure you have the right amount of water for your brew, a durable camping kettle with clear measurement markings can be incredibly helpful.
Common mistakes (and what happens if you ignore them)
| Mistake | What it causes | Fix |
|---|---|---|
| Forgetting a key item | Frustration, no coffee, or a subpar brew. | Pack a checklist and review it before leaving home. |
| Ignoring fire restrictions | Fines, damage to the environment, and a ruined camping trip. | Always check official sources for current fire bans. Use a camp stove if fires are prohibited. |
| Using dirty water | Sickness (giardia, etc.). | Filter or purify all water used for drinking and cooking. |
| Overheating the water | Burnt, bitter coffee; potential boil-overs. | Control your heat source. Remove the pot from direct heat once brewing. |
| Adding grounds to boiling water | Grounds float, leading to bitter coffee and a messy pot. | Let water cool slightly before adding grounds. |
| Over-steeping the coffee | Bitter, unpleasant taste. | Follow recommended brew times for your specific coffee pot. |
| Not securing the pot | Spilled coffee, burns, or a mess to clean up. | Use a level surface and be mindful of wind when placing the pot. |
| Leaving grounds behind | Attracts wildlife, leaves an unsightly mess, violates Leave No Trace. | Pack out all coffee grounds and packaging. Scatter used grounds thinly away from camp if permitted. |
| Not cleaning the pot | Stale flavors in future brews, potential for mold. | Rinse and dry your pot thoroughly after each use. |
| Improper water storage | Contaminated water, running out of water. | Use clean, dedicated water containers and store them properly. |
| Relying on a weak heat source | Long brew times, under-extracted coffee. | Ensure your stove or fire is adequate for the job. |
| Not letting coffee settle | Grounds in your cup. | Let the pot sit for a minute after brewing before pouring. |
Decision rules (simple if/then)
- If fire restrictions are in place, then use a camp stove because campfires are prohibited.
- If you’re at high elevation, then expect water to boil at a lower temperature because atmospheric pressure is reduced.
- If you have no cell service, then ensure someone knows your itinerary because you are more remote.
- If you are in bear country, then store coffee grounds and packaging with your food because you don’t want to attract unwanted visitors.
- If the wind is strong, then find a sheltered spot or use a windscreen for your stove because wind can blow out flames and cool your water too quickly.
- If you’re using a campfire, then ensure you have a good bed of coals, not roaring flames, for stable heat because direct flame can scorch the coffee.
- If you have limited fuel, then pre-heat water at home if possible because it saves fuel at camp.
- If you’re unsure about water purity, then always filter or purify it because sickness is a fast way to ruin a trip.
- If your coffee tastes burnt, then you likely overheated it or brewed too long, so try a lower heat and shorter brew time next time.
- If you’re making coffee for a group, then use a larger pot or brew in batches because you don’t want anyone waiting too long.
- If you brought pre-ground coffee, then store it in an airtight container because it loses freshness quickly.
- If you want to simplify cleanup, then consider using pour-over methods with disposable filters because they’re easy to pack out.
FAQ
Q: What’s the best type of coffee pot for camping?
A: It depends on your style. A percolator is classic and durable. A French press offers rich flavor. For ultralight trips, consider a pour-over cone with filters.
Q: How much coffee grounds should I use?
A: A good starting point is 1-2 tablespoons of grounds per 6 ounces of water. Adjust to your taste. More grounds mean stronger coffee.
Q: Can I use stream water directly for my coffee?
A: Absolutely not. Always filter or purify any water from natural sources before consuming or using it for cooking and beverages.
Q: How do I prevent grounds from getting in my coffee?
A: For percolators, ensure the basket is properly seated. For French presses, don’t press too hard. For pour-overs, use a good quality filter and pour slowly.
Q: What if my coffee tastes weak?
A: You might need more grounds, a finer grind, or a longer brewing time. Experiment to find what works best with your setup.
Q: Is it okay to leave coffee grounds in nature?
A: It’s best practice to pack them out. If you must dispose of them, scatter them thinly away from water sources and campsites.
Q: How do I clean my camping coffee pot?
A: Rinse it thoroughly with water after each use. For stubborn residue, use a little biodegradable soap and a soft brush. Dry it completely before storing.
Q: Can I use instant coffee?
A: Sure, if you’re in a pinch or prioritizing speed and simplicity. It’s the easiest option but doesn’t offer the same rich flavor as brewed coffee.
Q: What’s the deal with different coffee grinds for camping?
A: A medium to coarse grind is usually best for camping pots like percolators or French presses. Too fine a grind can lead to over-extraction and grounds in your cup.
What this page does NOT cover (and where to go next)
- Specific campsite reservations and fees. (Check the land manager’s website.)
- Detailed trail maps or backcountry navigation techniques. (Consult topographic maps and GPS resources.)
- Advanced fire-starting techniques. (Look into wilderness survival guides.)
- Legal regulations regarding firearms or hunting. (Always check state and federal wildlife agency rules.)
- Detailed wildlife identification and behavior. (Refer to local wildlife guides and park ranger information.)
Camping Bob has spent over 20 years camping across the US — from BLM dispersed sites in the Southwest to KOA campgrounds in the Pacific Northwest. He writes practical, no-nonsense guides to help fellow campers get outdoors with confidence.