Cleaning Your Hydration Pack Tube: A Simple Process
Quick answer
- Clean your tube regularly. Seriously, don’t wait until it smells funky.
- Use warm water and a bit of soap. Dish soap is fine.
- A flexible brush is your best friend here. Get one made for bottles or tubes.
- Rinse thoroughly. Any soap residue is gross.
- Air dry completely. Moisture breeds trouble.
- Store it dry. Keep it from getting kinked.
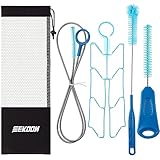
For the best results, consider investing in a dedicated hydration bladder cleaning kit. These kits often include specialized brushes and cleaning tablets designed to reach every nook and cranny.
What to check first (do this before you drive out)
Before you even think about hitting the trail with your hydration pack, give that tube a quick once-over. It’s the easiest part to neglect, and the one that’ll make you regret it fastest.
Land manager / legality
First off, know who’s in charge of the land you’re on. Is it National Forest, BLM, a State Park, or private? This matters for rules, especially fire bans or camping regulations. A quick check on their website or a call to the ranger station is wise.
Access/road conditions
Is that rough forest road really passable for your rig? If you’re not in a 4×4 with good clearance, a road that looks fine on a map might be a mud pit or a boulder garden in reality. Check recent reports if you can, or just be ready to turn around.
Fire restrictions + weather + wind
This is non-negotiable. Fire restrictions are often serious business. Check the official agency website for current bans. Also, check the weather forecast and wind speed. High winds can make even a small campfire a serious hazard.
Water plan + waste plan (Leave No Trace)
Do you have enough water for your trip, or a reliable way to filter/treat it? Don’t assume you can just fill up from a random creek. And what about trash? Pack it in, pack it out. That includes wrappers, food scraps, and anything else you bring.
Safety (wildlife, distance to help, comms)
Know what wildlife is common in the area and how to react if you encounter it. Understand how far you are from the nearest town or cell service. Carry a satellite communicator if you’re heading into the backcountry.
Step-by-step (field workflow)
This is how you get that tube clean and ready for action. It ain’t rocket science, but doing it right makes a difference.
1. Empty the reservoir. Dump out any leftover water. Don’t leave stale water sitting in there.
- Good: Reservoir is completely empty.
- Mistake: Leaving a little water at the bottom. This just lets gunk grow.
2. Disconnect the tube. Pull the bite valve off the tube and detach the tube from the reservoir. This gives you full access.
- Good: Tube and reservoir are fully separated.
- Mistake: Trying to clean it while still attached. It’s awkward and ineffective.
3. Rinse the tube with warm water. Flush it out thoroughly to remove any loose debris.
- Good: Water runs clear through the tube.
- Mistake: Using cold water. Warm water loosens things up better.
4. Add a cleaning solution. A drop of mild dish soap or a specialized hydration pack cleaner works well.
- Good: Just a small amount of cleaner. You don’t need a bubble bath.
- Mistake: Using harsh chemicals or too much soap. You don’t want to ingest that later.
5. Use a cleaning brush. Insert a long, flexible brush designed for hydration tubes or bottles. Work it back and forth.
- Good: The brush reaches the entire length of the tube.
- Mistake: Not having a brush long enough. You’ll miss spots.
A good hydration bladder cleaning kit will include a long, flexible brush perfect for this step, ensuring you can scrub the entire length of the tube effectively.
6. Rinse again, thoroughly. Flush out all soap and loosened grime with clean, warm water. Keep rinsing until you’re sure all the suds are gone.
- Good: No soap bubbles or residue visible when you look through the tube.
- Mistake: Not rinsing enough. Soap taste is the worst.
7. Clean the bite valve. If it’s removable, soak it in warm, soapy water and scrub gently. If not, use a smaller brush or a cloth.
- Good: Valve feels clean and free of any slime.
- Mistake: Forgetting the bite valve. It’s a prime spot for funk.
8. Rinse the reservoir. Give the reservoir itself a good scrub and rinse. Many come with their own cleaning brushes or tablets.
- Good: Reservoir is sparkling clean inside.
- Mistake: Only cleaning the tube and leaving the reservoir dirty.
9. Air dry everything completely. Hang the tube and reservoir upside down to dry. Make sure there’s no moisture left anywhere.
- Good: Everything is bone dry. No dampness.
- Mistake: Storing it while still wet. This is how mold starts.
10. Reassemble and store. Once dry, put it all back together. Store it in a cool, dry place, ideally not kinked.
- Good: Pack is ready for your next adventure.
- Mistake: Storing it with the tube bent sharply. This can damage the tube over time.
Common mistakes (and what happens if you ignore them)
| Mistake | What it causes | Fix |
|---|---|---|
| Not cleaning regularly | Mold, mildew, and funky tastes/smells | Establish a routine cleaning schedule. |
| Using hot water or harsh chemicals | Damaging the reservoir material or plastic tube | Stick to warm water and mild soap. |
| Not rinsing thoroughly | Unpleasant soap taste/residue in your water | Rinse until you see absolutely no bubbles. |
| Storing wet or damp | Mold and mildew growth, permanent odor | Ensure everything is completely air-dried before storage. |
| Forgetting the bite valve | Germs and slime build-up on a crucial part | Clean the bite valve with the same care as the tube. |
| Using a brush that’s too short | Incomplete cleaning, leaving dirty spots in the tube | Invest in a brush specifically designed for hydration tubes. |
| Not drying the reservoir completely | Stale water smells and potential contamination | Hang the reservoir to dry completely, inside and out. |
| Storing the tube kinked or bent | Weakening the tube, potential leaks or blockages | Store the tube straight or in a gentle curve. |
| Skipping the reservoir cleaning | Reservoir gets just as dirty as the tube | Clean the reservoir with the same diligence as the tube. |
| Relying only on rinsing | Surface grime remains, leading to build-up | Use a brush and a mild cleaning agent for a deep clean. |
Many common mistakes, like using a brush that’s too short, can be avoided by using a comprehensive hydration bladder cleaning kit.
Decision rules (simple if/then)
- If you notice a funky smell, then clean it immediately because that’s mold or mildew taking hold.
- If you’re going on a multi-day trip, then clean it thoroughly before you leave because you won’t have easy access to cleaning supplies.
- If you only use it for water, then a quick rinse and air dry might suffice between trips, but a deeper clean is still needed periodically.
- If you use it for electrolyte drinks or other additives, then clean it after every single use because those sugars are a breeding ground for bacteria.
- If you don’t have a dedicated tube brush, then use a clean, flexible straw or a tightly rolled paper towel with a bit of soap, but get a brush soon.
- If you find black spots inside the tube, then you’ve got mold and need to clean it thoroughly, possibly with a specialized cleaner.
- If you are storing it for a long time, then make sure it is 100% dry and consider storing it with the cap off to allow air circulation.
- If the taste of your water changes, then it’s a sure sign the tube needs cleaning because your water is picking up residue.
- If you’re sharing a pack, then each person should ideally have their own bite valve or ensure thorough cleaning between users.
- If you’re unsure about a cleaning product, then stick to warm water and mild dish soap because it’s generally safe and effective.
FAQ
How often should I clean my hydration pack tube?
It really depends on what you put in it and how often you use it. For just water, a rinse and air dry after each use and a deep clean every few weeks is a good start. If you use anything other than water, clean it after every single use.
What’s the best way to dry my hydration pack tube?
Hang it upside down so water can drain out. Make sure air can circulate around it. Some people use a small fan to speed up the process. Just ensure it’s completely dry before storing.
Can I use bleach to clean my hydration pack tube?
Generally, no. Bleach can degrade the plastic and leave a strong, lingering smell that’s hard to get rid of. Stick to mild dish soap or specialized hydration pack cleaners.
My tube has a persistent bad smell. What can I do?
This usually means mold or mildew. Try a stronger cleaning solution like a vinegar-water mix (1 part vinegar to 3 parts water), let it soak for a few hours, then rinse thoroughly. If that doesn’t work, you might need to replace the tube.
How do I clean the reservoir itself?
Most reservoirs have wide openings that allow for scrubbing with a brush. Some come with cleaning tablets or specific cleaning brushes. Again, rinse thoroughly and air dry completely.
What if I don’t have a special hydration pack cleaning brush?
You can improvise. A flexible straw with a paper towel wrapped tightly around one end can work in a pinch, or a long, thin bottle brush. Just ensure whatever you use can reach the entire length of the tube.
While you can improvise, a dedicated hydration bladder cleaning kit makes the job much easier and more effective, ensuring a truly clean tube.
Is it okay to just use hot water?
Hot water can be good for flushing, but too hot can warp or damage the plastic of your tube and reservoir. Warm water is usually the safest bet for cleaning.
What this page does NOT cover (and where to go next)
- Specific brand recommendations for hydration packs. (Check outdoor gear reviews.)
- Detailed repair guides for damaged hydration packs. (Look for manufacturer support or repair forums.)
- Advanced water purification techniques. (Research backpacking and wilderness survival guides.)
- Choosing the right hydration pack for different activities. (Consult specialized gear sites or experienced outdoors people.)
- Long-term storage solutions for extreme climates. (Seek advice from long-term adventurers or climate-specific outdoor forums.)
Camping Bob has spent over 20 years camping across the US — from BLM dispersed sites in the Southwest to KOA campgrounds in the Pacific Northwest. He writes practical, no-nonsense guides to help fellow campers get outdoors with confidence.