Cleaning Your Hydration Bladder Bag
Quick answer
- Rinse immediately after each use.
- Use warm water and mild soap.
- Brush the inside thoroughly.
- Dry completely before storing.
- Store with the bladder open.
- Deep clean every few weeks or if you notice smells.
What to check first (do this before you drive out)
Before you pack up for that trail or camping trip, give your hydration bladder a quick once-over. It’s a simple step that saves a lot of headaches later.
- Land manager / legality: Who manages the land you’re heading to? Are there any specific rules about water sources or waste disposal? Usually, it’s US Forest Service, BLM, or National Park Service. Know who’s in charge.
- Access/road conditions: Will your rig handle the roads? Is it 2WD friendly, or do you need AWD/4WD and decent clearance? Mud, snow, or washouts can wreck a trip before it starts.
- Fire restrictions + weather + wind: Check the local fire restrictions. Seriously. A rogue spark can ruin more than just your campfire plans. Also, look at the weather forecast and wind. High winds mean extra caution with fires and can make camping less pleasant.
- Water plan + waste plan (Leave No Trace): Where will you get water? Will you filter or treat it? How will you pack out all your trash, including food scraps and hygiene products? Leave No Trace principles are key out there.
- Safety (wildlife, distance to help, comms): What kind of wildlife might you encounter? Know how to store food properly. How far is the nearest town or ranger station? Do you have cell service, or will you need a satellite communicator? Better safe than sorry.
Step-by-step (field workflow)
When it’s time to clean that bladder bag, follow these steps. It’s not rocket science, but doing it right keeps your water tasting fresh and prevents funky stuff from growing.
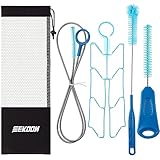
To make cleaning easier, consider investing in a dedicated hydration bladder cleaning kit. These kits often include specialized brushes for thorough cleaning.
1. Empty completely:
- What to do: Drink the last drop or pour out any remaining water.
- What “good” looks like: The bladder is totally empty. No sloshing when you shake it.
- Common mistake: Leaving a little water in the bottom. This is prime real estate for mold and bacteria. Always get it all out.
2. Initial rinse:
- What to do: Fill the bladder with warm water and swish it around. Dump it out. Repeat a couple of times.
- What “good” looks like: The water coming out looks clear.
- Common mistake: Using cold water. It won’t clean as effectively and won’t loosen up any residue as well as warm water.
3. Add mild soap and water:
- What to do: Put a few drops of mild dish soap (unscented is best) into the bladder, then fill it about halfway with warm water.
- What “good” looks like: You have a gentle soapy solution inside.
- Common mistake: Using harsh detergents or bleach. These can leave residue that affects water taste and can degrade the bladder material over time.
4. Agitate and soak (optional but good):
- What to do: Seal the bladder and shake it vigorously. Let it sit for 5-10 minutes.
- What “good” looks like: The soap has had time to work on any grime.
- Common mistake: Not shaking it enough. You need to get that soapy water into all the nooks and crannies.
5. Scrub the interior:
- What to do: Use a dedicated hydration bladder cleaning brush (they’re long and flexible) to scrub the inside walls and bottom.
- What “good” looks like: You can feel the brush reaching all surfaces, and any visible residue is gone.
- Common mistake: Relying only on shaking. Some spots just need a good scrub. A brush is your best friend here.
6. Clean the bite valve and tube:
- What to do: Detach the tube and bite valve. Clean them separately with soap and water, using a thin brush if needed for the tube. Rinse thoroughly.
- What “good” looks like: The tube and valve are free of any gunk.
- Common mistake: Forgetting the tube and valve. This is where a lot of that “old water taste” comes from. They need cleaning too.
7. Rinse thoroughly:
- What to do: Fill the bladder with clean, warm water and rinse. Dump. Repeat until all soap residue is gone. This might take several rinses.
- What “good” looks like: No suds, no soapy smell or taste.
- Common mistake: Not rinsing enough. Lingering soap is gross and can make you sick.
8. Dry completely:
- What to do: Hang the bladder upside down to dry. You can use a bladder drying hanger or prop it open with a clean towel or specialized drying stand. Make sure the tube and bite valve are also dry.
- What “good” looks like: Everything is bone dry. No dampness anywhere.
- Common mistake: Storing it while still damp. This is the fastest way to encourage mold and mildew growth. Patience here is key.
9. Store properly:
- What to do: Once dry, store the bladder with the opening slightly ajar or in a way that allows air circulation.
- What “good” looks like: The bladder is stored in a cool, dry place, ready for its next adventure.
- Common mistake: Stuffing it in a pack or drawer while sealed. This traps moisture and leads to smells.
For step 5, using a specialized hydration bladder cleaning kit can make scrubbing the interior much more effective. These kits come with brushes designed to reach all corners.
Common mistakes (and what happens if you ignore them)
| Mistake | What it causes | Fix |
|---|---|---|
| Not rinsing immediately | Water stains, mineral buildup, early mold growth | Rinse with clean water as soon as possible after each use. |
| Using hot water | Can warp or degrade bladder material | Stick to warm, not scalding, water. |
| Using harsh chemicals (bleach, etc.) | Damages bladder, leaves toxic residue, bad taste | Use mild, unscented dish soap only. |
| Forgetting to clean the bite valve/tube | Sour taste, bacteria buildup in drinking system | Detach and clean the tube and valve thoroughly with each bladder wash. |
| Not drying completely before storage | Mold, mildew, persistent bad odors | Hang to dry completely; use a dryer or prop open until bone dry. |
| Storing while sealed | Traps moisture, encourages mold/mildew | Store with the opening slightly ajar for air circulation. |
| Not using a cleaning brush | Ineffective cleaning, missed spots, lingering grime | Invest in a long, flexible bladder cleaning brush. |
| Relying on just soaking | Stubborn residue or buildup remains | Always follow soaking with a good scrub using a brush. |
| Not checking for leaks after cleaning | Water spills on gear, potential loss of hydration | Inspect the bladder, tube, and valve for any damage or leaks. |
To avoid the common mistake of not using a cleaning brush, a good hydration bladder cleaning kit will provide the necessary tools for a thorough clean.
Decision rules (simple if/then)
- If you notice a musty smell, then deep clean it immediately because that’s mold or mildew.
- If you used the bladder for something other than plain water (like electrolytes), then rinse it extra thoroughly because those sugars can feed bacteria.
- If you’re going on a multi-day trip, then clean your bladder before you leave because starting with a clean system is crucial.
- If you can’t get a smell out after a few washes, then consider replacing the bladder because some odors are permanent.
- If your bladder has been stored for a long time, then give it a good cleaning and inspection before use because moisture can accumulate.
- If you’re using a filter and plan to fill from natural sources, then ensure your bladder is clean to avoid contaminating treated water.
- If you’re in a pinch and have no soap, then a thorough rinse with warm water is better than nothing, but plan a proper wash soon.
- If the bladder feels sticky, then you definitely need to scrub it more because that’s residue.
- If you’re unsure about the water source you’ll be using, then having a clean bladder ready to go is one less thing to worry about.
- If you see any discoloration or slime inside, then stop and clean it thoroughly, as this is a sign of biological growth.
FAQ
How often should I clean my hydration bladder?
For regular use, rinse it after every single use. A more thorough wash with soap and a brush should happen every few weeks, or whenever you notice any smell or taste issues.
What’s the best way to dry a hydration bladder?
The key is airflow. Hang it upside down, mouth open, in a well-ventilated area. Specialized drying hangers are great, but you can also prop it open with a clean towel or use a fan. Make sure the tube and bite valve are also completely dry.
Many hydration bladder cleaning kits include drying hangers or stands to help ensure your bladder dries completely and properly.
Can I use hot water to clean my bladder?
It’s better to stick with warm water. Really hot or boiling water can potentially warp the plastic or degrade the bladder material over time, affecting its lifespan and safety.
My bladder smells funky. What do I do?
This usually means mold or mildew. Give it a deep clean with warm water and mild soap, using a brush. If the smell persists after a couple of tries, you might need to replace the bladder.
Is it okay to put my bladder in the dishwasher?
Some manufacturers say yes, but it’s generally not recommended for long-term care. The high heat and harsh detergents can degrade the material and potentially damage the bite valve or seals. Handwashing is safer.
What kind of soap is safe to use?
Use a mild, unscented dish soap. Avoid anything with harsh chemicals, bleach, or strong fragrances, as these can leave residue that affects your water’s taste and can be harmful.
How do I clean the drinking tube and bite valve?
Detach them from the bladder. Use a long, thin brush designed for tubes, along with warm, soapy water. Rinse them thoroughly and ensure they are completely dry before reattaching.
What if I can’t get it perfectly clean?
If you’ve tried cleaning it multiple times and it still looks or smells off, it might be time to retire it. Bladder replacement is cheaper than dealing with persistent bacteria or mold.
What this page does NOT cover (and where to go next)
- Specific brand cleaning recommendations (check your manufacturer’s guide).
- Advanced stain removal techniques for tough, old stains.
- Repairing leaks or damage to the bladder material.
- Detailed troubleshooting for electronic hydration tracking systems.
- Choosing the right size and type of hydration bladder for your needs.
Camping Bob has spent over 20 years camping across the US — from BLM dispersed sites in the Southwest to KOA campgrounds in the Pacific Northwest. He writes practical, no-nonsense guides to help fellow campers get outdoors with confidence.