
How Long Ice Packs Stay Cold
Quick answer
- Ice packs are your buddy for keeping things cool, but their lifespan varies.
- Most standard gel packs last 4-12 hours, depending on the environment.
- Bigger, better-insulated packs can go 24-48 hours or more.
- Pre-chill your pack and your cooler for maximum chill time.
- Minimize opening the cooler. Every peek lets the cold out.
- Factor in ambient temperature – a hot day cuts chill time short.
What to check first (do this before you drive out)
Before you load up and hit the road, a few quick checks ensure your ice packs work overtime.
- Land manager / legality: Who’s in charge here? Is it National Forest, BLM, a State Park, or private land? Different folks have different rules. Always check the official website for the specific area you’re headed to. This covers camping permits, fire bans, and any special regulations.
- Access/road conditions: Can your rig actually get there? A standard sedan might be fine for a paved campground, but a high-clearance 4×4 is a must for some backcountry spots. Mud, snow, or washboard roads can turn a quick trip into a crawl. Know your vehicle’s limits and the road ahead.
- Fire restrictions + weather + wind: This is crucial for safety and comfort. Are campfires allowed? Are there high wind warnings? What’s the temperature forecast? Weather can change fast in the outdoors, and being prepared means staying safe and not wrecking your trip.
- Water plan + waste plan (Leave No Trace): How will you get potable water? Are there sources, or do you need to pack it all in? And what about trash? Pack it in, pack it out. Following Leave No Trace principles keeps these wild places wild.
- Safety (wildlife, distance to help, comms): What kind of critters might you encounter? Know how to store food safely. How far is the nearest ranger station or town? Cell service is often spotty, so have a plan for emergencies. Maybe a satellite messenger if you’re really remote.
Step-by-step (field workflow)
Keeping your ice packs working hard is a process. Here’s how to maximize their chill.
1. Acquire your ice packs.
- What “good” looks like: You’ve got a mix of sizes and types – some hard plastic, some flexible gel packs.
- Common mistake: Grabbing whatever’s in the freezer. Different packs have different jobs.
- Avoid it: Choose packs based on your cooler size and trip duration.
For reliable, long-lasting cold, consider investing in quality hard plastic ice packs. They’re excellent for maintaining consistent temperatures over extended periods.
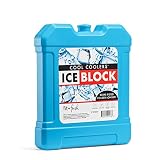
2. Freeze your ice packs thoroughly.
- What “good” looks like: They are rock solid. No give at all.
- Common mistake: Not freezing them long enough. This is the biggest chill-killer.
- Avoid it: Give them at least 24 hours in a deep freezer.
3. Pre-chill your cooler.
- What “good” looks like: The inside of the cooler feels cold to the touch.
- Common mistake: Putting cold packs into a warm cooler. The packs instantly start working to cool the cooler itself.
- Avoid it: Bring the cooler inside the night before, or pack it with sacrificial ice/cold packs a few hours before your main load.
4. Pack your cooler strategically.
- What “good” looks like: Coldest items at the bottom, then ice packs, then less sensitive items. Fill empty space.
- Common mistake: Just tossing everything in haphazardly.
- Avoid it: Think about what you’ll need first and last. Keep drinks separate if you access them a lot.
5. Layer ice packs.
- What “good” looks like: Ice packs on the bottom, sides, and top.
- Common mistake: Only putting ice packs on the bottom.
- Avoid it: Aim for a complete ice pack “hug” around your food.
6. Minimize opening the cooler.
- What “good” looks like: You only open it when absolutely necessary.
- Common mistake: Constantly peeking to see what’s inside.
- Avoid it: Plan your meals and snacks so you know what you need before you open the lid.
7. Keep the cooler shaded.
- What “good” looks like: The cooler is out of direct sunlight, under a tree or tarp.
- Common mistake: Leaving the cooler sitting out in the sun.
- Avoid it: Even a few hours of direct sun can drastically shorten ice pack life.
8. Monitor ambient temperature.
- What “good” looks like: You’re aware if it’s unusually hot or cold.
- Common mistake: Assuming your ice packs will last the same amount of time regardless of the weather.
- Avoid it: Hotter temps mean faster melting. Colder temps mean longer chill. Adjust expectations.
9. Use a separate cooler for drinks (optional but recommended).
- What “good” looks like: One cooler for food, one for drinks.
- Common mistake: Having one cooler that gets opened constantly for both food and drinks.
- Avoid it: Drinks are usually accessed far more often than food. This keeps your food cooler colder for longer.
10. Consider dry ice for longer trips.
- What “good” looks like: Dry ice is used for multi-day trips where standard ice packs won’t cut it.
- Common mistake: Overpacking with regular ice for a long trip.
- Avoid it: Dry ice is much colder and lasts longer but requires careful handling and ventilation.
Common mistakes (and what happens if you ignore them)
| Mistake | What it causes | Fix |
|---|---|---|
| Not freezing ice packs completely | Reduced cooling time, lukewarm food, potential spoilage. | Freeze for at least 24 hours until rock solid. |
| Putting ice packs into a warm cooler | Wasted energy; ice packs work to cool the cooler first, not the food. | Pre-chill the cooler with sacrificial ice or cold packs for several hours before packing. |
| Opening the cooler frequently | Constant loss of cold air, faster melting of ice packs. | Plan meals and snacks; only open when necessary. Consider a separate drink cooler. |
| Leaving the cooler in direct sunlight | Accelerates melting significantly, reduces overall cooling duration. | Keep the cooler in the shade, under a tree, tarp, or cover. |
| Packing loosely with air pockets | Cold air escapes easily; less efficient cooling. | Fill empty space with extra ice packs, towels, or even crumpled newspaper. |
| Not layering ice packs effectively | Uneven cooling; items at the bottom might stay cold while top items warm up. | Place ice packs on the bottom, sides, and top of the cooler. |
| Underestimating ambient temperature’s effect | Ice packs melt much faster in hot weather, leading to spoiled food. | Adjust your expectations and pack more ice than you think you’ll need in hot conditions. |
| Using the same cooler for food and drinks | Drinks are accessed more often, leading to constant temperature fluctuations. | Use a dedicated drink cooler that can be opened more freely without compromising food safety. |
| Not checking the weather forecast | Unexpected heat waves can drastically shorten ice pack life. | Always check the forecast and pack accordingly, perhaps adding more ice or a better cooler. |
| Using standard ice packs for very long trips | Ice melts too quickly, risking food spoilage on multi-day adventures. | Consider a high-performance cooler, dry ice, or a plan for replenishing ice. |
To avoid common mistakes like rapid melting, a high-quality insulated camping cooler is essential. It provides superior temperature retention, keeping your contents colder for longer.

Decision rules (simple if/then)
- If your trip is longer than 24 hours and it’s hot out, then you need more than just standard gel packs because they won’t last.
- If you’re going car camping with a good cooler, then pre-chilling the cooler is a high-impact step because it makes your ice packs work smarter.
- If you’re hiking and space is tight, then focus on lightweight, reusable ice packs and a well-insulated pack because weight is critical.
- If you plan to access your cooler every hour, then expect your ice packs to last significantly less time because each opening is a cold air escape.
- If you see condensation on the outside of your cooler, then the seal might be compromised or the ice packs are working overtime because the insulation isn’t as effective.
- If you’re storing raw meat, then make sure it’s double-bagged and at the bottom of the cooler because any leakage could contaminate other items.
- If you’re using a hard-sided cooler, then a solid block of ice or large gel packs will generally last longer than crushed ice because they melt slower.
- If you’re camping in freezing temperatures, then your ice packs will last a very long time, but you also need to ensure your food doesn’t freeze solid if that’s not desired.
- If you’re unsure about food safety, then when in doubt, throw it out because foodborne illness is not a fun camping souvenir.
- If you’re buying ice on the road, then try to find block ice if possible, as it melts more slowly than cubed ice.
If you’re going car camping, a good insulated camping cooler is a game-changer. It makes your ice packs work smarter, extending their chill time significantly.
FAQ
How long do typical gel ice packs last?
Most standard gel packs will keep things cool for about 4 to 12 hours, depending heavily on the cooler’s insulation and the outside temperature.
What makes ice packs last longer?
Pre-chilling your cooler, minimizing openings, keeping it in the shade, and using larger or block-style ice packs all contribute to longer cooling times.
Can I use dry ice instead of regular ice packs?
Yes, but with caution. Dry ice is much colder and lasts longer but requires proper ventilation and handling to avoid frostbite and suffocation risks. It’s best for multi-day trips.
Does the size of the cooler matter for how long ice stays cold?
Yes, larger coolers generally hold more ice and can maintain a more stable temperature, but they also have more air volume to cool. A well-insulated, appropriately sized cooler is key.
What’s the best way to pack a cooler with ice packs?
Put the coldest items at the bottom, surround them with ice packs, and then place less sensitive items on top. Fill any empty space to prevent air circulation.
How do I know if my food is still safe if the ice packs melt?
If perishable food has been above 40°F (4°C) for more than two hours, it’s generally considered unsafe. Trust your senses, but when in doubt, it’s best to discard it.
Are there reusable ice packs that last longer than gel packs?
Some advanced reusable ice packs are designed with better insulation or phase-change materials that can keep things colder for longer durations, often 24 hours or more.
What if I can’t pre-chill my cooler?
If you can’t pre-chill, pack your cooler with ice packs first, let it sit for an hour or two before adding food, or use sacrificial ice to cool it down before loading your main items.
What this page does NOT cover (and where to go next)
- Specific recommendations for individual cooler brands and their performance metrics. (Next: Read reviews for specific cooler models.)
- Detailed chemical compositions of various ice pack gels and their exact melting points. (Next: Research advanced cooling technologies.)
- Legal regulations regarding food transport and storage in every state or national park. (Next: Check specific park or state health department guidelines.)
- Advanced preservation techniques like vacuum sealing for extended food storage in the field. (Next: Explore backpacking or expedition food preparation methods.)
- DIY methods for creating homemade ice packs or alternative cooling solutions. (Next: Look for camping hacks and DIY project guides.)

Camping Bob has spent over 20 years camping across the US — from BLM dispersed sites in the Southwest to KOA campgrounds in the Pacific Northwest. He writes practical, no-nonsense guides to help fellow campers get outdoors with confidence.